Table Of Contents
Contents of Articles
main links
projects:
- PIC LAB-1
- Intro-top
- Intro-bottom
- Test Routine
- PIC Instructions
- HEX Values
- All expt files
- Experiments 1 to 3
- Experiments 4 to 6
- Experiments 7 to 11a
- Experiments 11b to 12
- 21 Matches
- Rock Paper Scissors
- Readers Experiments
Extra Pages
- Index
- Piezo
- Nitinol Wire
- Going Further
- 3-Digit Counter & AtoD
- Library of Routines
- Copy & Save Routines
- Timing and Delays
- Adding extra In/Out
- Advanced Programming
Tests

CONFIGURATION BITS
Before starting the Experiments, you need to know about the CONFIGURATION bits. These are the bits in the configuration file that determine some of the features of the chip.
We are mainly concerned with the 5 lowest bits. Note the double underbar before CONFIG.
Bits 0 and 1 select the oscillator. Bit 2 selects the watchdog timer. Bit 3 selects the Power-up timer and bit 4 selects the Code Protection.
Setting the WDT, PWRTE and CP is also called “Setting the fuses.”
Bit 4 is Code Protect. When it is “1” code protection is off. When it is “0” code protection is ON.
Bit 3 Power-up Timer Enable. When it is “1” power-up timer is enabled. When it is “0,” power-up timer is disabled. The Power-up timer produces a 72mS delay and prevents the chip starting to execute code until 72mS after supply voltage has been detected.
Bit 2 is Watchdog Timer Enable. When it is “1,” watchdog timer is enabled. When it is “0,” watchdog timer is disabled.
Bits 1-0 are Oscillator Selection bits:
11 = RC oscillator - external RC components. The chip will operate from 1Hz to 4MHz.
10 = HS oscillator - High Speed crystal or resonator - maximum frequency for the chip
01 = XT Oscillator - normal crystal oscillator - such 455kHz, 2MHz, 4MHz etc - use this for crystal.
00 = LP Oscillator - 38kHz watch crystal The __CONFIG (for this course), is shown in red:
CONFIG bits:    4   3   2   1   0
                CP   PWRTE      WDT       FOSC1    FOSC2

                1   1   0   1   1        __CONFIG 1Bh
            (code not (enabled)  (off)        (external RC osc)
                protected)
Note: The WDT timer bit has intentionally been SET in each of the following experiments so that you can see when a new program (or a re-burn) has been downloaded via IC-Prog. The tick beside WDT must be removed before burning commences.
<!-- //TODO FIXME: checkbox -->
WDT
click to remove tick
Now we come to the experiments.
ALL the files for experiments 1, 1a,1b etc to 12 are contained in: Expmts-all.
After the experiments, there are a number of additional pages and projects including ”21 Matches.” Further experiments and theory can be found HERE.
EXPERIMENT 1
Turning on a LED
This experiment turns on a LED when button A is pressed.
The button is connected to the lowest bit of Port A (bit0). When the button is pressed, the line goes HIGH. This is called positive logic.
The LED is connected to the lowest bit of Port B (Bit0). Any bit of any port can be an input or output. It is convenient to make port “A” an input and port “B” an output. Port A has 5 lines and port B has 8 lines.
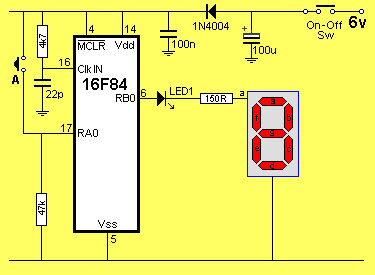
The circuit below shows the active components for Experiment 1. The switch is connected to RA0 and the LED is connected to RB0.

The circuit for Experiment 1
Any port-line can be changed from an input to an output or vice versa, at any time, during the running of a program.
If you are going to change the direction of a port-line, you must take into account any devices connected to the line. For instance, if a switch is connected between an output of the chip and rail; if the line is an output and is made LOW, the chip will be damaged when the button is pressed. The program consists of two loops in Main. The first instruction in Main looks at the input line and determines if the button has been pressed. This where a decision is made. If is is not pressed, the micro is taken to the next instruction in the program and a loop is executed that makes an output line LOW to turn off a LED. If it is pressed, the micro is taken to the third instruction in Main to turn ON an output bit to illuminate a LED.
The micro never stops executing instructions. It must be executing one loop or the other.
Main must be a loop (or more than one loop) as this is where the LED is turned ON and OFF and the microcontroller will loop this routine many times per second.
In Main, instructions will take the micro to other routines called sub-routines, carry out operations such as delays, produce beeps, etc and return to Main, as you will see in a moment.
Study the following experiment then click HERE for a test.
     ;Expt1.asm
     ;Project: Turning on a LED
List P = 16F84
#include <p16F84.inc>
__CONFIG 1Bh ;_CP_OFF & _PWRTE_ON & _WDT_OFF & _RC_OSC

        ORG 0           ;This is the start of memory for the program.
SetUp   BSF 03,5        ;Go to Bank 1
        CLRF 06         ;Make all port B output
        MOVLW 01        ;Load W with 0000 0001
        MOVWF 05        ;Make RA0 input
        BCF 03,5        ;Go to Bank 0 - the program memory area.
        CLRF 06         ;Blank the display

Main    BTFSS 05,0      ;Test the input line on port A
        GOTO Main2      ;Button not pressed
        BSF 06,0        ;Button pressed. Turn on LED
        GOTO Main       ;Loop Main
Main2   BCF 06,0        ;Button not pressed. Turn off LED
        GOTO Main       ;Loop Main

        END             ;Tells assembler end of program
EXPERIMENT 1a
Turning on a LED for 0.5sec - without debounce
This experiment turns on a LED for 0.5 sec when button “A” is pressed. It does not matter how long button “A” is pressed. The LED turns on immediately button “A” is pressed and turns off after 0.5 sec.
If the button is kept pressed after the LED turns off, the LED turns on AGAIN as the program detects noise from the switch.
This highlights the need for DEBOUNCE.
Debounce is shown in the next experiment.
There are variations of this: The LED can turn on for 0.5sec AFTER the button has been released (Experiment 1d) or the LED can turn on for 0.5sec MORE than the button-press time (Experiment 1e).
All these programs show how to control the output. You can extend the program to two flashes or a delay between flashes or a flash then turn on a LED or driver transistor to operate a globe or motor, or any other output device.
This program is an extension of Experiment 1, with the introduction of a delay.
The maximum delay for 2 files is 250mS. To achieve 500mS, the Delay sub-routine is called two times. This requires less instructions than creating a 500mS delay, and is simpler to understand.
The program is shown below and an alternate program is shown that controls the driver transistor.
The control of a single line of the output port is called BIT MANIPULATION.
Two or more output lines can be controlled at the same time by loading W with a hex value and moving the value to file 06. If this is done, all the output lines will be affected and if a line is HIGH and the corresponding bit in the instruction is “0” the line will change state. This may not be wanted and that’s why bit manipulation is the safest.
     ;Expt1a.asm
     ;Project: LED on for 0.5sec. No debounce
List P = 16F84
#include <p16F84.inc>
__CONFIG 1Bh ;_CP_OFF & _PWRTE_ON & _WDT_OFF & _RC_OSC

        ORG 0           ;This is the start of memory for the program.
SetUp   BSF 03,5        ;Go to Bank 1
        CLRF 06         ;Make all port B output
        MOVLW 01        ;Load W with 0000 0001
        MOVWF 05        ;Make RA0 input
        BCF 03,5        ;Go to Bank 0 - the program memory area.
        CLRF 1F         ;Clear the button-press file
        CLRF 06         ;Blank the display
        GOTO Main

Delay   NOP             ;Create approx 250mS delay
        DECFSZ 1A,1
        GOTO Delay
        DECFSZ 1B,1
        GOTO Delay
        RETURN

Main    BTFSS 05,0      ;Test the input line on port A
        GOTO Main1      ;Button not pressed
        BTFSC 1F,0      ;Button pressed first time?
        GOTO Main       ;Button already pressed
        BSF 06,0        ;First time button pressed. Turn on LED
        CALL Delay      ;Illuminate for 250mS
        CALL Delay      ;Illuminate for 250mS
        BCF 06,0        ;Turn off LED
        BSF 1F,0        ;Set button-press flag
        GOTO Main       ;Loop Main
Main1   BCF 1F,0        ;Clear button-press flag
        GOTO Main       ;Loop Main

        END
Main    BTFSS 05,0      ;Test the input line on port A
        GOTO Main1      ;Button not pressed
        BTFSC 1F,0      ;Button pressed first time?
        GOTO Main       ;Button already pressed
        BSF 06,0        ;First time button pressed. Turn on LED
        BSF 06,7        ;Turn on driver transistor
        CALL Delay      ;Illuminate for 250mS
        CALL Delay      ;Illuminate for 250mS
        BCF 06,0        ;Turn off LED
        CALL Delay      ;Keep driver transistor ON
        BCF 06,7        ;Turn off driver transistor
        BSF 1F,0        ;Set button-press flag
        GOTO Main       ;Loop Main
Main1   BCF 1F,0        ;Clear button-press flag
        GOTO Main       ;Loop Main

        END             ;Tells assembler end of program
EXPERIMENT 1b
Turning on a LED for 0.5sec - with debounce
This experiment turns on a LED for 0.5 sec when button “A” is pressed. The LED does not turn on when the button is released. The secret is the very short delay 7x256uS at Main 1. This is just long enough to cover the time when the switch is being released. Release the switch very slowly and you will see the LED illuminate. This proves the delay is just covering the noise from the release of the switch. Study the following experiment then click HERE for a test.
   ;Expt1b.asm
   ;Project: LED on for 0.5sec with debounce
List P = 16F84
#include <p16F84.inc>
__CONFIG 1Bh ;_CP_OFF & _PWRTE_ON & _WDT_OFF & _RC_OSC

        ORG 0           ;This is the start of memory for the program.
SetUp   BSF 03,5        ;Go to Bank 1
        CLRF 06         ;Make all port B output
        MOVLW 01        ;Load W with 0000 0001
        MOVWF 05        ;Make RA0 input
        BCF 03,5        ;Go to Bank 0 - the program memory area.
        CLRF 1F         ;Clear the button-press file
        CLRF 06         ;Blank the display
        GOTO Main

Delay   NOP             ;Create approx 250mS delay
        DECFSZ 1A,1     ;Decrement file 1A
        GOTO Delay      ;Loop
        DECFSZ 1B,1     ;Decrement file 1B
        GOTO Delay      ;Loop
        RETURN          ;Return

Main    BTFSS 05,0      ;Test the input line on port A
        GOTO Main2      ;Button not pressed
        BTFSC 1F,0      ;Button pressed first time?
        GOTO Main       ;Button already pressed
Main1   NOP             ;No Operation
        NOP
        NOP
        NOP
        DECFSZ 1A,1     ;Create short delay
        GOTO Main1      ;Look again
        BTFSS 05,0      ;Is switch still pressed?
        GOTO Main2      ;It was only noise
        BSF 06,0        ;Turn on LED
        CALL Delay      ;Illuminate for 250mS
        CALL Delay      ;Illuminate for 250mS
        BCF 06,0        ;Turn off LED
        BSF 1F,0        ;Set button-press flag
        GOTO Main       ;Loop Main
Main2   BCF 1F,0        ;Clear button-press flag
        GOTO Main       ;Loop Main

        END
EXPERIMENT 1c
Two pushes to turn on a LED for 0.5sec
This experiment turns on a LED for 0.5 sec after two presses of the push-button. The program shows how to take control of a push-button to recognise a particular sequence of presses or length of press etc. A program must “poll” or “look-at” an input on a regular basis and hold the information in a file called a “flag file,” then go to the Main routine and carry out other operations.
The micro must not get stuck in a sub-routine, as it always has other things to do. The program below shows how to place the switch instructions in a sub-routine and the Main program looks at the state of the button via a flag file.
     ;Expt1c.asm
     ;Project: Two pushes to turn on a LED
List P = 16F84
#include <p16F84.inc>
__CONFIG 1Bh ;_CP_OFF & _PWRTE_ON & _WDT_OFF & _RC_OSC

        ORG 0               ;This is the start of memory for the program.
SetUp   BSF 03,5            ;Go to Bank 1
        CLRF 06             ;Make all port B output
        MOVLW 01            ;Load W with 0000 0001
        MOVWF 05            ;Make RA0 input
        BCF 03,5            ;Go to Bank 0 - the program memory area.
        CLRF 1F             ;Clear the button-press file
        CLRF 06             ;Blank the display
        GOTO Main

Delay   NOP                 ;Create approx 250mS delay
        DECFSZ 1A,1
        GOTO Delay
        DECFSZ 1B,1
        GOTO Delay
        RETURN

Delay2  NOP                 ;Create 1mS debounce delay
        DECFSZ 1A,1
        GOTO Delay2
        RETURN

Sw      BTFSS 05,0          ;Test the push button
        GOTO Sw3            ;Button not pressed
        BTFSC 1F,2          ;Test end-of-flash flag
        RETURN
        BTFSC 1F,0          ;First pass?
        RETLW 00            ;No
        BTFSS 1F,1          ;Test first-press flag
        GOTO Sw2            ;First press
        BSF 06,0            ;Button has been pressed twice. Illuminate LED
        CALL Delay          ;Keep LED on
        CALL Delay          ;Keep LED on
        BCF 1F,1            ;Clear second-push flag bit
        BSF 1F,2            ;Set end-of-flash flag
        BCF 06,0            ;Turn LED off
        RETURN
Sw2     BSF 1F,1            ;Set the first-press flag
        BSF 1F,0            ;Set button pass flag bit
        RETURN
Sw3     BCF 1F,0            ;Clear button pass flag bit
        BCF 1F,2            ;Clear end-of-flash flag
        RETURN

Main    CALL Sw
        CALL Delay2
        other instructions  ;Carry out other instructions
        other instructions
        BCF 1F,0            ;Clear first-push flag bit
        GOTO Main

        END                 ;Tells assembler end of program
EXPERIMENT 1d
LED turns on for 0.5sec after button released
This experiment shows how to turn on an output when a button has been released.
     ;Expt1d.asm
     ;Project: LED ON when button released
List P = 16F84
#include <p16F84.inc>
__CONFIG 1Bh ;_CP_OFF & _PWRTE_ON & _WDT_OFF & _RC_OSC

        ORG 0               ;This is the start of memory for the program.
SetUp   BSF 03,5            ;Go to Bank 1
        CLRF 06             ;Make all port B output
        MOVLW 01            ;Load W with 0000 0001
        MOVWF 05            ;Make RA0 input
        BCF 03,5            ;Go to Bank 0 - the program memory area.
        CLRF 1F             ;Clear the button-press file
        CLRF 06             ;Blank the display
        GOTO Main

Delay   NOP                 ;Create approx 250mS delay
        DECFSZ 1A,1
        GOTO Delay
        DECFSZ 1B,1
        GOTO Delay
        RETURN

Delay2  NOP                 ;Create 1mS debounce delay
        DECFSZ 1A,1
        GOTO Delay2
        RETURN

Sw      BTFSS 05,0          ;Test the push button
        GOTO Sw2            ;Button not pressed
        BSF 1F,0            ;Button is pressed. Set the button-press flag
        RETURN              ;Return
Sw2     BTFSS 1F,0
        RETURN
        BSF 06,0            ;Illuminate LED
        CALL Delay          ;Keep LED on
        CALL Delay          ;Keep LED on
        BCF 1F,0            ;Clear button flag bit
        BCF 06,0            ;Turn LED off
        RETURN

Main    CALL Sw
        CALL Delay2         ;Debounce switch
        other instructions  ;Carry out other instructions
        other instructions
        GOTO Main

        END                 ;Tells assembler end of program
EXPERIMENT 1e
LED stays on 0.5sec longer than the button-press time
This experiment shows how to turn on an output for 0.5sec longer than button-press time. It’s just a matter of adding a single instruction into the program. BSF 06,0 is added in Sw sub-routine.
     ;Expt1e.asm
     ;Project: LED ON for 0.5s more than
     ;   button-press time.
List P = 16F84
#include <p16F84.inc>
__CONFIG 1Bh ;_CP_OFF & _PWRTE_ON & _WDT_OFF & _RC_OSC

        ORG 0               ;This is the start of memory for the program.
SetUp   BSF 03,5            ;Go to Bank 1
        CLRF 06             ;Make all port B output
        MOVLW 01            ;Load W with 0000 0001
        MOVWF 05            ;Make RA0 input
        BCF 03,5            ;Go to Bank 0 - the program memory area.
        CLRF 1F             ;Clear the button-press file
        CLRF 06             ;Blank the display
        GOTO Main

Delay   NOP                 ;Create approx 250mS delay
        DECFSZ 1A,1
        GOTO Delay
        DECFSZ 1B,1
        GOTO Delay
        RETURN

Delay2  NOP                 ;Create 1mS debounce delay
        DECFSZ 1A,1
        GOTO Delay2
        RETURN

Sw      BTFSS 05,0          ;Test the push button
        GOTO Sw2            ;Button not pressed
        BSF 1F,0            ;Button is pressed. Set the button-press flag
        BSF 06,0            ;Turn on LED
        RETURN              ;Return
Sw2     BTFSS 1F,0          ;Test to see if button is pressed
        RETURN              ;Return
        BSF 06,0            ; Illuminate LED
        CALL Delay          ;Keep LED on
        CALL Delay          ;Keep LED on
        BCF 1F,0            ;Clear button flag bit
        BCF 06,0            ;Turn LED off
        RETURN

Main    CALL Sw
        CALL Delay2         ;Debounce switch
        other instructions  ;Carry out other instructions
        other instructions
        GOTO Main

        END                 ;Tells assembler end of program
EXPERIMENT 1f
Flash a LED
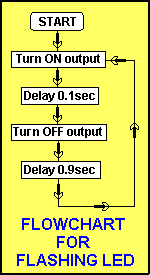
This experiment shows how to flash a LED. To make the LED flash with an on-time of 0.25seconds and off-time of 0.75seconds requires a 4-step program shown in the Flowchart below:

From the flow-chart you can see you need to do 4 things:
- Turn ON an output
- Keep the output ON for a period of time - called the Delay time
- Turn OFF the output
- Keep the output turned OFF for a period of time - called the Delay time
The processor (the heart of the microcontroller chip) must be kept running all the time. The PIC16F84 chip requires external components to complete the oscillator circuit. By using a 4k7 and 22p capacitor the oscillator will operate a 4MHz. This frequency is internally divided by 4 so that one instruction is processed every microsecond. This makes it very easy to produce accurate delay routines.
     ;Expt1f.asm
     ;Project: Flash a LED
List P = 16F84
#include <p16F84.inc>
__CONFIG 1Bh ;_CP_OFF & _PWRTE_ON & _WDT_OFF & _RC_OSC

        ORG 0           ;This is the start of memory for the program.
SetUp   BSF 03,5        ;Go to Bank 1
        CLRF 06         ;Make all port B output
        BCF 03,5        ;Go to Bank 0 - the program memory area.
        CLRF 06         ;Blank the display
        GOTO Main

Delay   NOP             ;Create approx 250mS delay
        DECFSZ 1A,1
        GOTO Delay
        DECFSZ 1B,1
        GOTO Delay
        RETURN

Main    BSF 06,0        ;Turn on LED
        CALL Delay      ; Illuminate LED
        BCF 06,0        ;Turn LED off
        CALL Delay
        CALL Delay
        CALL Delay
        GOTO Main       ;Loop the program

        END             ;Tells assembler end of program
EXPERIMENT 2
Toggle a LED
This experiment toggles the push button. Each time the button is pressed, a LED changes state.
The program introduces a very simple DEBOUNCE feature. All switches must be debounced to prevent false counting or false detection.
All switches produce noise and the micro is executing a program so quickly that it will pick up multiple pulses from a switch, each time it is pressed or released. To prevent this from happening we need to look at the push button at intervals that will prevent false counting.
The simplest debounce is a delay routine. The micro only looks at the button at intervals, dictated by the length of the delay. As soon as the push button is detected, the micro executes an XOR instruction that toggles the output line to change the state of the LED. It then goes to a delay sub-routine and when it returns, it looks for the release of the button.
This represents one cycle of the program and when the button is pressed again, the output line is toggled once more.
The program requires two separate loops as the micro is executing instructions at 1 million per second and a loop is executed so quickly that the micro can see the press of a button many times if the loop is not extended. One loop is the “pressed loop” and the other is the “not pressed loop.”
The program introduces the “button-press” flag. This is the lowest bit (bit0) in file 1F. You can use any file but the PIC Programming Course uses files 1E and 1F for flags. There are three instructions relating to this flag: The instruction to test the flag: BTFSC 1F,0 the instruction to set the flag: BSF 1F,0 and the instruction to clear the flag: BCF 1F,0 They must be placed in the program in the correct order, for the flag-bit to work. The delay can be increased until absolutely no false-triggering is produced. This will limit the speed of operation of the button and if a high-speed input is required, the pulses must be clean.
     ;Expt2.asm
     ;Project: Toggle a LED
List P = 16F84
#include <p16F84.inc>
__CONFIG 1Bh ;_CP_OFF & _PWRTE_ON & _WDT_OFF & _RC_OSC

        ORG 0           ;This is the start of memory for the program.
SetUp   BSF 03,5        ;Go to Bank 1
        CLRF 06         ;Make all port B output
        MOVLW 01        ;Load W with 0000 0001
        MOVWF 05        ;Make RA0 input
        BCF 03,5        ;Go to Bank 0 - the program memory area.
        CLRF 1F         ;Clear the button-press file
        CLRF 06         ;Blank the display
        GOTO Main

Delay   NOP             ;Create 1mS debounce delay
        DECFSZ 1A,1
        GOTO Delay
        RETURN          ;Return

Main    BTFSS 05,0      ;Test the input line on port A
        GOTO Main2      ;Button not pressed
        CALL Delay      ;Debounce the button
        BTFSC 1F,0      ;Button pressed first time?
        GOTO Main       ;Button already pressed
        MOVLW 01        ;First time button pressed
        XORWF 06,1      ;Toggle LED
        BSF 1F,0        ;Set button-press flag
        GOTO Main       ;Loop Main
Main2   CALL Delay      ;Button not pressed. Call Delay
        BCF 1F,0        ;Clear button-press flag
        GOTO Main       ;Loop Main

        END             ;Tells assembler end of program
EXPERIMENT 3
Running LEDs
The program runs a single LED forward and back across the 8 LEDs. When the push button is pressed, the action stops. Releasing the button enables the action.
This program shows the “shift-left, shift right” feature. The contents of any file can be shifted. We can detect a single bit “dropping off either end of a file” as it is shifted into a location called the CARRY - located in another file called the Status file. The address of the Carry is file 03, bit0.
If we test for a bit in the carry, we can move a single bit back and forth across a file and thus output this result on a set of LEDs to get a RUNNING LED effect.
The program also constantly looks for the press of the push button to halt the effect.
The Delay is an extension of the sub-routine above. It uses the 1mS delay and loops it 100 times by decrementing file 1B. The interesting feature is the inclusion of two RLF 06,1. They shift the LED from the end so that all the LEDs illuminate equally.
     ;Expt3.asm
     ;Project: Running LEDs
List P = 16F84
#include <p16F84.inc>
__CONFIG 1Bh ;_CP_OFF & _PWRTE_ON & _WDT_OFF & _RC_OSC

        ORG 0           ;This is the start of memory for the program.
SetUp   BSF 03,5        ;Go to Bank 1
        CLRF 06         ;Make all port B output
        MOVLW 01        ;Load W with 0000 0001
        MOVWF 05        ;Make RA0 input
        BCF 03,5        ;Go to Bank 0 - the program memory area.
        BCF 03,0        ;Clear the carry flag
        GOTO Main

Delay   MOVLW 64h       ;Load W with 100. Create 100mS delay
        MOVWF 1B
Delay1  NOP
        DECFSZ 1A,1
        GOTO Delay1
        DECFSZ 1B,1
        GOTO Delay1
Delay2  BTFSC 05,0      ;Look at input
        GOTO Delay2     ;Button pressed. Stop action
        RETURN

Main    MOVLW 01        ;Put 0000 0001 into W
        MOVWF 06        ;Illuminate the lowest LED
Main2   RLF 06,1        ;Shift to the left so that end LED shows equal time
Main3   RLF 06,1        ;Shift LED to the left.
        BTFSC 03,0      ;Has LED reached end of display?
        GOTO Main4      ;Yes
        CALL Delay      ;No. Illuminate LED
        GOTO Main3      ;Loop shift-left instructions.
Main4   RRF 06,1        ;Shift to the right so that end LED shows equal time
Main5   RRF 06,1        ;Shift LED to the right.
        BTFSC 03,0      ;Has LED reached end of display?
        GOTO Main2      ;Yes.
        CALL Delay      ;No. Illuminate LED
        GOTO Main5      ;Loop shift-right instructions.

        END             ;Tells assembler end of program
Quick Links
Legal Stuff
Social Media


