Table Of Contents
<!--  TODO FIXME: add OnHover HoverImage Component here -->
   PIC LAB-1 Hex Values   <!-- // preload images: if (document.images) { image1on = new Image(); image1on.src = "images/Ans1.gif"; image1off = new Image(); image1off.src = "images/MouseoverForAnswer.gif"; image2on = new Image(); image2on.src = "images/Ans2.gif"; image2off = new Image(); image2off.src = "images/MouseoverForAnswer.gif"; image3on = new Image(); image3on.src = "images/Ans3.gif"; image3off = new Image(); image3off.src = "images/MouseoverForAnswer.gif"; image4on = new Image(); image4on.src = "images/Ans4.gif"; image4off = new Image(); image4off.src = "images/MouseoverForAnswer.gif"; image5on = new Image(); image5on.src = "images/Ans5.gif"; image5off = new Image(); image5off.src = "images/MouseoverForAnswer.gif"; image6on = new Image(); image6on.src = "images/Ans6.gif"; image6off = new Image(); image6off.src = "images/MouseoverForAnswer.gif"; image7on = new Image(); image7on.src = "images/Ans7.gif"; image7off = new Image(); image7off.src = "images/MouseoverForAnswer.gif"; image8on = new Image(); image8on.src = "images/Ans8.gif"; image8off = new Image(); image8off.src = "images/MouseoverForAnswer.gif"; image9on = new Image(); image9on.src = "images/Ans9.gif"; image9off = new Image(); image9off.src = "images/MouseoverForAnswer.gif"; image10on = new Image(); image10on.src = "images/Ans10.gif"; image10off = new Image(); image10off.src = "images/MouseoverForAnswer.gif"; } function changeImages() { if (document.images) { for (var i=0; i<changeImages.arguments.length; i+=2) { document\[changeImages.arguments\[i\]\].src = eval(changeImages.arguments\[i+1\] + ".src"); } } } // -->   <!-- //code hiding function hexdec(f1) { f1.hexval.value = f1.hexval.value.toUpperCase(); rval = parseInt(f1.hexval.value,16); f1.result.value=rval; } function dechex(f1) { rval= f1.redval.value; rhex = tohex(rval); f1.hexnot.value = rhex; } function tohex(i) { a2 = '' ihex = hexQuot(i); idiff = eval(i + '-(' + ihex + '*16)') a2 = itohex(idiff) + a2; while( ihex > 16) { itmp = hexQuot(ihex); idiff = eval(ihex + '-(' + itmp + '*16)'); a2 = itohex(idiff) + a2; ihex = itmp; } a1 = itohex(ihex); return a1 + a2 ; } function hexQuot(i) { return Math.floor(eval(i +'/16')); } function itohex(i) { if( i == 0) { aa = '0' } else { if( i== 1) { aa = '1'} else {if( i== 2) { aa = '2'} else {if( i == 3) { aa = '3' } else {if( i== 4) { aa = '4'} else {if( i == 5) { aa = '5' } else {if( i== 6) { aa = '6'} else {if( i == 7) { aa = '7' } else {if( i== 8) { aa = '8'} else {if( i == 9) { aa = '9'} else {if( i==10) { aa = 'A'} else {if( i==11) { aa = 'B'} else {if( i==12) { aa = 'C'} else {if( i==13) { aa = 'D'} else {if( i==14) { aa = 'E'} else {if( i==15) { aa = 'F'} } } } } } }}} }}}}}} } return aa } //-->
<!-- /TODO FIXME: hex converter -->
Hex to Decimal Converter:
Hex:
Decimal:
Decimal:
Hex: h

Hex Addresses
00 - 255
There are three ways to enter numbers into a program. Binary, Decimal and Hexadecimal.
When you are working at the lowest level (called Machine Code), you are writing instructions the microcontroller can understand.
The most convenient number systems at this level are BINARY and HEXADECIMAL.
Once you know how they work, you will find they match with the 8 bits in each file and corresponds to the input and output lines.
You don’t have to know very much about the systems. You don’t even need to know how to add two hex numbers together (this is very difficult). You only need to know how to count to fifteen.
It all starts with the bits in a file. There are 8 bits. If they are presented as 8 empty boxes:

each box can be filled with “0” or “1.”
The easiest way to represent this is: 0000 0000 or 1111 1111 Any combination of 0’s or 1’s can be used.
As with normal numbers, the lowest number is to the right: 0000 0001 and since the only values allowed in the “boxes are 0 or 1, the numbers increment: 0000 0010 0000 0011 0000 0100
0000 0101 0000 0110 0000 0111 0000 1000 0000 1001 0000 1010 0000 1011
0000 1100 0000 1101 0000 1110 0000 1111 etc.
This is called BINARY and is exactly the way the value in a file increments. When all the “boxes” are filled, (1111 1111) the file will contain 255.
But don’t worry about the 255 at the moment. Simply look at the numbers such as 1010 1001 or 1100 1110 and give an instant answer to the value of each. It’s very difficult. Our mind does not work in 1’s and 0’s.
To make it easy, clever programmers have devised a simple way to read a group of four binary values. They have given it a single digit from 0 to 9 and then the letters A, B, C, D, E and F.
This produces two digits to cover all the values from 00 to 255.
There are only two more points we have to cover and you know all about Binary and Hex.
The first is the Binary to Hex table:
| Binary: | Hex: |
|---|---|
| 0000 | 0 |
| 0001 | 1 |
| 0010 | 2 |
| 0011 | 3 |
| 0100 | 4 |
| 0101 | 5 |
| 0110 | 6 |
| 0111 | 7 |
| 1000 | 8 |
| 1001 | 9 |
| 1010 | A |
| 1011 | B |
| 1100 | C |
| 1101 | D |
| 1110 | E |
| 1111 | F |
The only other thing is the value of each “bit” or “line.” Each bit can have a LED connected to it and to be able to illuminate an individual LED, its value must be known. Similarly, if you want to illuminate two or three LEDs or globes, or relays at the same time, you need to know how to combine (add up) the value of each line to provide a number for the instruction in a program.
The value of each LED is shown on the PIC LAB-1 PC board as:

From the table above you can see the lowest LED has the value 01, the next LED has the value 02, the next has the value 04, then 08. The next set of four LEDs have the same values but since they represent the left-hand digit, the values are 10, 20, 40 and 80.
This allows two or more values to be combined into a 2-digit answer.
Take the four lower LEDs for example: Go to the table to see the value of the two lowest LEDs. The answer is 0000 0011 = 03 All the four lower LEDs = 0000 1111 = 0F The three top LEDs = 1110 0000 = E0. The four middle LEDs = 0011 1100 = 3C.
This is how you write a value in the program to turn on a particular set of LEDs.
Any of the 255 combinations of LEDs can be presented in this way.
HOW DOES IT WORK?
Putting a value in a file:
You can put any number from 00 to 255 into a file. Numbers (values) are used for a number of purposes. It may be to output onto a display or for decrementing a file.
You can think of numbers such as 50, 100, 200 etc but in computer terms you generally think in terms of a full file or half-filled file etc.
This brings you around to 0FFh for a full file or 80h for a half-filled file. If you want 75 for a loop sub-routine, go to the converter above and get 4Bh as the value for loading into a file (via W).Outputting to a display:
If you are creating a display on a set of LEDs or 7-segment display, you will need to know the LEDs to be illuminated and the value of each LED.
Here are some examples:

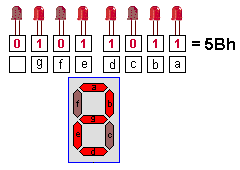
Under each LED, write 0 for not illuminated and 1 for illuminated. Go to the table above and write down the value for the first 4 LEDs. Do the same for the other 4 LEDs. This is the Hex value for the output.
The same applies for a 7-segment display:

When 5Bh is output to the 7-segment display, the figure “2” appears on it.
The 7-segment display is also capable of producing almost all the letters of the alphabet as well as many other characters and effects. See Expt 4c for letters on the display.
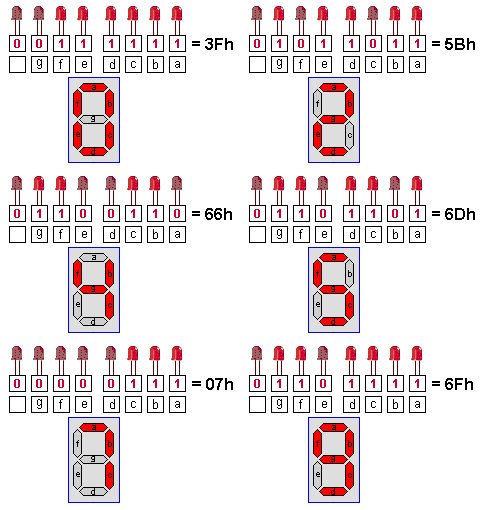
Here are the values to produce the numbers 0 to 9:

When writing a program, Hex numbers are loaded into W and moved from W to a file. In the comments section, the binary value is shown so that you can see how the Hex number is generated.
For instance, in the instruction below, the value 0011 1111 is loaded into W to turn on segments of the 7-segment display to create the number “0.” This is the value 3Fh. The programmer produces the binary number first in the comments section then converts the value to hex for the program.
MOVLW 3Fh   ;Load W with 0011 1111
MOVWF 06    ;Output "0" on 7-segment display
ADDING HEX NUMBERS
Adding Hex numbers is very difficult. The easiest and quickest way to add Hex numbers is to convert to decimal by using the converter above, add the numbers conventionally, then convert to a Hex value.
If you need to increment a hex value or add a small number to a hex value (such as for an increment function) you can go to the Hex table above and increment down the table.
QUESTIONS:
<!-- TODO FIXME: add OnHover HoverImage Component here - MAYBE, otherwise quizdown -->
What is the hex number to turn ON the lowest LED on the display?

What is the hex number to turn ON the 4 lowest LEDs?

What is the hex number to turn ON the top LED?

What is the hex number to turn ON all the LEDs?

What is the hex number to turn ON the highest and lowest LEDs?

What LEDs will turn ON: 0011 1100

What LEDs will turn ON: 1100 0011 and what is the Hex number?

What LEDs will turn ON: 1010 1010 and what is the Hex number?

What LEDs will turn ON: 0000 0000 and what is the Hex number?

What LEDs will turn ON: 1111 1111 and what is the Hex number?

Quick Links
Legal Stuff
Social Media


