

Table Of Contents
Adding extra Inputs and Outputs
There are many ways to design a project using the PIC LAB-1.
Here are three:
- Design a project around the inputs and outputs of the PIC LAB-1.
- Write a program for the PIC LAB-1 and include instructions for additional inputs, such as switches. Connect the switches to the underside of the board and test everything before making a prototype.
- Use the PIC LAB-1 as a module and connect it to a “base-board” containing the remainder of the circuitry - such as relays, driver transistors etc - like a “plug-in” or “add-on” module.
The actual layout you chose is up to you.
In this chapter we will cover the circuitry required to add inputs and outputs.
Up to 13 inputs and 13 outputs can be created with a PIC16F84, so the potential is enormous. We will only be showing a small part of the capability.
The four features we will cover are:
- Creating an input.
- Creating an output with Low, Medium and HIGH driving capability.
- Creating an input and output on a single line.
- Creating two separate inputs on a single line.
With all devices connected to the microcontroller, you have to remember one thing. The output is only capable of delivering 20mA and if it delivers more current than this, it will be damaged.
That’s why it is very important to prevent devices such as switches causing a short-circuit. A switch can very easily create a short. If a switch-line is made an output and is LOW while the switch is pressed, damage will occur. That’s why you need to look at a design before damage occurs.
CREATING AN INPUT
An input line is created by simply writing a few instructions in a program. These instructions are placed in SetUp.
For example, to make the lowest line of Port A, an INPUT, the following instructions are needed. These must be placed inside BSF 03,5 and BCF 03,5.
BSF 03,5    ;Go to Bank 1
MOVLW 01    ;Load W with 0000 0001
MOVWF 05    ;Make RA0 input
BCF 03,5    ;Go to Bank 0 - the program memory area.
The input line (pin 17) will then detect a HIGH or LOW.
The amplitude of the HIGH must be as large as possible and can be about 500mV lower than rail voltage. The low must be as small as possible and can be about 500mV. If the input voltage does not reach these excursions, a definite HIGH or LOW may not be detected.
The input to the micro is high-impedance and very little current is required to register a HIGH or LOW. That’s all you need to know.
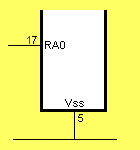
Micro input line
If the input voltage is present for a long period of time (in microcontroller terms), there will be no problem detecting the signal.
But if it is only present for a short period of time, or of insufficient amplitude, an amplifier or pulse-stretcher will be required.
If the signal is a tone, a clever program can be produced to create a varying-width window. This will prevent the signal synchronising with the window and not being detected.
Audio    CLRF 13h       ;File 13h counts audio "lows"
         MOVLW 0A0h     ;Create 50h loops! Yes 50h
         MOVWF 1A
Audio2   MOVF 1A,0      ;Copy 1A to W
         MOVWF 1B       ;Copy W to 1B
Audio3   DECFSZ 1B,1
         GOTO Audio3
         BTFSS 05,1     ;Look at audio input. Audio = LOW
         GOTO Audio4
         INCFSZ 1A,1    ;Increment file 1A to zero!
         GOTO Audio2
         RETURN
Audio4   INCF 13h
         GOTO Audio2
If the signal is present for a very short period of time, a pulse stretcher will be needed. This is simply a storage electrolytic placed on the input line to increase the LOW time. Any value from 100n, 1u to 10u can be used.
If the output from the device is insufficient to guarantee detection, an amplifier, similar to the circuit above, will be needed.
Some of the tricks in getting an input device to interface to the micro, will be in the program. You may need to look at the device a number of times before making a decision. This will be mainly to remove background noise or incorrect frequencies etc.
CREATING AN OUTPUT
Any of the 13 lines of a PIC16F84 microcontroller can be made an OUTPUT. The line must be “set-up” (turned into) an output via the following instructions:
BSF 03,5    ;Go to Bank 1
MOVLW 0FEh  ;Load W with 1111 1110
MOVWF 06    ;Make line RB0 of Port B output
BCF 03,5    ;Go to Bank 0 - the program memory area.
Any line that is made output can be made HIGH or LOW. To make a line LOW, the corresponding
bit is “0”:
MOVLW 00    ;Load 0000 0000 into W
MOVWF 06    ;Make RB0 LOW.
To make a line HIGH, the corresponding bit is “1”:
MOVLW 01    ;Load 0000 0001 into W
MOVWF 06    ;Make RB0 HIGH.
Low Current OUTPUT
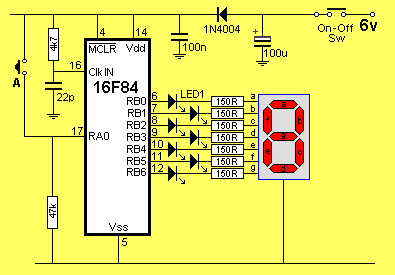
A output from the PIC16F84 micro will deliver up to 20mA. It will also sink 20mA. This is sufficient for LEDs and 7-segment displays. The circuit below shows LEDs connected to a micro:
If more than 20mA is needed, a buffer transistor can be added.
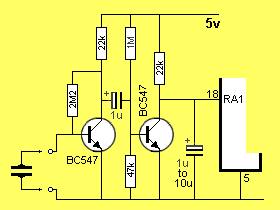
Medium Current OUTPUT
A low-current transistor (meaning a low collector current capability) can be connected the output of a micro to deliver up to about 1 amp. At about 1 amp, you can call the transistor a medium-current device.
High Current OUTPUT
A high-current transistor (meaning a high collector current capability) can be connected the output of a micro to deliver currents above 1 amp.
Here is a list of types and their collector current capability:
| NPN | PNP | Collector Current mA | Case |
|---|---|---|---|
| BC107 BC108 BC109 | BC177 BC178 BC179 | 100 |  |
| BC147 BC148 BC149 | BC157 BC158 BC159 | 100 |  |
| BC167 BC168 BC169 | BC257 BC258 BC259 | 100 |  |
| BC171 BC172 BC173 BC182 BC183 BC184 | BC251 BC252 BC253 BC212 BC213 BC214 | 100 200 |  |
| BC207 BC208 BC209 | BC204 BC205 BC206 | 100 |  |
| BC237 BC238 BC239 | BC307 BC308 BC309 | 100 | |
| BC317 BC318 BC319 BC337 BC347 BC348 BC349 BC382 BC383 BC384 | BC320 BC321 BC322 BC327 BC350 BC351 BC352 | 500 |  |
| BC407 BC408 BC409 | BC417 BC418 BC419 |  | |
| BC413 BC414 | BC415 BC416 | | |
| BC437 BC438 BC439 |  | ||
| BC467 BC468 BC469 |  | ||
| BC547 BC548 BC549 BC582 BC583 BC584 | BC557 BC558 BC559 BC512 BC513 BC514 | 100 | |
| BC261 BC262 BC263 | | ||
| 2N3903 2N3904 | 2N3905 2N3906 | 200 |  |
| 9013 9014 | 9012 9015 | | |
| TIP3055 | TIP2955 | 15A |  |
| BD131 BD139 BD263 | BD132 BD140 BD262 | 1.5A 4A |  |
| MJE 3055T BD267A TIP31A TIP41A | MJE 2955T BD266A TIP32A TIP42A | 10A 8A 3A 6A |  |
| 2N3055 | MJ2955 | 15A |  |
| 2N3054 | 4A |  | |
| 2N2222A | 800 | | |
| Darlington TIP121 TIP132 | Darlington TIP126 TIP137 | 5A | |
| Darlington TIP141 | Darlington TIP146 | 10A | |
There is a complex problem with delivering a current above 1 amp. The problem is this:
The output of the micro is 20mA. Any transistor with a collector current above 500mA has a gain of 20-200. To be realistic you should allow a gain of 50. This means the collector current cannot be above 20 x 50 = 1,000mA = 1amp.
A LITTLE THEORY:
It works like this: For every mA of current delivered to the base, the transistor will allow 50mA to pass through the collector-emitter terminals.
What happens?
What happens if you try to pass more than 50mA through the collector-emitter circuit?

Quick Links
Legal Stuff
Social Media