

Table Of Contents
Library of Routines
The following is a list of sub-routines, ideas and help for the PIC16F84. They apply to any project using the PIC16F84. They can be pasted into your program and modified in any way - especially to suit the input/output lines.
Your program should be created on a template in a text editor such as NotePad, using blankF84.asm as a starting layout. It provides the correct layout and spacing.
The most unusual problem you may get is a failure to compile your program due to hidden formatting/characters. MPASM will not produce the needed .hex file if any problem or fault exists in a program but it will produce a .lst file containing the faults. If you open .lst and see unusual mistakes, they will be due to hidden formatting characters. Simply retype all the wording around the mistake (in the .asm file) and the program will compile. Do not use EditPad as it produces hidden characters.
To use the Library of Routines below, go to the NotePad set of ”Copy and Paste” Routines and “Copy and Paste” them into your program in another NotePad, as needed.
Additional sub-routines can be found in the PIC Programming Course.
Make sure each sub-routine uses a file (a register) with a name (a hex number) that doesn’t clash with any other sub-routine you have created. Make sure CALLs and RETURNs are functional and Labels have not been used elsewhere.
The following library is presented in alphabetical order. Using these routines will get you started very quickly and will usually assist you with 70% - 90% of a new project.
Read through the entire library so you know the content.
Simply think of a word or requirement for each part of a program. Go to the word and read the comments. Go to the equivalent section in NotePad and copy the instructions.
Paste them into your program and modify them to suit. Follow through each of the lines exactly as the micro will interpret them and make sure you have a RETURN to Main, somewhere in the sub-routine.
Get each small addition to work correctly before adding more instructions. Gradually build up your program and save it as a new name so it can be recalled if a major problem develops.
Add a value to a File
The PIC12C508A does not have an instruction to add a number to a file. Two instructions are needed to carry out this operation so that the program you are producing is suitable for both a PIC12C508A and PIC16F84.
Add   MOVLW 0CCh    ;Put CCh into W
      ADDWF 0Eh,1   ;CC will be added to the contents of file "E."
Add “bits” to a port - turn on bits or “lines.”
This is handy when more than one line needs to be turned on.
              ;suppose port 6 has bits 0, 1 and 2 HIGH and we need
              ;  to turn on bit 7
MOVLW 80h     ;Put 80h into W - this is bit 7
IORWF 06h,1   ;80h will be added to the contents of file "6." (port 6)
Address a File
This means “to act on” or “work with” a file. It can be to “move a value into a file,” “increment a file,” “decrement a file” or other similar operation. Only files can be addressed. The files we are talking about are the “empty” files from 0C to 4F. None of the program or the values in the tables can be altered. The values in a table can be accessed and copied by a set of instructions covered in CALL Table.
Typical addressing instructions are:
MOVWF 1A,0    ;Copy file 1A into W
DECFSZ 1A,1   ;Decrement file 1A
INCF 1A,1     ;Increment file 1A
Addressing a Set of Files
A number of files can be used to store temporary data, such as the digits or letters of a score-board.
This is sometimes called a “scratchpad” or “scratchpad area.” The files should be sequential to make programming easy.
Suppose we have 8 files and need to address them with a simple sub-routine to output the data to a display. The sub-routine is called INDIRECT ADDRESSING. See Indirect Addressing.
ARITHMETIC OPERATORS AND PRECEDENCE
| OPERATOR | Example | |||||
|---|---|---|---|---|---|---|
| $ | Current/Return Program Counter | goto $ + 3 | ||||
| ( | Left parenthesis | 1 + ( d * 4) | ||||
| ) | Right parenthesis | (length + 1) * 256 | ||||
| ! | NOT (logical complement) | if ! (a == b) | ||||
| – | Negation (2’s complement) | – 1 * length | ||||
| ~ | Complement | flags = ~ flags | ||||
| * | Multiply | a = b * c | ||||
| / | Divide | a = b / c | ||||
| % | Modulus | entry_len = tot_len % 16 | ||||
| + | Add | tot_len = entry_len * 8 + 1 | ||||
| – | Subtract | entry_len = (tot – 1) / 8 | ||||
| << | Left Shift | flags = flags << 1 | ||||
| >> | Right Shift | flags = flags >> 1 | ||||
| >= | Greater or equal | if entry_idx >= num_entries | ||||
| > | Greater than | if entry_idx > num_entries | ||||
| < | Less than | if entry_idx < num_entries | ||||
| <= | Less or equal | if entry_idx <= num_entries | ||||
| \== | Equal to | if entry_idx == num_entries | ||||
| ! = | Not equal to | if entry_idx ! = num_entries | ||||
| & | Bitwise AND | flags = flags & ERROR_BIT | ||||
| ^ | Bitwise EXclusive OR | flags = flags ^ ERROR_BIT | ||||
| Bitwise Inclusive OR | flags = flags | ERROR_BIT | ||||
| && | Logical AND | if (len == 512) && (b == c) | ||||
| Logical OR | if (len == 512) | (b == c) | ||||
| \= | Set equal to | entry index = 0 | ||||
| += | Add to, set equal | entry index += 1 | ||||
| – \= | Subtract, set equal | entry index – \= 1 | ||||
| *= | Multiply, set equal | entry index *= entry_length | ||||
| /= | Divide, set equal | entry total /= entry_length | ||||
| %= | Modulus, set equal | entry index %= 8 | ||||
| <<= | Left shift, set equal | flags <<= 3 | ||||
| >>= | Right shift, set equal | flags >>= 3 | ||||
| &= | AND, set equal | flags &= ERROR_FLAG | ||||
| = | Inclusive OR, set equal | flags | = ERROR_FLAG | |||
| ^ = | EXclusive OR, set equal | flags ^= ERROR_FLAG | ||||
| ++ | Increment | i ++ | ||||
| – – | Decrement | i – – |
Beep see Tone
A Beep is a tone of short duration.
Button see Switch
CALL see also Stack
CALL means to branch to, and return from a subroutine. It does NOT mean GOTO. GOTO means to branch unconditionally and maybe not return to the present routine. CALL means to branch to another sub-routine and RETURN to the next address. Every CALL must have its own RETURN or RETLW 00 to 0FFh statement. When a CALL instruction is executed, the next address-value is placed on the stack and the micro goes to the location identified in the instruction.
Do not “GOTO” a sub-routine that has a RETURN at the end of it. The micro will not know where to return as the GOTO instruction does not put a return address into memory (the stack).
The CALL instruction works to the full 1024 locations in a PIC16F84A chip.
But the CALL instruction only works to the first 256 locations (half the memory - called the first page of memory and sometimes referred to as Page0) in a PIC12C508A.
To use the CALL instruction in a PIC12C508A, use the first 256 locations in the normal way and if any more sub-routines are required, they are accessed as a GOTO. At the end of the sub-routine you place a GOTO to take the microcontroller back to the Main program. Remember this: any sub-routine with a GOTO can only be accessed ONCE from Main. (Alternatively you can place all the instructions of these extra sub-routines in Main.) If you want to access a sub-routine many times, put it in the first 256 locations and use CALL. Always put Tables in the first 256 locations, and remember, a Table cannot extend over the 256 byte boundary, for a PIC12C508A.
USING THE CALL INSTRUCTION
The micro will come to CALL Delay in the sub-routine below. It will then advance down the program to Delay and carry out instructions until it reaches RETURN. The micro will then move up the program to the xxxxxxxxx line.
        CALL Delay
        xxxxxxxxx
        - - - - - - - -
        - - - - - - - -
        - - - - - - - -

Delay   MOVLW 80h         ;Put 80h into W
        MOVWF 1A          ;Copy 80h into file 1A
DelA    DECFSZ 1A,1       ;Decrement file 1A
        GOTO DelA         ;Loop until file 1A is zero
        RETURN
CALL Table see also Table and Output a Table Value
The instructions CALL Table uses the value in W and adds it to the Program Counter (PC - location 02 (file 02) - the ,1 indicates the value in W will be placed in the PC file) to create a JUMP VALUE to jump down a Table and pick up a value. The instruction beside each value in a table places the value in W and makes the micro return to the instruction after CALL Table. The next instruction should be to move the value from W to a file.
Call  MOVF 1A,0     ;File 1A contains 05. Move it to W
      CALL Table    ;W will return with display-value for "5" (6D)
      MOVWF 06      ;Output display value to 7-segment display
Table   ADDWF 02h,1   ;Add W to the Program Counter to create a jump.
        RETLW 3Fh     ;0 format= gfedcba
        RETLW 06h     ;1
        RETLW 5Bh     ;2
        RETLW 4Fh     ;3
        RETLW 66h     ;4
        RETLW 6Dh     ;5
        RETLW 7Dh     ;6
        RETLW 07h     ;7
        RETLW 7Fh     ;8
        RETLW 6Fh     ;9
Carry
The carry bit is located in the STATUS register (file 03) and is bit 0.
It is cleared by the instruction:
BCF 03,0 - clear bit0 in file 03
Carry is SET by the instruction:
BSF 03,0
To test the carry:
BTFSS 03,0
GOTO AAA ;The micro will go HERE if the carry is NOT set.
GOTO BBB ;The micro will go HERE if the carry is SET.
CBLOCK
A directive used for defining file registers to be reserved in an application. The format of CBLOCK is:
cblock 0x0C ;define the start of the files
Lowbyte       ;this will be file 0C
Medbyte       ;this will be file 0D
Hibyte        ;this will be file 0E etc  etc  etc
endc
This method of declaring variables is quite good, but macros cannot take advantage of it.
Change Direction
The direction of an input/output line (or a whole port) can be changed at any time during the running of a program. See SetUp for setting up the Input/Output lines. See Input for the instruction(s) to make a line Input. See Output to make a line Output. Lines are changed by setting or clearing bits. This is called BIT MANIPULATION. This prevents touching (and upsetting) other lines.
See Toggle to change the direction of a line.
Compare
To compare two values, you can use XOR.
To compare two numbers, they are XORed together and if they are the same, the Z flag will be set. Take two numbers:
number = 7A 0111 1010
W = 7A 0111 1010
Starting at the right hand end, ask yourself the question, “Is one OR the other a 1?” The answer is no. The next column. “Is one number OR the other a 1?” No BOTH the numbers are 1! so that’s why the answer is NO. In this way every column has the answer NO, when both numbers match.
When all the answers are Zero, the flag rises! to say the result is ZERO. In other words it is SET.
To find the zero flag look in the STATUS register, bit 2, i.e. File 03,2. e.g: To compare two files:
MOVF 1A,0   ;Move one file into W
XORWF 1B,0  ;XOR W and 1B
BTFSS 03,2  ;Test Z flag  If Z flag is SET (ie 1) the two files are the SAME!
The same thing can be done by using the subtract operation:
MOVF 1A,0   ;Move one file into W
SUBWF 1B,0  ;Subtract W from 1B
BTFSS 03,2  ;Test Z flag  If Z flag is SET (ie 1) the two files are the SAME!
Same:
Z flag is SET (ie 1) when the two files are the SAME!
Comparison
The contents of a file can be compared with the contents of the working register (W) to determine their relative magnitudes. This is done by subtracting the contents of W from the selected file. By testing the Carry and Zero flags, 4 results can be obtained:
E.g:
MOVLW 22h    ;Put 22h in W
MOVWF 0CD    ;Move 15h to file 0C
MOVLW 15h    ;Put 15h in W
SUBWF 0C,1   ;Subtract 15h from 22h
BTFSS 03,2   ;Test Zero flag
OR
BTFSS 03,0 ;Test Carry flag
Zero flag is SET if W = File value = Match
Zero flag is CLEAR if no Match
Carry flag is SET if a borrow did not occur (W is less than or equal to file value)
Carry flag is CLEAR if a borrow occurred (W is greater than file value)
(Put a value into W and perform SUBWF). Test Carry:
More than: Carry flag is CLEAR if W is greater than file value.
Less than: Carry flag is SET if W is less than or equal to file value.
Suppose a file (file 1E) is incremented to 8 such as in the Logic Probe with Pulser. We need to know if the file is 1, 2 or 3. The first thing to do is eliminate the possibility of zero.
TestA  MOVLW 00h     ;Eliminate file 1E if it is zero,
       XORWF 1E,0    ;XOR file 1E with W
       BTFSC 03,2    ;Test the zero flag to see if file 1E is zero
       GOTO TestA1   ;File 1E is zero
The SUBWF operation below subtracts the W register (via a process called the 2’s complement method) from file 1E and the carry flag in the Option register (file 03) will be SET if 1E is equal to W or more than W (i.e: 4 or more).
  MOVLW 04       ;Put 04 into W for subtract operation
  SUBWF 1E,0     ;Carry will be set if 1E is = or more than 4
  BTFSS 03,0     ;Test the carry flag
  GOTO Hi        ;Go to another sub-routine such as "Hi"
Here is the outcome for all the possibilities for file 1E:
If 1E = 0 C = 0 (we have eliminated the possibility of zero via the first 4 lines above)
If 1E = 1 C = 0 (carry is zero - this is not the CARRY BIT it is the SET (1) or clear (0) indicator)
If 1E = 2 C = 0
If 1E = 3 C = 0 (carry is clear)
If 1E = 4 C = 1 (carry is set)
If 1E = 5 C = 1
If 1E = 6 C = 1
If 1E = 7 C = 1
If 1E = 8 C = 1
The carry bit in the Option file is bit 0. Therefore we test bit 0 of file 03:
BTFSS 03,0
The result in 1E can only be 1, 2, or 3.
Debounce a Button (Switch)
See Switch and Poll
Debug
This is not a term used in creating a program in PIC language, however we have two suggestions for finding a “bug” or problem in a program.
- Go back to your previously saved version and note the differences in the programs. Try to visually detect the fault.
- “Home-in” on the faulty section and see how far the micro is getting through by inserting a Wait instruction. (See Wait) A LED on an output line will illuminate to indicate the micro has reached the instruction.
Decrement
To decrement a file, use the instruction: DECF 1A,1. This puts the new value back into the file. Do not use DECF 1A,0 as the new value goes into W!
To decrement a file twice, use:
DECF 1A,1
DECF 1A,1
To halve the value of a file, the contents is shifted right:
RRF 1A,1- the file must not have a bit in bit0.
A file can be decremented until it is zero:
DECFSZ, 1A,1
Delay
A delay sub-routine is needed for almost every program. One of the main purposes is to slow down the execution of a program to allow displays to be viewed and tones to be produced.
The shortest delay is NOP. This is a “do nothing” instruction that takes 1 micro-second.
You will need one million ”NOP’s” to produce a 1 second delay.
This is impractical as the program space will only allow about 1,000 instructions.
The answer is to create a loop. If a file is loaded with a value and decremented, it will create a short delay. The two instructions: DECFSZ 1A,1 and GOTO DelA will take 3uS. 80h loops = 127 loops x 3 + 1 loop x 2uS + 2uS on entry + 1uS on exit = 386uS code
Del   MOVLW 80h     ;Put 80h into W
      MOVWF 1A      ;Copy 80h into file 1A
DelA  DECFSZ 1A,1   ;Decrement file 1A
      GOTO DelA     ;Loop until file 1A is zero
      RETURN
A simpler delay routine below decrements a file with 256 loops. Each loop is 4uS and the result is slightly more than 1,000uS = 1mS. The routine exits with 00h in the file. On the second execution, the routine performs 256 loops - the file does not have to be pre-loaded.
The longest delay (such as the one below) using a single file is approx 1mS. code
Del   NOP
      DECFSZ 1A,1   ;Decrement file 1A
      GOTO Del      ;Loop until file 1A is zero
      RETURN
1mS delay
NESTED DELAYS
To produce delays longer than 1mS, two or more files are needed. Each file is placed around the previous to get a multiplying effect. The inner delay produces 256 loops, the output file produces 256 loops of the inner file. This results in 256 x 256 loops = 256mS.
The simplest delay decrements a file to zero. At the end of an execution, a delay contains 00 and this produces the longest delay, the next time it is used.
This means a file does not have to be pre-loaded.
The following is a two-file nested delay. The delay time is approx 260mS (say 1/4Sec): code
Del   NOP
      DECFSZ 1A,1   ;Decrement file 1A
      GOTO Del      ;Loop until file 1A is zero
      DECFSZ 1B,1   ;Decrement file 1B
      GOTO Del      ;Loop until file 1B is zero
      RETURN
260mS Delay
If you want a delay between 1mS and 256mS, you will need to pre-load file 1B. For each value loaded into file 1B, a delay of 1mS will be produced. A 125mS delay is shown below: code
Del   MOVLW 7Dh     ;Load W with 125 for 125mS delay
      MOVLW 1B
Del1  NOP
      DECFSZ 1A,1   ;Decrement file 1A
      GOTO Del1     ;Loop until file 1A is zero
      DECFSZ 1B,1   ;Decrement file 1B
      GOTO Del1     ;Loop until file 1B is zero
      RETURN
125mS Delay
Detect a value
If a file has been incremented in a sub-routine you may want to know the value it contains.
You may want to know its exact value or if it is higher or lower than a certain value.
To see if it is an exact value, it is XORed with a known value. See XOR.
To detect a particular value, they are XORed together. See XOR.
You can also detect a particular value by BIT TESTING. You must make sure that all the numbers being tested can be distinguished by testing a single bit. For example: 1, 2, 4, 8, 10h can be tested via bits 0, 1, 2, 3, 4. But if 3 is included in your requirement, you cannot test a single bit.
Different
To find out if two numbers are different, they are XORed together. See XOR
Divide
Simple division such as divide by 2 can be performed by the RRF instruction. Successive RRF’s will divide by 4, 8, sixteen etc. Other divisions are beyond the scope of this course. The number cannot have a bit in bit0, if an accurate division is required.
Double
To double the value of the contents of a file, it is shifted LEFT (RLF 1A,1). The number must be less than 80h. (it must not have a bit in location bit7).
EEPROM
The PIC16F84 has 64 bytes of EEPROM to permanently store data.
If you need to store only a few bytes of data for a short period of time, use files that are not required for the running of the program. This information will be lost when power is removed.
The 64 bytes of EEPROM requires a special set of instructions to place data into EEPROM. The actual writing time for this data is very long (in computer terms) and can be done in the background, while the main program is executing. A flag will SET when the data has been written and this will allow another byte of data to be entered.
Each EEPROM cell can be written about 1 million times.
Before reading a value in a location in the EEPROM, it must be loaded with a value during “burning.” To load the first location in EEPROM with a value, the following instructions are placed in a program. The EEPROM starts at location 2100h and the term DE means: “define EEPROM.” There are 64 EEPROM locations and by following the layout in the second table, any location can be addressed during burning. code
ORG 2100h   ;Starting point of EEPROM on 16C84 or 16F84
DE 00h      ;First EEPROM location initialized to zero
END
To load more locations in EEPROM, the following layout is used:
ORG 2100h                                       ;Starting point
DE 84h, 16h, 23h, 80h, 0CAh, 32h, 7Bh, 0A2h     ;
DE 34h, 53h, 25h, 02h, 0FFh, 20h, 03h, 04h      ;
                                                ;for up to eight lines
END
Example: To read the value at the first address in EEPROM, DECrement it and write the new value into the first address, use the following sub-routine:
Dec   MOVLW 00h
      MOVWF 09h       ;EEPROM Address is file 09
      CALL EERead     ;Get EEPROM value
      MOVWF 1E        ;Move to temp file 1E
      DECF 1E, 0      ;DECrement and put new value into W
      CALL EEWrite    ;Write new value to EEPROM
      CALL EERead     ;Get new EEPROM value
      RETURN
READ EEPROM:
The sub-routine to read a value in the EEPROM is shown below. It reads EEPROM data at location specified in EEADR and returns the value in W code
EERead    BSF Status, RP0     ;Go to Bank 1
          BSF EECON1, RD      ;Set the RD bit
          BCF Status, RP0     ;Back to bank 0
          MOVF 08, W          ;EE Data is file 08.  Put into W
          RETURN
WRITE TO EEPROM:
The sub-routine to write to EEPROM is shown below. code
Delay1    MOVLW 13h       ;Create a 20mS delay
          MOVWF 1B        ;20 loops
Delay1a   NOP
          DECFSZ 1A,1     ;4uS x 256 loops=approx 1mS
          GOTO Delay1a
          DECFSZ 1B
          GOTO Delay1a
          RETLW 00        ;Return

EEWrite   MOVWF 08        ;W to EEData
          BSF 03,5        ;Switch to bank 1
          BCF 0B,7        ;Disable interrupts
          BSF 08,2        ;Write Enable bit set
          MOVLW 55h       ;Toggle EEPROM Control
          MOVWF 09           Register bits
          MOVLW 0AAh      ;Toggle EEPROM Control
          MOVWF 09           Register bits
          BSF 08,1        ;Begin write sequence
          CALL Delay1     ;Call Delay1
          BCF 08,2        ;Disable any further writes
          BSF 0B,7        ;Enable Interrupts
          BCF 03,5        ;Back to data bank 0
          RETURN          ;Return
End of Table
The end of a table can be detected in two different ways.
If a value such as FF is not used in any of the data, it can be used as an End of Table marker. The sub-routine calling the table must look for 0FFh to detect End of Table.
Table   ADDWF 02h,1   ;Add W to the Program Counter to create a jump.
        RETLW 3Fh     ;0 format= gfedcba
        RETLW 06h     ;1
        RETLW 5Bh     ;2
        RETLW 4Fh     ;3
        RETLW 66h     ;4
        RETLW 6Dh     ;5
        RETLW 7Dh     ;6
        RETLW 07h     ;7
        RETLW 7Fh     ;8
        RETLW 6Fh     ;9
        RETLW 0FFh    ;End of table mark
The other method is to count the number of items in a table and make sure the sub-routine calling the table doe not CALL values beyond this value.
FSR See Indirect Addressing
This is a special file called File Select Register. It has the address 04. It is not a file like the other files in the micro but a POINTER FILE and is used in conjunction with another file called INDF.
INDF has the address 00.
INDF is not actually a file but a robot arm. It grabs the contents (or delivers contents) to a file pointed to by FSR. These are two special files (devices) that allow very powerful (low instruction) programming to be produced.
For instance, if FSR is loaded with 0C, it will tell INDF to grab (or deliver) contents to file 0C.
To do this, we need the instructions:
MOVLW 0C
MOVF 04
If we now put 8Fh into INDF, the value will actually go into file 0C.
This is called INDIRECT ADDRESSING.
GOTO or Jump to a location according to a value in a file. (See Jump)
Halt
Do not use the word “Halt” as a label, the assembler does not like it. Use Loop, Pause, Stop, Wait. See Loop and Stop.
Halve (Half)
To halve (half - divide by two) the value of the contents of a file, it is shifted RIGHT (RRF 1A,1). The number must be an even number (it cannot have a bit in bit0).
Higher
To find out if a number is higher than a know value, a comparison is made. See Comparison.
Increment
To increment a file, use the instruction: INCF 2A,1. This puts the new value back into the file.
Using INCF 2A,0 puts the new value also into W!
To add two to a file, it can be incremented twice:
INCF 2A,1
INCF 2A,1
To double the value of a file, the contents is shifted left:
RLF 2A,1
A file can be incremented until it “rolls over to zero.” Normally a file is decremented to zero and a skip occurs when it is zero. But the same effect can be produced by incrementing a file:
INCFSZ, 2A,1
To increment W, use ADDLW, thus: ADDLW 01 or ADDLW 3Bh
Indirect Addressing
A number of files can be addressed by a sub-routine and the information can be moved into each file or read from each file. The files must be a group.
Suppose we have 8 files and need to read the contents and output it to a display.
The files are: 21h, 22h, 23h, 24h, 25h, 26h, 27h, and 28h.
There are two special files that allow a sub-routine to be created to look at the 8 files and read the contents.
They are: INDF and FSR
The INDF file is not a real file. It is like a Robot Arm. It reaches down the list of files and picks up the contents or delivers the contents of a file to the programmer. The file it reaches is determined by the value in FSR.
FSR is loaded with the address of the file you wish to read or write.
This arrangement has an advantage. By loading FSR with a value, you can reach a file and by incrementing FSR, you can reach the next file etc.
If you load a value into INDF, you will actually load the value into the file pointed to by FSR.
If you read INDF, you will actually read the contents of the file pointed to by FSR.
You can consecutively read 8, 10 or 20 files or clear 20 files or load into 20 or more files with a simple looping sub-routine. It’s a very powerful feature.
The following instructions put a value of 8Fh into file 21h.
MOVLW 21h   ;Load W with start of 8 files
MOVWF 04    ;Load 21h into FSR
MOVLW 8Fh   ;Put 8F into W
MOVWF 00    ;Put 8Fh into file 21h
The animation below shows how the information passes to the files:

Using INDF and FSR
The following instructions put a value of 8Fh into files 21h, 22h, 23h, 24h, 25h, 26h, 27h and 28h.
      MOVLW 08      ;8 loops of the program
      MOVWF 20h     ;File 20h is the decrementing file
      MOVLW 21h     ;Load W with start of 8 files
      MOVWF 04      ;Load 21h into FSR
      MOVLW 8Fh     ;Put 8F into W
Loop1 MOVWF 00      ;Put 8Fh into file 21h
      INCF 04       ;Increment FSR to make INDF go to next fil
      DECFSZ 20h
      GOTO Loop1
      RETURN
The following instructions read files 21h, 22h, 23h, 24h, 25h, 26h, 27h and 28h and output to port B (file 06).
      MOVLW 08      ;8 loops of the program
      MOVWF 20h     ;File 20h is the decrementing file
      MOVLW 21h     ;Load W with start of 8 files
      MOVWF 04      ;Load 21h into FSR
Loop1 MOVF 00,0     ;Copy file 21h (or next file) into W
      MOVWF 06      ;Move W to output Port B
      CALL Delay    ;Show value on 7-segment display etc
      INCF 04       ;Increment FSR to make INDF go to next file
      DECFSZ 20h
      GOTO Loop1
      RETURN
INDF See Indirect Addressing and FSR
This is a special file called INDirect File.
INDF has the address 00.
INDF is not actually a file but a robot arm. It grabs the contents (or delivers contents) to a file pointed to by FSR.
This is used in an operation called INDIRECT ADDRESSING.
Input
The files (also called Registers) we are dealing with in this section are actually the TRIS files. These are located in Bank1 and the address is 05 for PortA and 06 for PortB.
PortA for a PIC16F84 has 5 lines: RA0, RA1, RA2, RA3, and RA4.
PortB for a PIC16F84 has 8 lines: RB0, RB1, RB2, RB3, RB4, RB5, RB6, and RB7.
Port A is usually the input lines and Port B is usually the output lines.
To make a line INPUT, the corresponding TRIS bit must be “1.”
To make a line OUTPUT, the corresponding TRIS bit must be “0.”
To make a line INPUT (or OUTPUT), the instructions must be placed inside BSF 03,5 and BCF 03,5.
For example, to make the lowest line of Port A, an INPUT, the following instructions are needed:
BSF 03,5  ;Go to Bank 1
MOVLW 01  ;Load W with 0000 0001
MOVWF 05  ;Make RA0 input
BCF 03,5  ;Go to Bank 0 - the program memory area.
The other individual lines are:
MOVLW 02 ;Load W with 0000 0010
MOVWF 05 ;Make RA1 input
MOVLW 04 ;Load W with 0000 0100
MOVWF 05 ;Make RA2 input
MOVLW 08 ;Load W with 0000 1000
MOVWF 05 ;Make RA3 input
MOVLW 10 ;Load W with 0001 0000
MOVWF 05 ;Make RA4 input
MOVLW 20 ;Load W with 0010 0000
MOVWF 05 ;Make RA5 input
To make more than one line (with a single instruction) an input, the hex values are added.
MOVLW 0F ;Load W with 0000 1111
MOVWF 05 ;Make RA0, RA1, RA2, RA3 input
MOVLW 12 ;Load W with 0001 0010
MOVWF 05 ;Make RA1, RA4 input
This also applies to port B:
MOVLW 33 ;Load W with 0011 0011
MOVWF 06 ;Make RB0, RB1, RB4, RB5 input
Port direction can be changed at any time during the running of a program. You must make sure that any input or output devices on the line will not upset the running of the program.
In this case it is best to SET or CLEAR a BIT. This involves setting or clearing an individual bit. This prevents touching any other lines.
Eg: To make the lowest line of port B an input:
BSF 03,5  ;Go to Bank 1
BSF 06,0  ;Make RB0 input
BCF 03,5  ;Go to Bank 0 - the program memory area.
Carry out instructions using the input line, then make the line an output:
BSF 03,5  ;Go to Bank 1
BCF 06,0  ;Make RB0 output
BCF 03,5  ;Go to Bank 0 - the program memory area.
Jump or GOTO to a location according to a value in a file.
In theory, this will allow you to go to 256 different places in a program, but the instructions to do this will be huge. To GOTO say 8 different locations, use the following instructions. Use file 23h and load it with 0000 0001, 0000 0010, 0000 0100, or 00001000, etc and test the particular bit to see if it is CLEAR (0). If it is CLEAR, the micro will go down the program until it finds the bit which has been SET.
BSFSC 23h,0   ;
GOTO Link0    ;
BSFSC 23h,1   ;
GOTO Link1
BSFSC 23h,2
GOTO Link2
BSFSC 23h,30
GOTO Link3
etc
Less than - see Comparison
Load a file
This operation cannot be done directly. A number (a value) is called a LITERAL. It is loaded into W then the value in W is moved to a file. The two instructions are:
MOVLW 0FFh  ;Load a value (called a Literal) (00 to 0FFh) into W
MOVWF 1A    ;Move the value in W to a file
Look at an Input
There is no instruction called “look.” If a switch or button is connected to an input line such as the lowest line on Port A, the instruction is:
BTFSS 05,0  ;Is button pressed?
GOTO No     ;No
GOTO Yes    ;Yes
This assumes the switch is connected to the positive rail and the input goes HIGH when the button is pressed.
This instruction also works for a signal on line 05,0. You must make sure line 05,0 is an INPUT via the SetUp routine.
The two instructions after BTFSS 05,0 can be “GOTO Yes”, “GOTO No” by changing the first instruction. The decision will depend on the number of instructions for the “Yes” or “No” answer, as the instruction placed directly after BTFSS 05,0 must be a GOTO.
BTFSC 05,0  ;Is button pressed?
GOTO Yes    ;Yes
GOTO No     ;No
Loop
The action of looping is carried out for a number of reasons. The micro does not have a Halt or Stop feature and must carry out instructions at all times. A loop will hold the micro in one place.
To get out, a set of instructions such as “look” is needed inside the loop. These instructions see if a button has been pressed etc. Alternatively, if the watchdog timer is SET, the micro will come out of the loop and go to location 04. The instructions to create a loop are as follows:
Loop  NOP
      GOTO Loop
Lower
To find out if a number is lower than a know value, a comparison is made. See Comparison.
Macro
A Macro is similar to a sub-routine. You can call it from anywhere in a program. The aim of a macro is to save lines of code.
Some assemblers have built-in macros and recognise abbreviations such as the following:
Do not use these instructions unless you know EXACTLY what you are doing.
fr = file register
For instance, we will explain the following instruction in the table below:
Branch on No Zero to addr =
btfss 3, 2 goto addr. (file 3, bit 2 is the zero flag)
Test the zero flag. Skip if it is set. In other words skip if the zero flag is set, but BRANCH if it is not zero!
| Mnemonic | Description | Function |
|---|---|---|
| addcf fr, d | Add carry to fr | btfsc 3, 0 incf f,d |
| subcf fr, d | Subtract carry from fr | btfsc 3, 0 decf fr,d |
| negf fr, d | Negate file register fr | comf fr, 1 incf fr,d |
| b addr | Branch to addr | goto adddr |
| bz addr | Branch on Zero to addr | btfsc 3, 2 goto addr |
| bnz addr | Branch on No Zero to addr | btfss 3, 2 goto addr |
| bc addr | Branch on Carry to addr | btfsc 3, 0 goto addr |
| bnc addr | Branch on No Carry to addr | btfss 3, 0 goto addr |
| skpc | Skip on Carry | btfss 3, 0 |
| skpnc | Skip on No Carry | btfsc 3, 0 |
| skpz | Skip on Zero | btfss 3, 2 |
| skpnz | Skip on No Zero | btfsc 3, 2 |
| clrz | Clear Zero flag | bcf 3, 2 |
| setz | Set Zero flag | bsf 3, 2 |
| clrc | Clear Carry flag | bcf 3, 0 |
| setc | Set Carry flag | bsf 3, 0 |
| tstf fr | Test file register fr | movf fr, f |
| decbnz fr,addr | Decrement fr, if zero branch to addr | decfsz fr goto addr |
Main
The Main routine is constantly looped and generally consists of sub-routines that are CALLed.
Main  CALL Switch
      CALL Display
      CALL Beep
      GOTO Main     ;Loop Main
Mask
If you want to remove a number of bits from a file, the operation is called MASKING.
You can remove the high or low nibble (a nibble is a set of 4 bits) or any other bits. Any number from 0 - 7 can be obtained by masking (removing) bits 3,4,5,6,7, and leaving only bits 0, 1 and 2.
To mask (remove) the upper nibble, the number is ANDed with 0F. To mask the lower nibble, the number is ANDed with F0. (this is written: 0F0h in the program)
number:   1001
W:        0111
answer:   1111
          0000
          ____
          1001
          ____
          0000
MOVLW 97h   ;Put 97h into W
MOVWF 1A    ;Move 97h into file 1A
MOVLW 0F0h  ;put the "masking value" into W
ANDWF 1A,1  ;AND 97h with file 1A. The result will be in file 1A.
More than - see Comparison
Move a file to W
The contents of a file can be moved to W with the following instruction:
MOVF 1A,0 The contents are actually COPIED. The original file still holds the contents.
Move a file to another file
The contents of a file can be moved to another file via the following instructions. It is firstly copied to W then W is copied to the new file:
MOVF 1A,0   ;The contents of file 1A is copied to W
MOVWF 1B    ;W is copied to file 1B
Multiply
Simple multiplication such as multiply by 2 can be performed by the RLF instruction. Successive RLF’s will multiply by 4, 8, sixteen etc. You need to be careful as this is called a “blind” operation.
A number such as 80h (128) will not be doubled as 1000 0000 will be moved to the left and the top bit will be passed to the Carry. Only numbers up to 7F (127) can be doubled.
To multiply by 2:
RLF 0C,1 ;The contents of file 1A is doubled
To multiply any two numbers together requires a program. Since the PIC16F84 does not have any multiply function, it is carried out by successive ADDITIONS. A number from 01 to 255 can be multiplied by 01 to 255.
To multiply 75(4Bh) by 122(7A), 122 is added to a file 75 times. It needs two files to hold the answer.
    CLRF 1B       ;Clear the receiving file
    CLRF 1C       ;Clear the receiving file
    MOVLW 7Ah     ;122
    MOVWF 1A,1    ;file 1A holds 122
    MOVLW 4B      ;75
M1  ADDWF 1B,1    ;ADD 75 to file 1B
    BTFSS 03,0    ;Test Carry bit in status
    GOTO M2       ;file. CLEAR = no carry
    INCF 1C,1     ; SET = carry
M2  DECFSZ 1A,1
    GOTO M1
    RETURN
The result is a 16 bit binary number of the form: file 1C, file 1B \= 0000 0000 0000 0000
To multiply two numbers and obtain a decimal result requires a different program.
Nested Delay
See Delay
Origin - ORG
This is a pseudo instruction that tells the assembler where to place the next instruction. ORG must have a value. For ORG 000, the next real instruction will be placed at memory location 000.
For ORG 1CC, the next instruction will be placed at address location 1CC as shown below:
      ORG 000               ;Start of program in memory
SetUp MOVLW 08              ;
      TRIS 06
      OPTION 0DFh           ;
      - - - - - - - - - -
      - - - - - - - - - -
      ORG 1CC               ;Next instruction will be placed at location 1CC
Main  CALL Switch
      CALL Display
      CALL Beep
      GOTO Main
Output a Table Value see also Table
Suppose file 1A contains 05 and this corresponds to the figure “5” on a 7-segment display.
Here are the instructions:
Table  ADDWF 02h,1  ;Add W to the Program Counter to create a jump.
       RETLW 3Fh    ;0 format= gfedcba
       RETLW 06h    ;1
       RETLW 5Bh    ;2
       RETLW 4Fh    ;3
       RETLW 66h    ;4
       RETLW 6Dh    ;5
       RETLW 7Dh    ;6
       RETLW 07h    ;7
       RETLW 7Fh    ;8
       RETLW 6Fh    ;9

       MOVF 1A,0    ;File 1A contains 05. Move it to W
       CALL Table   ;W will return with display-value for "5" (6D)
       MOVWF 06     ;Output display value to 7-segment display
Output a Value
The output ports for a PIC16F84 are actually FILES or REGISTERS! Port A is file 05 and Port B is file 06.
Port A has 5 lines, called RA0, RA1, RA2, RA3, and RA4.
Port B has 8 lines, called RB0, RB1, RB2, RB3, RB4, RB5, RB6 and RB7.
Each line can deliver approx 25mA. The maximum total current for the chip is about 150mA.
An output line can be HIGH or LOW. Each output line corresponds to a bit in the file associated with the port. When the bit is SET, the line is HIGH. When the bit is CLEAR, the line is LOW.
Before you can make a line HIGH or LOW, the file must be “configured.” This means each bit must be made an OUTPUT. This is done via the TRIS file. The TRIS 05 file operates on file 05 = Port A, and TRIS 06 operates on file 06 = Port B.
Any line can be made either an input or an output at any time during the running of a program and to make a line INPUT, the corresponding bit in the TRIS file is made “1.” To make a line OUTPUT, the corresponding bit in the TRIS file is made”0.”
There are two ways to get to the TRIS file. One is directly via the instruction TRIS 05 or TRIS 06.
MOVLW 03  ;Load 0000 0011 into W
TRIS 05   ;Make RA2 and RA3 and RA4 output.
The other is via the two instructions: BSF 03,5 and BCF 03,5. These instructions allow you to go to bank1 where the TRIS file is located. When in Bank1, the TRIS file is called 05 and 06.
BSF 03,5  ;Go to Bank 1
MOVLW 00  ;Load W with 0000 0000
MOVWF 06  ;Make all Port B output
BCF 03,5  ;Go to Bank 0 - the program memory area.
Any lines that are made output can be made HIGH or LOW.
MOVLW 1Ch   ;Load 0001 1100 into W
MOVWF 05    ;Make RA2 and RA3 and RA4 HIGH.
MOVLW 0FFh  ;Load W with 1111 1111
MOVWF 06    ;Make all Port B HIGH
Poll See also Switch
The action of POLLING means to ”look at - on a regular basis.” It generally refers to an input device such as switch or push button. A push button can be pressed and released in less than 10th second and this means it must be scanned or polled 10 times a second (100mS).
This means you have 100,000 machine cycles available between “looks.”
Most programs consist of a Main routine and this is looped on a regular basis. As a program gets larger and larger, the Main routine may loop at a slower rate (mainly due to delay sub-routines needed for some of the operations) and you may exceed the 100,000 limit.
The answer is to place the “look” feature inside the delay sub-routine. The following sub-routine has a ”Look” feature inside a Delay:
Delay   MOVLW 01h           ;Approx 300mS per "unit"
        MOVWF 1C
Delay1  NOP
        DECFSZ 1A,1
        GOTO Delay1
        BTFSS 05,0          ;Look at push-button line on port A
        GOTO Not            ;Button not pressed
        BSF 1F,0            ;Set button-press flag
        RETURN
Not     BCF 1F,0            ;Clear button-press flag
        BCF 1F,1            ;Clear "action" flag
Delay2  DECFSZ 1B,1
        GOTO Delay1
        DECFSZ 1C,1
        GOTO Delay1
        RETURN

Main    CALL Delay
        other instructions
        BTFSS 1F,0          ;Has button been pushed?
        GOTO Main           ;No.
        BTFSC 1F,1          ;Yes. Has "action" already been performed?
        GOTO Main           ;Yes.
        BSF 1F,1            ;No.
        CALL Action
        GOTO Main
The Delay sub-routine includes instructions to look at a button and set a flag (BSF 1F,0) when it is pressed.
The micro comes out of the Delay routine with the flag is SET. The flag is then looked at in Main and the appropriate sub-routine is executed.
This sequence may be executed very quickly and the micro may return to Delay before the button is released. The “action” flag (BTFSC 1F,1) prevents the action being carried out more than once for a single button-press.
When the button is released, both flags are cleared.
Random number see also Mask
A truly random number cannot be generated by a computer as a sequence is nearly always produced. However it can be created by monitoring human intervention - such as the pressing of a button etc. Put the random number file in a place where it will increment regularly and where human involvement will cause the number of cycles etc to change by an unknown amount.
INCF 11h,1 ;Increment the random number
The random number file will then need to be MASKED to obtain a set of bits and incremented if zero is not needed.
Read a File
Files can be used to store temporary data.
Read Data
The PIC16F84 does not have a feature such as “Read Data” or “Read an Instruction.” Data can be added into a program in the form of a table (see Table) and this data cannot be altered.
Temporary data can be stored in a file or set of files. There are 68 files (from 0C to 4F) in the PIC16F84.
Remove bits see Mask
Return
This instruction must be somewhere in each sub-routine. It is generally at the end, but clever programming may allow the micro to Return part-way through the routine.
RETLW 00 to FF - Return with Literal in W
A sub-routine can carry out an operation and set a flag. Alternatively it can return with a value in W.
If a sub-routine generates two or three different result, the RETLW 00 to FF instruction can Return with the appropriate value in W. RETLW 00 to FF is used for each value of data in a Table. (see Table)
Rotate
This is the same as SHIFT. All the bits in a file are moved to the left or right through the CARRY.
Carry is located in the STATUS file (03,0).
It requires 9 shifts (rotates) to get the bits back to the original position.
The CARRY must be cleared (BCF 03,0) if you don’t want it to appear in the file.
RLF (Rotate Left File) increases the value of the contents (doubles the value).
RRF (Rotate Right File) decreases the value of the contents (halves the value).
Same
To find out if two numbers are the same, they are XORed together. See XOR and Comparison
SetUp
The first sub-routine in a program is SetUp. It sets the direction for each Input/Output line and clears any other files to get them ready for incrementing etc.
To make a line INPUT or OUTPUT, see INPUT, OUTPUT.
Instructions between BSF 03,5 and BCF 03,5 are dealing with files files in Bank 1. For instance, if files 05 is loaded with 02, this is actually the TRIS A file. CLRF 06 is clearing the file called TRIS B. This file controls the direction of the Input/Output lines of Port B and when it contains 0’s, all the lines are output.
        ORG 0       ;This is the start of memory for the program.
SetUp   BSF 03,5    ;Go to Bank 1
        MOVLW 02    ;Load W with 0000 0010
        MOVWF 05    ;Make RA1 input
        CLRF 06     ;Make all port B output
        BCF 03,5    ;Go to Bank 0 - the program memory area.
        CLRF 1F     ;Clear flag file
        CLRF 05     ;Clear Port A (RA0 - RA4)
        CLRF 06     ;Clear Port B (RB0 - RB7)
        GOTO Main
To make SetUp suitable for both a PIC12C508A and PIC16F84, use the following:
        ORG 0         ;This is the start of memory for the program.
SetUp   MOVLW 08      ;Load W with 0000 1000
        TRIS 06       ;Make RB3, (GP3) input
        OPTION 0DFh   ;Make GP2 an output & disable weak pullups
        MOVLW 17h     ;Make GP0, GP1, GP2, GP4, GP5 HIGH
        MOVWF 06
        GOTO Main
Shift see Rotate
SLEEP
This instruction puts the micro to sleep. This is also called “power-down mode.”
The micro stops executing the program when it comes to this instruction.
If the Watchdog Timer is enabled, it will be cleared but will keep incrementing.
The In/Out lines maintain the status they had before SLEEP was executed.
For the lowest consumption in SLEEP, all output lines must not drive any circuitry before the SLEEP instruction.
On-chip pull-ups must also be turned off to reduce the current consumption during SLEEP.
The micro will wake up from SLEEP via one of the following:
- Taking MCLR pin LOW
- Watchdog Timer wake-up (if watchdog is enabled)
- Interrupt from GP2/INT pin
- GPIO change
- Peripheral interrupt.
On wake-up from SLEEP, the WDT is cleared.
When the SLEEP instruction is being executed, the next instruction (PC + 1) is pre-fetched. For the micro to wake up through an interrupt event, the corresponding interrupt enable bit must be set (enabled). Wake up is regardless of the state of the GIE bit. If the GIE bit is clear (disabled) the micro continues execution at the instruction after SLEEP. If the GIE bit is set (enabled) the micro executes the instruction after SLEEP then branches to the interrupt address (004h). In the case where the instruction following SLEEP is not desirable, the user should have a NOP after the SLEEP instruction.
The TO and PD bits in the STATUS register can be used to determine the cause of RESET. The PD bit, which is set on power-up, is cleared when SLEEP is invoked. The TO bit is cleared if WDT wake-up occurred.
The SLEEP instruction is:
sleep
To send the micro to the “sleep_micro” sub-routine, the following instruction is needed:
goto sleep_micro
The simplest sub-routine for SLEEP is:
sleep_micro
sleep
If the Watchdog timer is enabled, the micro will come out of SLEEP and goto main.
The watchdog will reset after 18,000uS (18m) and wake the micro.
If 18mS is too short, a prescaler can be added to increase the WDT time by 2, 4, 8, 16, 32, 64 or 128. The maximum time is 18mS x 128 = 2.3sec
The micro contains an 8-bit prescaler register that can be assigned to Timer0 or Watchdog. This prescaler register is not readable or writable.
To set the prescaler to the WDT, bit 3 of the OPTION REGister must be set. The instruction is:
  bsf   STATUS, RP0  ;select bank 1
  bsf   OPTION_REG,3
or
  movlw  b'xxxx1xxx'
  movwf  OPTION_REG

  bcf   STATUS, RP0  ;select bank 0
The three lowest bits of the Option register set the timing for the WDT:
  bsf    STATUS, RP0 ;select bank 1

  movlw  b'xxxxx000'
  movwf  OPTION_REG  ;WDT timer = 18mS
or:
  movlw  b'xxxxx001'
  movwf  OPTION_REG  ;WDT timer  = 36mS
or:
  movlw  b'xxxxx010'
  movwf  OPTION_REG  ;WDT timer  = 72mS  etc  etc
or:
  movlw  b'xxxxx111'
  movwf  OPTION_REG  ;WDT timer  = 2,304mS = 2.3 Seconds

  bcf    STATUS, RP0 ;select bank 0
GPIO CHANGE
If you want the micro to come out of sleep when the voltage-level changes on any input line, the WDT must be turned off. This must be done during burning the program into the chip. (You will not have the advantage of the watchdog timer to reset the micro if it runs off the end of the program.)
  movlw  b'xxxx1xxx'  ; Enable GPIO port change interrupt (but NOT GIE)
  movwf  INTCON
Make at least one of the in-out pins an input:
  bsf    STATUS, RP0  ;select bank 1
  movlw  b'xxxx1xxx'  ;make GP3 input
  movwf  TRISIO
  bcf    STATUS, RP0  ;select bank 0
Add the SLEEP instruction to the program:
goto sleep_micro
Add the SLEEP sub-routine:
sleep_micro
    sleep
Alternately, a SLEEP instruction can be added to a program. In the program below, the micro will stop executing instructions when it reaches “sleep” and wait for a “time-out” of the WDT or a change in GPIO (depending on the setting in INTCON.) If the GIE bit is set, the micro will execute “instruction A” (after sleep) and go to the interrupt address (004h).
instruction
instruction
instruction
sleep
instruction A - this instruction can be anything but a GOTO instruction.
no further instructions
If you don’t want an instruction after “sleep” use: NOP.
The Global Interrupt feature is enabled by setting bit 7 of the INTCON register. For this and other features of SLEEP see: PIC12F629 Data Sheet (.pdf 4,926KB)
Stack
This is an area where up to 8 addresses are placed, when a CALL is made - 8 CALLs- 8 addresses in the stack. When an address is put on the stack it is called PUSH and when it is removed, it is called POP. If more than 8 address are placed on the stack, the first address is lost off the end. That’s why you cannot have any more than 8 CALLs. When a return is made, the CALL number is reduced.
The PIC16F84 can have a CALL instruction that CALLs another sub-routine and the sub-routines CALLs another sub-routine and that sub-routine CALLS another sub-routine until 8 CALLs are made.
The 8th sub-routine will have a RETURN to go back the the previous sub-routine and each sub-routine will have a RETURN until finally the micro returns to Main.
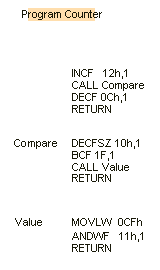
The animation below shows a CALL in a sub-routine CALLing another sub-routine and this sub-routine CALLs another sub-routine. The Program Counter makes the micro carry out the instructions:
A PIC12C508A has only a 2-CALL stack. This means the Main routine can CALL a sub-routine and the sub-routine can call another sub-routine. This is the limit of the chip.
Stop see also Wait.
The microcontroller does not have a Stop instruction. Do not use the word “Halt” as a label, the assembler does not like it. Use Loop, Pause, Wait. See Loop.
To create a “waiting loop” use the following instructions:
Loop  NOP         ;Hold the micro in a loop
      GOTO Loop
When testing a program, you may need to know if the microcontroller has advanced to a certain part of the program.
Insert the instruction: GOTO Wait.
Insert the following instructions. They should include an output to a LED etc so you can prove the micro has entered the loop.
Wait  NOP         ;Hold the micro in a loop
      MOVLW 1Ch
      MOVWF 06    ;Put "u" on 7-segment display
      GOTO Wait
Store Data
The PIC16F84 has two ways to store data.
If you need to store only a few bytes of data for a short period of time, use files that are not required in any of the running of the program.
This information will be lost when power is removed.
If you want to store data permanently, the PIC16F84 has 64 bytes of EEPROM.
This requires a special routine - found under EEPROM.
SWAP
PIC language has a SWAP NIBBLES instruction. It swaps the HIGH nibble with the LOW nibble. Swapping INDF (file 00) actually swaps the nibbles in the file pointed to by FSR.
SWAPF 1A,1 ;Before: File 1A = 81h After: File 1A = 18h
SWAP THE CONTENTS OF TWO FILES
Example: File 0C = 81h
File 0D = 47h
File 0E = temp storage
MOVF 0C,0     ;Move 0C to W
MOVWF 0E,1    ;Move W to 0E
MOVWF 0D,0    ;Move 0D to W
MOVWF 0C,1    ;Move W to 0C
MOVF 0E,0     ;Move 0E to W
MOVWF 0D,1    ;Move W to 0D
Switch (button, key) see also Poll
There is no difference between “Switch,” “Button” and “Key.” They all refer to a push button that has momentary action. It can be an individual push button, one of a number of buttons or in a matrix of buttons such as a keypad.
With all button instructions, there are three important things to remember. They are mechanical devices and their action is very slow in “microprocessor-time.” They produce a lot of pulses when pushed and also when released (this is called switch-noise or switch-bounce). In any button routine, you must also prevent a button-press being registered more than once.
Many sub-routines already have a switch or button feature included in them. Select an existing sub-routine or use the following.
The most important part of adding a switch or button routine is creating the debounce feature.
This is to prevent “double-counting” when the button is pushed or released. Try slow-pressing and slow-release to see if the program produces a false result. If the program “double-counts,” you will have to increase the debounce-time.
Debounce can take up a lot of computer-time. Debounce is a delay routine that “masks” (hides - or disallows) the time when the button is pressed or released, so that only one pulse is detected. Instead of producing a separate debounce routines, you may be able to use the time taken to execute other sub-routines. In other words, the program looks before and after the execution of another routine and if the button is still pressed, the micro detects it as a “button-press.”
Finally, you need to detect the first press of a button and prevent the program operating on the button during the second pass of the program.
The basis of detecting a button-press consists of 6 separate items that must be placed in the following order:
There are two flags. Bit0 in file 1F is the Debounce Flag and Bit1 in file 1F is the Button Pressed flag.
The microprocessor executes Main and CALLs Sw. If Sw detects a key-press, two flags are SET. The first is the Button Pressed flag and the second is the Debounce flag.
The micro returns to Main and tests the Button Pressed flag to see if it is SET. If is is SET, the micro goes to a sub-routine such as CALL Increment, where a value can be incremented. The Button Pressed flag is then cleared and the micro CALLs Sw. If the switch is still pressed, the micro will return. The program is looking for the button to be released. When the button is released, the Sw sub-routine is ready to detect another button-push.
SetUp   BSF 03,5          ;Go to Bank 1
        MOVLW 01          ;Put 01 into W
        MOVWF 05          ;Make RA0 input
        BCF 03,5          ;Go to Bank 0
        CLRF 1F           ;Clear the button-press file
        GOTO Main

Sw      BTFSS 05,0        ;Test the button. Button is "Active HIGH"
        GOTO Sw2          ;Button not pressed
        BTFSC 1F,0        ;Button pressed first time?  Test debounce flag
        RETURN            ;Button already pressed. Return to Main
Sw1     DECFSZ 1A,1       ;Create short delay
        GOTO Sw1          ;Look again
        BTFSS 05,0        ;Is switch still pressed?
        GOTO Sw2          ;It was only noise
        BSF 1F,1          ;Button Pressed.  Set button-pressed flag
        BSF 1F,0          ;Set debounce flag
        RETURN            ;Return to Main
Sw2     BCF 1F,0          ;Clear debounce flag
        RETURN            ;Return to Main

Main    CALL Sw
        BTFSC 1F,1        ;Test button-press flag to see if button was pressed
        GOTO Main2        ;Button pressed
        Display the values ;Button not pressed
        on a display etc.
        GOTO Main
Main2   CALL Increment    ;Increment the display. (you provide the routine)
        BCF 1F,1          ;Clear the button-press flag
        GOTO Main
Table see also Output a Table Value and CALL Table
The layout for a Table is shown below:
Table ADDWF 02h,1   ;Add W to the Program Counter to create a jump.
      RETLW 3Fh     ;0 format= gfedcba
      RETLW 06h     ;1
      RETLW 5Bh     ;2
      RETLW 4Fh     ;3
      RETLW 66h     ;4
      RETLW 6Dh     ;5
      RETLW 7Dh     ;6
      RETLW 07h     ;7
      RETLW 7Fh     ;8
      RETLW 6Fh     ;9
Toggle
The direction of a line can be changed from Input to Output or vice versa to create a tone or other feature.
The instructions below do not know the initial condition of the line. They simply reverses the state. The instructions are:
MOVLW 01h   ;Put 01 into W
XORWF 06,1  ;XOR 01 with Port B, lowest line (RB0)
The following instructions apply to the other lines: Port A (05) can also be toggled.
MOVLW 02h   ;Put 0000 0010 into W
XORWF 06,1  ;XOR 02 with Port B, for RB1

MOVLW 04h   ;Put 0000 0100 into W
XORWF 06,1  ;XOR 04 with Port B, for RB2

MOVLW 08h   ;Put 0000 1000 into W
XORWF 06,1  ;XOR 08 with Port B, for RB3

MOVLW 10h   ;Put 0001 0000 into W
XORWF 06,1  ;XOR 10h with Port B, for RB4

MOVLW 20h   ;Put 0010 0000 into W
XORWF 06,1  ;XOR 20h with Port B, for RB5

MOVLW 40h   ;Put 0100 0000 into W
XORWF 06,1  ;XOR 40h with Port B, for RB6
Tone see also Beep
When a line is taken HIGH then LOW at a rapid rate, a tone is produced in a piezo or speaker. A buffer transistor (amplifier) may be needed.
The simplest tone takes a line HIGH, then executes a delay. The line is taken LOW and a delay is executed. This process is repeated. The following routine shows how a tone is produced. The micro never comes out of the Tone sub-routine. It is only suitable as an “end of the line” sub-routine.
Tone  NOP
      DECFSZ 1A,1
      GOTO Tone
      MOVLW 80h     ;Put 80 into W
      XORWF 06,1    ;XOR 80 with Port B. Toggle RB7
      GOTO Tone
To get the micro out of the Tone routine is must have a “duration.” The pitch of the tone can also be changed:
Tone  MOVLW 10h     ;The duration of the tone or "beep"
      MOVWF 1B
Tone1 MOVLW 80h     ;The length of  HIGH and LOW - frequency of tone
      MOVLW 1A
Tone2 NOP
      DECFSZ 1A,1
      GOTO Tone2
      MOVLW 80h     ;Put 80 into W
      XORWF 06,1    ;XOR 80 with Port B. Toggle RB7
      DECFSZ 1B,1
      GOTO Tone1
      RETURN
TRIS
The file that determines the in/out state of each line in a Port is the TRIS file.
It is located in Bank1 of the microcontroller. It has a value of 05 for Port A and 06 for Port B.
Port A only has RA0, RA1, RA2, RA3, and RA4. Eg: MOVLW 0FFh will only affect the 5 input lines of port A. Bits 5, 6, and 7 of a value will not have any effect.
There are two ways to get to the TRIS file. It can be accessed directly by adding the following two instructions directly into your program at any location:
MOVLW 01h   ;Put 01 into W
TRIS 05     ;Make RA0 an input and all others output
The following instructions apply to the other lines: Port B (06) can also be operated on.
PortA:  MOVLW 02h   ;Put 0000 0010 into W
        TRIS 05     ;Make RA1 an input and all others output

        MOVLW 04h   ;Put 0000 0100 into W
        TRIS 05     ;Make RA2 an input and all others output

        MOVLW 08h   ;Put 0000 1000 into W
        TRIS 05     ;Make RA3 an input and all others output

        MOVLW 10h   ;Put 0001 0000 into W
        TRIS 05     ;Make RA4 an input and all others output

        MOVLW 20h   ;Put 0010 0000 into W
        TRIS 05     ;Will make all output!

        MOVLW 1Fh   ;Put 0001 1111 into W
        TRIS 05     ;Will make all input!

PortB:  MOVLW 40h   ;Put 0100 0000 into W
        TRIS 06     ;Make RB6 an input and all others output
                    ;(most PortB lines are used as outputs.)
The TRIS file can also be accessed by inserting BSF 03,5 BCF 03,5 instructions into your program.
The BSF 05,3 instruction takes you to Bank1 where the TRIS file is located. When in Bank1, the TRIS file for PortA is file 05 and the TRIS file for PortB is file 06. See SetUp for details of the instructions to be inserted between BSF 03,5 and BCF 03,5.
BSF 03,5        ;Go to Bank 1
- - - - - - -
- - - - - - -
BCF 03,5  `     ;Go to Bank 0 - the program memory area.
Wait see also Stop.
When testing a program, you may need to know if the microcontroller has advanced to a certain part of the program.
Insert the instruction: GOTO Wait.
Insert the following instructions. They should include an output to a LED etc so you can prove the micro has entered the loop.
Wait  NOP         ;Hold the micro in a loop
      MOVLW 1Ch
      MOVWF 06    ;Put "u" on 7-segment display
      GOTO Wait
Watchdog Timer (WDT)
The PIC16F84 has an inbuilt timer that increments all the time. It has a normal time-out period of 18mS (18,000 instruction-cycles). You cannot turn the timer on or off via the program. It is turned on (or off) during the burning of the program by setting WDT in the __config file.
To turn the watchdog timer off: & _WDT_OFF
To turn the watchdog timer on: & _WDT_ON
If it is active (turned ON) the micro will go to 000 (reset) after 18,000uS.
This action has a purpose.
If a program is badly designed, it may “run off the end of the program” and start executing “junk” commands. A glitch may cause the micro to go to an incorrect part of a program to cause it to “Freeze.” To prevent this from occurring, the WDT takes the micro back to the beginning and starts the program over again.
To prevent the WDT constantly resetting a program, the WDT must be constantly reset via the instruction CLRWDT. This gives the programmer another 18,000 instructions before having to reset the WDT.
To keep WDT constantly reset, CLRWDT must be placed inside delays.
Normal programming (experimenting etc) is carried out with WDT OFF.
If 18mS is insufficient a prescaler can be added to increase the WDT time by 2, 4, 8, 16, 32, 64 or 128. The maximum time is 18mS x 128 = 2.4sec
XOR - XOR detects a MATCH!
XOR is called exclusive OR.
It means the only time the output of a gate is HIGH is when ONE (and ONLY one) of the inputs is HIGH.
When two numbers are XORed together, the result is “1” when one (and only one) of the numbers is “1.” [The OR function is called inclusive OR see IOR].
To find out if two numbers are the same, they are XORed together. Since each binary digit will be the same (i.e. either a 0 or 1) the result will be 0000 0000. The result will set the zero flag in the status (03) file and by testing bit 2 (the Z flag) you can skip when SET.
You also have to decide where you want the result to be placed. If you don’t want the value of the file to be altered, the result should be put into W.
Example: To see if file 1E holds the value 3C. (file 1E does contain the value 3C)
MOVLW 3C    ;Put 3C in W
XORWF 1E,0  ;XOR 3C with file 1E and put the result into W.
The micro will XOR file 1E with the value 3C.
We know file 1E contains the value 3C, so the operation is:
W: 0011 1100
1E: 0011 1100
0000 0000 - this answer will be put into W
In this example, 3C is put into file 1E and the XOR operation is carried out:
MOVLW 3C      ;Put 3C in W
MOVWF 1E      :Put 3C into file 1E
XORLW 3C      ;XOR 3C with file 1E and put the result into W.
BTFSS 03,2    ;Test the Zero flag
GOTO clear
GOTO SET
The zero flag will be set. (The zero flag is SET to show the answer is zero) i.e: a MATCH! and the program will go to the line GOTO SET.
Zero Flag
The zero flag is found in the STATUS register (file 03). It is bit 2. When the result of an operations is zero, the zero flag is SET. In other words it is = 1.
Zero a file
A file can be made zero in two ways. To zero a file is the same as clear a file.
The instruction CLRF 1A makes the contents zero.
CLRF 1A ;Make file 1A zero.
You can load 00 into W and move W to a file:
MOVLW 00  ;Put 00 into W
MOVWF 1A  ;Make file 1A zero.
Zero in a file (test for)
To see if a file is zero, move it in and out of itself. The Z flag will be affected. If it is SET, the file contains 00h.
MOVF 1A,1     ;Move 1A in and out of 1A
BTFSS 03,2    ;Test the zero flag
___________   ;Micro goes here if 1A is NOT zero
___________   ;Micro goes here if 1A is zero.

Quick Links
Legal Stuff
Social Media