

Table Of Contents
TIMING AND DELAYS
PIC LAB-1 is capable of performing all types of timing and Delay operations.
Don’t let the single external output on the board put you off. You can design programs for one or more outputs and use the 8 LEDs on the board to indicate the state of each output. A new PC board can then be made with relays and driver transistors.
You should also leave the LEDs on the board to show the state of each output at any particular instant. This is a very clever inclusion as it helps with diagnosis and keeps track of the state of each output.
Timing can start at microseconds and extend to hours, days or months.
You can have number of random on-off cycles within a program and even include over-riding inputs such as switches and sensors, to vary the timing cycles.
This section covers a number of experiments, starting with a simple program and advancing to complex routines with a switch input and a liquid-level sensor (using the “pot” input to detect water conductivity).
Timing and Delays are the same thing. They all use a DELAY routine. A Delay Routine is a “Do Nothing” routine. It consists of instructions that take time to execute without anything appearing on a display, or anything else happening.
Before executing a delay, an output can be “set-up” to display a number or value, or a set of LEDs can be illuminated. The delay then allows the eye to view the display, before removing it and displaying another value.
The same thing can happen to produce a tone. The speaker or piezo is delivered a HIGH and a delay routine is executed. The piezo is then delivered a LOW and a delay routine is called. The action of delivering a HIGH then LOW then HIGH etc will activate the piezo to produce a sound.
The microcontroller we are using operates at one million instructions per second so the only way to create a program requiring 200,000 instructions, for example, is to create a loop. This is a set of instructions that are executed over and over. Each time they are executed, a file is reduced in value.
A file contains 256 and this will produce 256 loops. If each loop takes 4 micro-seconds, we have a 1,000 microsecond delay. This is 1 millisecond.
If this loop is called a number of times by another file, we are already starting to build up a delay of significant duration.
Delay routines can be designed with loops inside a loop and even three of four loops can be inside other loops. These are called NESTED LOOPS and very soon we have a delay routine that takes minutes, hours and even days to execute.
EXACT VALUES
One of the challenges is to produce a delay routine that has an exact execution value. This is needed if you want to produce accurate timing for a clock etc.
Since we are using an RC oscillator in the PIC LAB-1, the execution times will not be exact, however it is very easy to increase or decrease their duration to suit an application.
For exact time intervals, a crystal is needed for the oscillator and this can be the subject for a future experiment.
Normally, a long delay is not executed by a micro as any push-buttons in the program will not be detected during this time. The answer is to include a button-press feature inside a short delay routine so that they remain operative. You will see this feature in Expt 20b.
The first experiment produces a beep every minute.
      ;Expt20.asm
      ;Project: 1 min timer with beep
List P = 16F84
#include <p16F84.inc>
__CONFIG 1Bh ;_CP_OFF & _PWRTE_ON & _WDT_OFF & _RC_OSC

      ORG 0             ;This is the start of memory for the program.
SetUp BSF 03,5          ;Go to Bank 1
      CLRF 06           ;Make all Port B output
      BCF 03,5          ;Go to Bank 0 - the program memory area.
      CLRF 05           ;Blank the display
      CLRF 06           ;Blank the display
      GOTO Main

Delay MOVLW 0F1h        ;Create 1 minute delay
      MOVWF 1C
Delay1  NOP
      DECFSZ 1A,1
      GOTO Delay1
      DECFSZ 1B,1
      GOTO Delay1
      DECFSZ 1C,1
      GOTO Delay1
      RETURN

Beep  MOVLW 1Ah         ;Length of the Beep
      MOVWF 12h
Beep1 MOVLW 40h         ;The HIGH/LOW time
      MOVWF 13h
Beep2  DECFSZ 13h,1     ;Time for ON and OFF periods
      GOTO Beep2
      MOVLW 80h         ;Toggle the Piezo line
      XORWF 06,1
      DECFSZ 14,1       ;256 loops of ON/OFF
      GOTO Beep1
      DECFSZ 12h,1
      GOTO Beep1
      BCF 06,7          ;Turn off piezo bit
      RETURN

Main  CALL Delay
      CALL Beep
      GOTO Main         ;Loop Main

      END               ;Tells assembler end of program
The time can be altered by approx 0.25sec with each increment or decrement of the value placed in file 1C. This file is the outer file of the nested loop. Small increments or decrements can be obtained by adjusting the length of the beep.
TURNING A TIMER ON AND OFF
You can turn the beep on and off by the action of a push button and have the display show “0” for off and “1” for on.
This involves more programming and the following experiment shows this feature:
   ;Expt20a.asm
   ;Project: 5 sec timer with on/off
List P = 16F84
#include <p16F84.inc>
__CONFIG 1Bh ;_CP_OFF & _PWRTE_ON & _WDT_OFF & _RC_OSC

      ORG 0             ;Start of memory
SetUp BSF 03,5          ;Go to Bank 1
      MOVLW 01          ;Load W with 01
      MOVWF 05          ;Make RA0 input
      CLRF 06           ;Make all Port B output
      BCF 03,5          ;Go to Bank 0
      CLRF 05           ;Blank the display
      CLRF 06           ;Blank the display
      CLRF 1F           ;Clear the button-press flag
      GOTO Main

Delay MOVLW 010h        ;Create 5 second delay
      MOVWF 1C
Delay1  NOP
      DECFSZ 1A,1
      GOTO Delay1
      BTFSS 05,0        ;Test the button line on port A
      GOTO Not          ;Button not pressed
      BTFSC 1F,0        ;Button pressed first time?
      GOTO Delay2       ;Button already pressed
      MOVLW 02          ;First time button pressed
      XORWF 1F,1        ;Toggle the on/off flag
      BSF 1F,0          ;Set button-press flag
      BTFSS 1F,1
      GOTO Off
      MOVLW 06
      MOVWF 06
      GOTO Delay2
Off   MOVLW 3Fh
      MOVWF 06
      GOTO Delay2
Not   BCF 1F,0          ;Clear button-press flag
Delay2  DECFSZ 1B,1
      GOTO Delay1
      DECFSZ 1C,1
      GOTO Delay1
      RETURN

Beep  MOVLW 1Ah         ;Length of the Beep
      MOVWF 12h
Beep1 MOVLW 40h         ;The HIGH/LOW time
      MOVWF 13h
Beep2 DECFSZ 13h,1      ;Time for ON and OFF periods
      GOTO Beep2
      MOVLW 80h         ;Toggle the Piezo line
      XORWF 06,1
      DECFSZ 14,1       ;256 loops of ON/OFF
      GOTO Beep1
      DECFSZ 12h,1
      GOTO Beep1
      BCF 06,7          ;Turn off piezo bit
      RETURN

Main  CALL Delay
      BTFSS 1F,1        ;Test on/off flag
      GOTO Main
      CALL Beep
      GOTO Main         ;Loop Main

      END               ;Tells assembler end of program
You can increase the time, add two beeps, create a 10 second, 30 second, 10 second, 30 second timer or any number of effects.
A LONG DELAY
A very long delay can be produced by using Expt20a and calling the 1 minute sub-routine a number of times. The push-button starts the timing and the beep is constant at the end of the timing cycle.
(For demonstration purposes, the time is 2 x 5 seconds). The duration of the beep routine has been shortened so that the start/stop action in Main works instantly.
For a time-length of 256 x 1 minute, load file 1C in Delay with 0C0h and load file 0Ch in Main with 256.
      ;Expt20b.asm
      ;Project: 10 sec timer with start/stop
List P = 16F84
#include <p16F84.inc>
__CONFIG 1Bh ;_CP_OFF & _PWRTE_ON & _WDT_OFF & _RC_OSC

      ORG 0             ;Start of memory
SetUp BSF 03,5          ;Go to Bank 1
      MOVLW 01          ;Load W with 01
      MOVWF 05          ;Make RA0 input
      CLRF 06           ;Make all Port B output
      BCF 03,5          ;Go to Bank 0
      CLRF 05           ;Blank the display
      CLRF 06           ;Blank the display
      CLRF 1F           ;Clear the button-press flag
      GOTO Main

Delay MOVLW 010h        ;Use 0C0h for 1 minute delay
      MOVWF 1C
Delay1  NOP
      DECFSZ 1A,1
      GOTO Delay1
      BTFSS 05,0        ;Test the button line on port A
      GOTO Not          ;Button not pressed
      BTFSC 1F,0        ;Button pressed first time?
      GOTO Delay2       ;Button already pressed
      MOVLW 02          ;First time button pressed
      XORWF 1F,1        ;Toggle the on/off flag
      BSF 1F,0          ;Set button-press flag
      BTFSS 1F,1
      GOTO Off
      MOVLW 06          ;Put "1" on display
      MOVWF 06
      GOTO Delay2
Off   MOVLW 3Fh         ;Put "0" on display
      MOVWF 06
      GOTO Delay2
Not   BCF 1F,0          ;Clear button-press flag
Delay2  DECFSZ 1B,1
      GOTO Delay1
      DECFSZ 1C,1
      GOTO Delay1
      RETURN

Beep  MOVLW 02h         ;Length of the Beep
      MOVWF 12h
Beep1 MOVLW 40h         ;The HIGH/LOW time
      MOVWF 13h
Beep2 DECFSZ 13h,1      ;Time for ON and OFF periods
      GOTO Beep2
      MOVLW 80h         ;Toggle the Piezo line
      XORWF 06,1
      DECFSZ 14,1       ;256 loops of ON/OFF
      GOTO Beep1
      DECFSZ 12h,1
      GOTO Beep1
      BCF 06,7          ;Turn off piezo bit
      RETURN

Main  MOVLW 02          ;Produce a 10 sec timer
      MOVWF 0C
Main1  CALL Delay
      DECFSZ 0C,1
      GOTO Main1
      BTFSS 1F,1        ;Test start/stop flag
      GOTO Main
Main2 CALL Beep
      BTFSS 05,0        ;Test the button line on port A
      GOTO Main2        ;Keep beeping
      GOTO Main

      END               ;Tells assembler end of program
TURNING ON 8 OUTPUTS
In this experiment we show how to turn on 8 outputs according to the following chart:
The “ON” times have durations of “2,” “4” and “10” seconds.
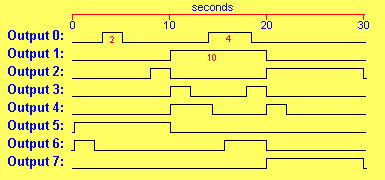
The program starts at time=0 and the relevant lines are taken HIGH. A 1-minute timer is called and then the state of the 8 outputs is determined. If only one line is altered, it can be “bit-set.” This process is continued across the chart.
 ;Expt20c.asm
      ;Project: Outputting to 8 LEDs
List P = 16F84
#include <p16F84.inc>
__CONFIG 1Bh ;_CP_OFF & _PWRTE_ON & _WDT_OFF & _RC_OSC

      ORG 0             ;This is the start of memory for the program.
SetUp BSF 03,5          ;Go to Bank 1
      CLRF 06           ;Make all Port B output
      BCF 03,5          ;Go to Bank 0 - the program memory area.
      CLRF 05           ;Blank the display
      CLRF 06           ;Blank the display
      GOTO Main

Delay MOVLW 10h         ;Use 0F1h for 1 minute delay
      MOVWF 1C
Delay1  NOP
      DECFSZ 1A,1
      GOTO Delay1
      DECFSZ 1B,1
      GOTO Delay1
      DECFSZ 1C,1
      GOTO Delay1
      RETURN

Main  MOVLW 60h         ;Turn on: 0110 0000
      MOVWF 06
      CALL Delay
      CALL Delay
      BCF 06,7
      CALL Delay
      BSF 06,0
      CALL Delay
      CALL Delay
      BCF 06,0
      CALL Delay
      CALL Delay
      CALL Delay
      BSF 06,2
      CALL Delay
      CALL Delay        ;End of 10 seconds
      MOVLW 1Ah         ;Turn on: 0001 1010
      MOVWF 06
      CALL Delay
      CALL Delay
      BCF 06,3
      CALL Delay
      CALL Delay
      MOVLW 03h         ;Turn on: 0000 0011
      MOVWF 06
      CALL Delay
      BSF 06,6
      CALL Delay
      CALL Delay
      BSF 06,3
      CALL Delay
      BCF 06,0
      CALL Delay
      CALL Delay        ;End of 20 seconds
      MOVLW 94h         ;Turn on: 1001 0100
      MOVWF 06
      CALL Delay
      CALL Delay
      BCF 06,4
      CALL Delay
      CALL Delay
      CALL Delay
      CALL Delay
      CALL Delay
      CALL Delay
      CALL Delay
      CALL Delay
      BCF 06,2
      BCF 06,7
      GOTO Main

      END
The display may not look very impressive with LEDs turning on and off, but if the outputs were connected to solenoids controlling ink or drill-heads and the program speeded up, quite impressive designs could be produced.
There are many ways to create an output pattern and be able to change the combinations with a user-friendly program. One idea is to have 8 buttons. These are all pushed at the same time to create HIGHs. Another button increments the minutes.
4 TIMING PROGRAMS
Four programs can be combined into a single application with the push button to select the program. The program starts at “0” on the display (no routine operating) to 1, 2, 3, and 4 and finally to “0.”
The 4 programs are as follows:
| 1 | Beeps after 40 seconds then turns off |
|---|---|
| 2 | Beeps every 60 seconds |
| 3 | Beeps after 20 seconds then every 2 seconds |
| 4 | Beeps twice every 10 seconds |
These could be incorporated into a commercial kitchen, for timing frying of foods or in a production-line.
It’s the universal nature of a microcontroller design that we are covering - the actual type of beep routine is only a concept. We have used low values for counting in the demo experiment below to speed-up the evaluation process.
   ;Expt20d.asm
   ;Project: 4 Timing Programs
List P = 16F84
#include <p16F84.inc>
__CONFIG 1Bh ;_CP_OFF & _PWRTE_ON & _WDT_OFF & _RC_OSC

      ORG 0             ;Start of memory
SetUp BSF 03,5          ;Go to Bank 1
      MOVLW 01          ;Load W with 01
      MOVWF 05          ;Make RA0 input
      CLRF 06           ;Make all Port B output
      BCF 03,5          ;Go to Bank 0
      CLRF 05           ;Blank the display
      CLRF 1E           ;Clear the button-counter file
      CLRF 1F           ;Clear the button-press flag
      GOTO Main

Delay MOVLW 04h         ;Create 1 second delay
      MOVWF 1C
Delay1  NOP
      DECFSZ 1A,1
      GOTO Delay1
      BTFSS 05,0        ;Test the button line on port A
      GOTO Not          ;Button not pressed
      BTFSC 1F,0        ;Button pressed first time?
      GOTO Delay2       ;Button already pressed
      INCF 1E,1         ;Increment the button-counter flag
      BSF 1F,0          ;Set button-press flag
      GOTO Delay2
Not   BCF 1F,0          ;Clear button-press flag
Delay2  DECFSZ 1B,1
      GOTO Delay1
      DECFSZ 1C,1
      GOTO Delay1
      RETURN

Beep  MOVLW 08h         ;Length of the Beep
      MOVWF 12h
Beep1  MOVLW 30h        ;The HIGH/LOW time
      MOVWF 13h
Beep2  DECFSZ 13h,1     ;Time for ON and OFF periods
      GOTO Beep2
      MOVLW 080h        ;Toggle the Piezo line
      XORWF 06,1
      DECFSZ 14,1       ;256 loops of ON/OFF
      GOTO Beep1
      DECFSZ 12h,1
      GOTO Beep1
      BCF 06,7          ;Turn off piezo bit
      RETURN

Main  MOVLW 00
      XORWF 1E,0        ;Is the button-counter = 0?
      BTFSS 03,2        ;Test the zero flag in STATUS
      GOTO Main1        ;No
      MOVLW 3Fh         ;Yes
      MOVWF 06          ;Put "0" on 7-segment display
      CALL Delay
      GOTO Main         ;Loop for button-press = 0

Main1 MOVLW 01          ;See if program 1 has been selected
      XORWF 1E,0
      BTFSS 03,2
      GOTO Main4        ;No
      MOVLW 02h         ;Use 28h for 40 loops of 1 second delay
      MOVWF 0C          ;Loop counter for 1 second delay
      MOVLW 06
      MOVWF 06          ;Put "1" on 7-segment display
Main2 CALL Delay
      MOVLW 01
      XORWF 1E,0
      BTFSS 03,2
      GOTO Main4
      DECFSZ 0Ch,1
      GOTO Main2
      CALL Beep
Main3 CALL Delay
      MOVLW 01          ;The delay routine will increment 1E
      XORWF 1E,0        ;  and allow the program to progress to the
      BTFSS 03,2        ;  next section
      GOTO Main4
      GOTO Main3        ;End of program 1

Main4 MOVLW 02
      XORWF 1E,0
      BTFSS 03,2
      GOTO Main6
      MOVLW 02h         ;Use 3Ch for 60 loops of 1 second delay
      MOVWF 0C
      MOVLW 5Bh
      MOVWF 06          ;Put "2" on 7-segment display
Main5 CALL Delay
      MOVLW 02
      XORWF 1E,0
      BTFSS 03,2
      GOTO Main6
      DECFSZ 0Ch,1
      GOTO Main5
      CALL Beep
      GOTO Main4        ;End of program 2

Main6 MOVLW 03
      XORWF 1E,0
      BTFSS 03,2
      GOTO Main9
      MOVLW 04h         ;Use 14h for 20 loops of Delay
      MOVWF 0C
      MOVLW 4Fh
      MOVWF 06          ;Put "3" on 7-segment display
Main7 CALL Delay
      MOVLW 03
      XORWF 1E,0
      BTFSS 03,2
      GOTO Main9
      DECFSZ 0Ch,1
      GOTO Main7
Main8 CALL Beep
      CALL Delay
      MOVLW 03
      XORWF 1E,0
      BTFSS 03,2
      GOTO Main9
      CALL Delay
      GOTO Main8        ;End of program 3

Main9 MOVLW 0FFh        ;Put FF into button-counter to
      MOVWF 1E          ;  make 00 on next increment!
      MOVLW 0Ah         ;10 loops of Delay
      MOVWF 0C
      MOVLW 66h
      MOVWF 06          ;Put "4" on 7-segment display
MainA CALL Delay
      MOVLW 00
      XORWF 1E,0
      BTFSC 03,2
      GOTO Main
      DECFSZ 0Ch,1
      GOTO MainA
      CALL Beep
      CALL Delay
      MOVLW 00
      XORWF 1E,0
      BTFSC 03,2
      GOTO Main
      CALL Beep
      GOTO Main9        ;End of program 4

      END
Most of the complexity of the program is due to the push button. It needs to be poled all the time and when it is pushed, the program must advance to the next section.
There are many ways to present a program such as this and the simplest is the LINEAR APPROACH. This involves laying out the instructions with the minimum GOTO’s. You can read the instructions exactly as the micro executes them.
The program can be shorted considerably with clever coding but this will make it more difficult for the beginner to understand. If you have plenty of program space, you don’t have to be concerned about compressing a program.
It’s only when you think you are going to run out of program-space that efficiency has to be introduced.
You have over 1,000 lines of program-space in the PIC16F84 and the next chip we will be introducing has over 2,000 lines of space.
It is the PIC16F628 and is effectively an upgrade of the PIC16F84. It has twice the memory, more than twice the speed of operation, an extra 3 in/out lines and is approx half the price. It also has more features and a few more instructions. You will see it in the PIC LAB-1 project.
They are pin-for-pin upwardly compatible as everything on the ‘84 is also on the ‘628. The extra features are included as “selectables” on the pins.
For now, we have to master the ‘84. It’s then very easy to upgrade.
A DELAY WITH WATER DETECTION
The “pot” input on PIC LAB-1 detects resistance. It can also detect the presence of water via two probes. Most water contains dissolved salts and this reduces its resistance so that a reading can be obtained.
For the purposes of this experiment we will connect a pot to the input.
The program has the following features:
Push the button to start the program. The alarm sounds after 30 seconds (this can be extended). If the pot is rotated to approx mid-value the alarm sounds.
This is an alarm for filling a tank etc. If the tank does not fill in a prescribed time the alarm sounds. As soon as the tank is full, the alarm sounds.
There are many variations of this. It could be light-intensity, sound, temperature, distance, counting, etc. It’s the concept of combining two items or features at the same time.
To produce a program with the features outlined above, the starting point is to take a program already produced (such as Expt20b) as it has the button-press and display features already provided. The program is already half-complete! The only section to add is the A-to-D (analogue-to-digital) “pot” section. Page 9 describes an experiment that connects a pot to the PIC LAB-1. “Cut and Paste” the “Look” sub-routine and use file 0D as the decrementing file.
The SUBWF instruction in Main subtracts W from file file 0D and the Carry (in file 03) will be SET if 0D is more than 80h. This is equivalent to approx mid position of the pot.
You will have to supply probes and start with a “test value” of say 10h and gradually immerse the probes in water (slightly salty water) to see when the circuit responds.
      ;Expt20e.asm
      ;Project: Delay with water detection
List P = 16F84
#include <p16F84.inc>
__CONFIG 1Bh ;_CP_OFF & _PWRTE_ON & _WDT_OFF & _RC_OSC

      ORG 0             ;Start of memory
SetUp SetUp BSF 03,5    ;Go to Bank 1
      MOVLW 11h         ;Load W with 0001 0001
      MOVWF 05          ;Make RA0, RA4 input
      CLRF 06           ;Make all Port B output
      BCF 03,5          ;Go to Bank 0
      CLRF 05           ;Blank the display
      CLRF 06           ;Blank the display
      CLRF 1F           ;Clear the button-press flag
      GOTO Main

Beep  MOVLW 0A0h        ;The HIGH/LOW time
      MOVWF 13h
Beep1 DECFSZ 13h,1      ;Time for ON and OFF periods
      GOTO Beep1
      MOVLW 80h         ;Toggle the Piezo line
      XORWF 06,1
      RETURN

Delay MOVLW 04h         ;1 second delay
      MOVWF 1C
Delay1  NOP
      DECFSZ 1A,1
      GOTO Delay1
      BTFSS 05,0        ;Test the button line on port A
      GOTO Not          ;Button not pressed
      BTFSC 1F,0        ;Button pressed first time?
      GOTO Delay2       ;Button already pressed
      MOVLW 02          ;First time button pressed
      XORWF 1F,1        ;Toggle the on/off flag
      BSF 1F,0          ;Set button-press flag
      BTFSS 1F,1
      GOTO Off
      MOVLW 06          ;Put "1" on display
      MOVWF 06
      GOTO Delay2
Off   MOVLW 3Fh         ;Put "0" on display
      MOVWF 06
      GOTO Delay2
Not   BCF 1F,0          ;Clear button-press flag
Delay2  DECFSZ 1B,1
      GOTO Delay1
      DECFSZ 1C,1
      GOTO Delay1
      RETURN

Look  CLRF 0D           ;Count-down file
      BSF 06,7          ;Take cap HIGH
Look2 NOP
      INCFSZ 0D,1
      GOTO Look4
Look3 BCF 06,7          ;Take cap low
      RETURN
Look4 BTFSC 05,4        ;Is input LOW?
      GOTO Look2
      GOTO Look3

Main  MOVLW 1Eh         ;Produce 30 x 1 sec delays
      MOVWF 0C
Main1 CALL Delay
      BTFSS 1F,1        ;Test start/stop flag
      GOTO Main
      CALL Look
      MOVLW 80h         ;This is the "test value" for the pot.
      SUBWF 0D,0
      BTFSS 03,0
      GOTO Main2        SS or SC ;Carry will be SET if 0D is more than 80h.
      DECFSZ 0C,1
      GOTO Main1        ;Goes here if low-resistance
Main2 CALL Beep         ;Goes here if high-resistance
      BTFSS 05,0
      GOTO Main2
      GOTO Main         ;Test the button
                        ;Keep beeping
      END
                        ;Tells assembler end of program

Quick Links
Legal Stuff
Social Media