

Table Of Contents
[Kits are available](mailto:colin@elechelp.com?Subject=Buying Super Probe MkII kit&Body=Please e-mail the cost of Super Probe MkII kit by air mail to my country:**___**** and send details of how I can pay for it. My name is:____)** for this project from Talking Electronics for $18.00 plus postage.
You will also need:
PIC2 USB Burner (MPASM and MPLAB come with PIC2) and it includes USB lead, plus a 6pin to 5pin adapter @ $2.50, if you want to re-program the micro.
- PIC16F870 Data Sheet (.pdf 3,026KB)
- PIC16F870.inc
See more projects using micros:
Library of Sub-routines “Cut and Paste”
Library of routines: A-E E-P P-Z SuperProbeMkII.asm
This project has been adapted and modified from a project designed by Luhan Monat of mondo-technology.com
The original project has been changed slightly with an added feature but retaining the simplicity of the circuit and the code. It just goes to show what can be done with a simple microcontroller and a set of instructions.
This is by far the most complex project we have ever described and it should be thoroughly investigated to see exactly how each function has been designed and how the external components are “switched into circuit” to charge and discharge the component being tested.
By looking at sites on the web you will see this has been a very popular project but no-one has provided a kit of components to build it. That’s what we have done.
We have added one extra feature (Voltage: 0 to 25v) and provided a pre-programmed PIC chip and a complete kit of parts for a total of $18.00 plus postage. The case is extra and can be purchased from one of the suppliers mentioned below.
The project is built on a Printed circuit board 22mm x 100mm and comes with a pre-programmed chip, surface mount components, 4-digit display, 5v6 zener diode, 20MHz Xtal, regulator, switches, very fine solder, wire and battery clip. You would normally need to go to more than 3 different suppliers and also get someone to program the chip. We have done it all for you and modified the program to reduce the flicker (the strobing effect that separates the segments when the display is moved).
The project does an enormous number of things and you have to study the list of functions to see how each function works and the features within each function.
To cycle through the 20 functions, turn the Probe ON and the centre segment of the first display will illuminate.
Now press button #1 (top button) and keep it pressed.
Now press the lower button and the display will cycle through the 20 functions, each time the button is pressed.
Make sure the switch is on 5v for all the functions except 20v VoLH
Here are the details of the 20 functions:
| Prob | Logic Probe | Logic Probe shows the first position of the display:
- ‘H’ for high (above 3.7V)
- ‘L’ for low (below 0.8V)
- ’–’ For floating input (status uncertain)
| If a pulse (0.5us) is detected, the second display flashes ‘P’. | |||||
|---|---|---|---|---|---|
| PULS | Logic Pulser | The Logic Pulser shows the pulse rate (5, 50, 500, 5.0) in the last 3 locations. The first location shows the sensed logic level as a dash in the bottom or top of the digit. When button #1 is held down, a series of 0.5 microsecond pulses are generated in the opposite direction and the center segment is lit. Pushing button #2 cycles thru the 4 pulse rates. The selected pulse rate is saved on power down. | |||
| FrEq | Frequency Counter | In the Frequency Counter mode, pushing button #1 switches the display to the next 4 digits of the count. For instance, the display shows ‘12.57’ for a frequency of 12,576 Hz. Holding down button #1 shows ‘2576’ - the lowest 4 digits. If a decimal point shows, the value is in KHz, if the decimal is flashing, the value is in MHz. Hence, a frequency of 42,345,678Hz is displayed as 42.34 with a flashing decimal. Holding down button #1 will display 5678. | |||
| Cnt | Event Counter | In the event count mode, the display shows the lowest 4 digits. Button #1 switches to the next higher 4 digits while held down. Button #2 resets the count. | |||
| VoLL | Voltmeter | Switch the 5v_25v switch to 5v. The project uses the 5v from the regulator as a reference. Do not connect the probe to voltages above 5 volts. | |||
| VoLH | Voltmeter | Switch the 5v_25v switch to 25v. The display measures voltage to 25v. Do not connect the probe to voltages above 45 volts as the probe does not detect anything above 25v and the components are not rated for high voltages. The 1M is the “protection resistor.” in the voltage divider. | |||
| diod | Diode Junction Voltage | This is just the voltmeter function with a 10k resistor feeding current to the probe tip. When a diode or transistor junction is connected from the tip to the ground lead, the drop voltage is displayed. | |||
| LEdS | LED voltage drop | Measures the characteristic voltage drop across a LED @3mA. Ideal for detecting cathode lead and matching LEDs. (29-6-2011) Approx 0.1v is dropped across 22R so take 0.1v from LED reading. LOW Battery is detected by open probes reading less than 5.95v | |||
| Cap | Capacitance Measurement READ THESE NOTES: | When a capacitor is connected from the tip to the ground lead and button #1 is pushed, its value is displayed. Values from .001 uf (1n or 1,000p) to about 500 uf are displayed. The larger the capacitor, the longer it takes to measure. A value of 100uf takes a couple of seconds. To do this, turn the Probe OFF. Fit the electrolytic to the leads. Turn the Probe ON. It will display CAP and then go blank while it reads the value of capacitance. It will then display the value. | |||
| Coil | Inductance Measurement | When an inductor is connected from the tip to the ground lead and button #1 is pushed, its value is displayed. Values from 0.1mH (100nH) to 999.9 millihenries are displayed. Note: this function assumes the DC resistance is not more than a few ohms. Also, if the unit gets ‘stuck’ in this mode, jumper the tip to ground to free it. | |||
| SIG | Signal Generator | This mode generates a 500Hz square wave at about 0.5 volts. The signal is only generated while button #1 is held down. | |||
| ntSC | Video Pattern | Generates an NTSC video frame with a white dot pattern. | |||
| SEr | Serial Ascii | Each time button 1 is pushed, the letters A-Z followed by cr/lf is generated. Auto polarity sensing. If the signal injection point is originally high, then normal (zero start bit) ascii is generated. Otherwise, the opposite polarity is created. New feature: Button #2 cycles thru 1200, 2400, 4800, 9600 baud. | |||
| Midi | Midi Note | Sends note middle C on any of the 16 midi channels. Holding button 1 sends ‘note on’. Release of button 1 sends ‘note off’. Button 2 cycles thru the 16 channels. The midi channel number is stored. | |||
| R/C | R/C Servo | Generates 1mS to 2mS pulse for r/c servos. Button 1 increases pulse, Button 2 decreases pulse. Defaults to 1.5mS each time mode is entered. | |||
| _ | ¯ | _ | Square Wave | Generates 1 - 9999 Hz Square Wave. Button 1 decreases frequency, Button 2 increases frequency. | |
| noiS | Pseudo Random Number | Generates 10kHz digital PRN series - commonly called :White Noise.” | |||
| ir38 | IR LED | Generates 1 millisecond ON and 2.5 millisecond OFF - 38kHz square wave. When connected to IR LED, used for testing IR receiver modules. | |||
| PWM | Pulse Width Modulation | Generates variable pulse-width 3% to 97% of a 6kHz (approx) digital signal. Button 1 decreases pulse-width, Button 2 increases pulse-width. | |||
| StOP | Stop Watch | Button 1 starts/stops timer. Change of state on probe tip also will start/stop timer. Button 2 resets timer. Timer counts in 1/100 second from 0-99 seconds, then counts in 1/10 second from 100 -999 seconds. |
The original project is from Mondo Technology. The case was a broken Logic Probe from Radio Shack - but see the brightness of the display. It is perfectly viewable when each segment is accessed individually. This is the way the display is accessed in the program. It is a rather unusual way to scan the display but has two features. It allows the outputs of the chip to be connected directly to the display without putting too much strain on the FETs and produces equal illumination for all segments.


The project is built on Matrix Board
Here is the Super Probe from Heli:
http://heli.xbot.es/SuperProbe/SuperProbe.htm

Here is a Probe case “U-SONDA3” and tip. “U-SONDA-tip,” from GM Electronic Slovakiaa:
(cost: about $3.00 USD including tip, plus postage):

Here is the Super Probe from: http://ikon.wz.cz/mondo/sonda_2.php, with the PC board and top-half-shell of the case:

Here is a Logic Probe case from Kelvin, for $3.75 plus postage, but they require a minimum $150 order!!
Here is a Logic Probe case from Rapid Electronics: It costs $10.50 plus postage.
External size excluding tip (mm):145 x 30 x 21 Window size (mm):95 x 19
Order code:31-0330
- An internally removable side panel can be permanently fixed into position or replaced by displays
- Supplied complete with probe tip
- Opening below the probe tip for a flying lead
- 10mm x 10mm square opening in the rear of the case for cable exits to equipment

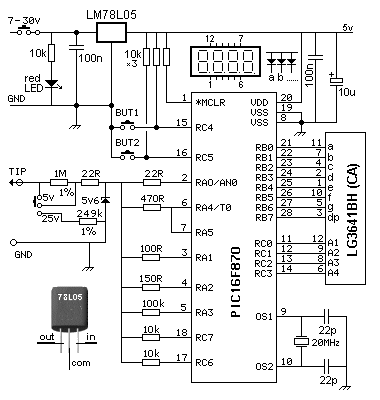
Super Probe MkII Circuit
The CIRCUIT
The circuit is very simple. It uses a PIC 16F870 microcontroller connected directly to a 4 digit display. All the segments are connected together to reduce the wiring to 14 pins. No current limiting resistors have been used between the micro and display and this means the voltage-drop will be across the FETs inside the micro.
The display is illuminated ONE SEGMENT AT A TIME. And this means it takes 4x7=28 to display all the segments (plus extra for the decimal points). You would think the display would be very dull. But this is not so. The display we have supplied in the kit is “super-bright red” and although each segment is seeing only a duty cycle of about 3-4%, the overall brightness is perfect.
During each segment illumination, we have one output of the chip driving HIGH and one driving LOW. The LED drops 1.7v leaving 1.65v across the top FET and 1.65v across the lower FET. This is overdriving the FETs but thy do not seem to suffer.
The current taken by the project is 20-30mA. The rest of the components are connected to the probe tip to create different charging and discharging values for testing capacitors and inductors and for the 25v voltage range.
The crystal needs 2 capacitors and the buttons need pull-up resistors (portB is the only port with weak pull-up resistors). The 249k is created with a 220k and 33k in series. The 22p capacitors are created with 2x47p caps in series and the kit contains 4x47p surface-mount.

Super Probe MkII connects to a 9v battery
The brightness of the display is superb

Underside of Super Probe MkII
Click HERE for larger image
Here is the Super Probe constructed by Ahyan Yilmaz of Kocaeli TURKEY:


Note: the link is now a track on the top side of the board. No tracks need to be cut with the new PCB’s
Look at the perfect soldering… Surface-mount certainly makes a very neat project. The secret is the use of 0.8mm solder.
SURFACE-MOUNT COMPONENTS
We have used SM components to make the project as small as possible. They also make it look simpler as they “disappear” under the board. You will need fine tweezers to hold them in place while one end is soldered to a pin of the 28 pin IC socket. Using very fine solder (supplied in the kit) makes soldering easier and quicker. Always solder resistors with the value showing.
CONSTRUCTION
This project is for medium-to-advanced constructors as it is very compact. It is built on a double-sided PCB and the kit comes with all parts, including a pre-programmed chip. They are fitted as shown in the photos above.
Two tracks need to be cut near the crystal and a link fitted under the board.

Cut the two tracks. Click HERE for larger image.
When the IC socket and display are fitted, they are soldered in place. The next thing is fit the crystal, switches, regulator and then the surface-mount components. Tin one pad then fit the surface-mount component. Use fine tweezers. Now solder the other pad and the solder will run under the chip. Don’t forget to cut the two tracks next to the crystal and join the track with a short length of enamelled wire. Fit the regulator and short lengths of tinned copper wire in the holes for the battery snap.
Twist the wires together and cut them short so they just fit through the hole in the battery snap. Tin the wires and fit the battery snap and solder the wires to the snap. Refer to the photo above to see how the snap is connected.
Parts List - Super Probe MkII
Cost: au$18.00 plus postage[Kits are available**](mailto:colin@elechelp.com?Subject=Buying Super Probe MkII kit&Body=Please e-mail the cost of Super Probe MkII kit by air mail to my country:****___**** and send details of how I can pay for it. My name is:____)
- 2 - 22R (220) SM resistors
- 1 - 100R (101) SM resistor
- 1 - 150R (151) SM resistor
- 1 - 470R (471) SM resistor
- 6 - 10k (103) SM resistors
- 1 - 33k (333) SM resistor
- 1 - 100k (104) SM resistor
- 1 - 220k (224) SM resistor
- 1 - 1M (105) SM resistor
- 4 - 47p SM capacitors (to make 2 x 22p)
- 2 - 100n SM capacitors
- 1 - 10u electrolytic SM
- 1 - SPDT slide switch
- 1 - SPDT mini slide switch
- 1 - PIC16F870 chip (with SP-44)
- 1 - LM78L05 regulator
- 1 - high-bright 3mm red LED for power
- 1 - 5v6 zener diode
- 1 - 4 digit display
- 2 - 14 pin IC sockets (to make 28 pin)
- 2 - mini tactile switches
- 1 - battery snap
- 1 - 20MHz crystal
- 1 - probe 1.6mm x 35mm
- 1 - 25cm black hook-up wire
- 1 - black alligator clip
- 10cm 0.25mm enamelled wire for link
- 10cm tinned copper wire for battery snap
- 30cm very fine solder
- 1 - Super Probe MkII PC board
If you want to burn your own chip, you will need:
- Multi Chip Programmer $17.50
- or PIC-2 USB Burner $25.00
Extras (see list below) $8.00 plus $6.50 postage
TESTING THE CIRCUIT
To assist in testing the circuit, you will need a 3v supply with a 220R series resistor. This is called a “tester.”
Remove the chip and place the positive of the “tester” on one pin of the IC socket and negative on a pin of the display to illuminate segment “a.” Go through the pins to check all the other segments.
Without the chip, turn the project ON to make sure the regulator is providing 5v.
This completes the tests. Fit the chip and turn the project ON.
If you have one of our ”Slimline Probe/Pulser” projects you can do some additional testing.
The Slimline Probe/Pulser has a piezo and you can hear the activity on the output of the chip (to the segments and digit lines).
By pressing the button, the Slimline Probe/Pulser will produce a signal that can be injected into the micro at either clock line, (where the crystal connects to the chip) and you can “clock the chip” at a very low frequency and see each of the segments illuminate.
FAULT:
I have not had any problems until today. The project did not work for a customer, so I told him to send it in.
Three surface mount chips were not soldered at one end. But the display did not illuminate.
So I connected the LOGIC PROBE/PULSER project to the 5v test pins and put the probe on pin 9 and pressed the pulser button.
I then turned ON the Super Probe.
The pulser would “inch” through the program and after a few seconds the segments of a single digit started to cycle.
This showed the crystal was not working. I changed the crystal and the Super Probe worked.
The PROGRAM
The program is complex because it is carrying out operations of a very complex nature. The only way you can study the program is to select a particular function and remove all the other sub-routines.
Burn a new chip to make sure the function works, then print out the program so it can be studied.
MODIFYING THE PROGRAM and/or PROGRAMMING THE CHIP
The kit comes with a pre-programmed PIC chip but if you want to program your own chip or modify the program, the .hex file is available as well as the assembly file, so you can see how the program has been written and view the comments.
The program consists of a large number of sub-routines and this requires looking up and down the program.
You will need to load the program into a text editor with line numbering so you can keep a record of the line you need to “go to” as well as the line you came from.
The is only 34 empty locations in “program memory,” so you have very little space to add any new feature.
However the one thing you can do is change some of the values in a sub-routine and see what effect it has on the program. This is the only way to start a modification.
To “burn” (program) a blank PIC16F870, you will need a programmer.
Talking Electronics has 2 different models, depending on your computer.
If you are using a desk-top and/or tower with a serial port, you can use a programmer called Multi Chip Programmer ($17.50 incl. lead plus $6.50 postage). Or you can build your own on matrix board with this article: PicProgrammer-12Parts
If you have a lap-top with USB, you can buy PIC-2 USB Burner ($25.00 plus $6.50 postage).
Or you can buy PICkit-2 from other suppliers, if you are using a laptop. It is the best programmer on the market and comes with a USB cable and 2 CD’s containing the programs needed to “burn” the chip. But it does not have a 6pin to 5pin adapter or an IC socket to hold the chip you are programming. It is classified as an “In-Circuit Programmer” but can be used to program a chip that has been placed in a programming socket. The additional parts you need to do this are available below as ”Extras.”
No matter which programmer you buy, you will need a 6pin to 5pin adapter from talking electronics.
You will also need a PC board to hold a PROGRAMMING IC SOCKET.
You will also need adapter sockets to adapt 8 pin to 18 pin and 18 pin to 20 pin.
These 4 items are explained in the PIC-2 USB Burner article.
You will also need a 28 pin IC socket that is permanently fitted to the IC so you can transfer it from “burner” to project. The socket will prevent damage to the pins and makes the transfer much easier.
The Extras: 1 x 8pin 2 x 18pin, 1 x 20pin, 1 x 28 pin IC socket, 2 x small matrix boards for the adapters, a programming PC board with wire and 5 pins and a 6pin to 5pin adapter, wire and solder. Cost:$8.00
SUMMARY:
You will need:
- Multi Chip Programmer $17.50 or PicProgrammer-12Parts for tower PC’s. (you supply parts)
or PIC-2 USB Burner $25.00
or PICkit-2 for laptops with USB. (cost approx $50.00 from other suppliers - look on web for suppliers.) - Extras $8.00
- plus $6.50 postage max.
You will also need Notepad++ or VS Code to write your .asm program.

6pin to 5pin Adapter

PIC-2 USB Burner connected to 6pin to 5pin Adapter.
PCB is wired for In-Circuit Programming. 8pin to 18pin adapter and 18pin to 20 pin adapter connected to 8pin IC socket on PC board. 20 pin socket holds 28 pin PIC16F870 for programming. All the components in photo above are available as “Extras” for $8.00
Details of the 3 adapters can be found in: PIC-2 USB Burner*
Here are the files you will need:
- SuperProbeMkII.asm
- SuperProbeMkII.hex
- See full program HERE
MODIFICATIONS/CHANGES AND IMPROVEMENTS by: “Karlis”
Karlis has sent some changes to the SuperProbe MkII.
He has used a PIC16f876a instead of PIC16f870. The PIC16f876a has 8k of program memory. PIC16f870 has 2k.
He has added a Common-cathode display.
His version is: 44
See the list of changes: Changes.txt
SuperProbeMkII_876a_CC.asm

Quick Links
Legal Stuff
Social Media