

Table Of Contents
A PHOTOPOPPER ROBOT
Page 7
ROBO-ROLLER
This is the ultimate circuit for a Photopopper. It is also phototropic due to the light-detecting nature of the flashing LEDs.
It converts the voltage from any number of solar cells to drive motors up to 12v. The minimum number of cells is two but four is probably the most practical minimum.
Almost all the Photopopper circuits described to date use a 1.5v pager motor and a 3.5v to 5.5v solar panel.
But for the majority of constructors, these components are not available near where they live or even a “phone call away.”
However the two items that are closest to the requirements of a solar panel and pager motor are individual solar cells and a 1.5v or 3v hobby motor. I know these motors aren’t as efficient as pager motors but if you need to use readily available components, this is what you have to get.
Some motors from old VCR’s etc are 12v types and these can be used with this circuit.
USING WHAT’S AVAILABLE
Individual solar cells produce 0.45v and come in output current capabilities of 100mA, 200mA and 500mA.
Creating a panel from individual cells will be larger than the mini solar panels on the market but when you see the current capability of some solar panels, you will see why individual cells are a viable alternative. Small solar panels deliver 7mA, 15mA, or 30mA @ 3.5v to 5.5v The cost of the highest output type is twice the cost of our design.
When you use this circuit with individual cells and a salvaged motor, you will be able to create sun powered vehicles at a lower cost to anything else. A single motor design such as “Solar Roller” can be designed using the circuit below or a two-motor design using two Solar Engine sections. We have called our single motor design Sun Roller MkIII and its constructions starts on page 11. Our two motor design , similar to the Photopoppers described on previous pages is called Robo Roller MkII and its construction starts on page 12.
With our circuits and components you will be able to get things up-and-running sooner.
Firstly, let’s look at the circuit.
Only one Solar Engine section has been drawn.

How much of the Robo Roller Circuit can you remember? Click above and try this test.
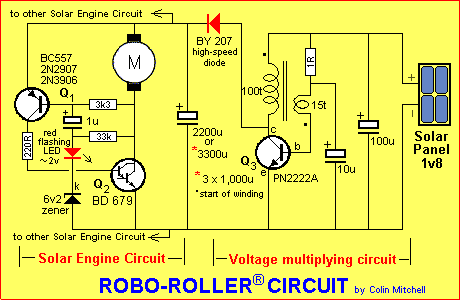
THE CIRCUIT
The circuit consists of two building blocks. The Photopopper circuit designed by Ben Hitchcock and a voltage multiplying (or voltage increasing) circuit from a Solar Charger project we will be presenting in a future issue.
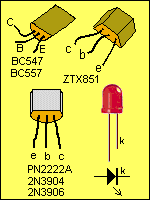
We have already covered the Photopopper circuit and the items we have added are green LEDs to increase the “turn-on” level. Each LED (including the flashing LED!) increases the “turn-on” voltage by approx 2v. This gives a wide range of voltage for the type of motor you intend to use. The circuit also includes a 220R to limit the turn-on current to the base of the Darlington transistor. This is very important as it represents wasted energy.
The Solar Charger circuit is very simple in design but much more complex in discussion as it employs a transformer. Although the transformer consists of only two windings, the way it works could take a page to explain fully.
It is a self-oscillating building block called a Blocking Oscillator.
The transistor in a Blocking Oscillator draws current only during a small portion of the cycle and the output is a pulse. (Other transformer circuits looking very similar to this one are sine-wave oscillators. A sine-wave oscillator does not generate a high voltage across the primary winding.)
At switch-on, the base receives current via the 15t winding and 1R resistor and this turns the transistor on a small amount.
Current flows through the collector-emitter terminals and through the main winding (this can also be called the Primary).
This causes magnetic flux to be produced and the flux cuts the turns of the 15t feedback winding and the transistor is turned on more. The effect is called re-generation or positive feedback and the transistor keeps turning on until it is fully turned on.
At this point maximum current is flowing through the primary and maximum flux is produced in the core of the transformer but this flux is not expanding flux and thus it does not produce a voltage in the feedback winding. The current into the base of the transistor reduces slightly (there is still current flowing via the 1R resistor) and the transistor turns off slightly. The current in the primary winding reduces and this causes the magnetic flux to reduce. This is called collapsing flux and it causes a reverse voltage to be produced in both the main winding and feedback winding. The reverse voltage has the effect of reducing the base voltage and also the base current and causes the transistor to turn off even more. This keeps happening until the transistor is completely turned off.
The action occurs very rapidly and here’s where the clever part comes in.
When magnetic flux collapses very quickly, the voltage produced in a winding is quite high. It can be 10-times or even 100-times greater than the applied voltage and this is how we get the value of “Q” for the transformer. “Q” is a term for efficiency (or multiplication-factor) and in our design we get output spikes exceeding 18v.
However don’t panic. Nothing will be damaged. The Photopopper section removes the charge from the electrolytic before it has time to go higher than about 12v.
Why does this circuit work with any number of cells and any voltage motor?
There are two different types of circuits in electronics. One type is called ”Power Electronics” and the other is called ”loose electronics.” Power electronics is where you have sufficient current behind a waveform for it to damage the surrounding components.
Loose electronics is where a circuit adapts to the “mis-match” of the surrounding components and nothing is damaged.
The Solar Charger section is an example of Loose electronics. It will adapt to almost any input voltage and accept any load, without being damaged. This circuit will operate on 4 to 8 cells and drive a motor from 3v to 12v.
The circuit produces high voltage spikes but they are very narrow and do not contain much energy. The large reservoir electrolytic accepts these spikes and stores them. The result is the voltage across the electro increases a small amount on each pulse.
The circuit operates at more than 20,000 cycles per second and is effectively an OSCILLATOR. The actual frequency of operation is determined by the amount of ferrite in the core of the transformer, the applied voltage, the load on the circuit, the number of turns on the feedback winding and the type of transistor. It cannot be readily altered.
Converting a low voltage to a high voltage is not very easy and some losses naturally occur. Our circuit is about 30% efficient but if more cells are added, the efficiency increases.
WINDING THE TRANSFORMER
The core of the transformer is an old 10mH choke. This provides an ideal bobbin for winding the transformer.
The first thing to do is remove the wire from the choke. You will not need it. Both windings are wound with 0.25mm enamelled wire. (0.25mm = 0.01” = #30AWG = #30B&S)
Mark the start of the wire with “white-out” and solder it to one of wires connected to the core. Wind 15 turns on the core and solder the end to the other wire connected to the core.
The main winding consists of 100 turns over the feedback winding. This can be “jumble-wound. It does not matter how it is wound. Mark the start of the winding and add the 100 turns. Twist the ends together. Leave about 3” (6cm) for connecting to the circuit.
CONSTRUCTING THE CIRCUIT
Construction notes for the circuit are on page 12.
Points worth noting:
You cannot measure the output current of a single solar cell with an ordinary multimeter and get an accurate short-circuit capability. This is because the output voltage is very low and the impedance of the multimeter will not allow the full current to flow. Even 4 cells will not provide an accurate reading.
The circuit for the Solar Charger has a very low impedance to cater for the low supply voltage. It will operate down to 1v but the efficiency increases considerably as more cells are added.
The ZTX851 transistor we have suggested has a very low collector-emitter voltage (0.1v) when switched ON and this improves the output considerably. If you use any other type of transistor the output will be 20% less.
If you build the Solar Charger circuit and need to test it, you must place a large electrolytic on the output to store the pulses of energy. You cannot measure the output with a multimeter with the electrolytic because the pulses are very brief and the meter will not respond.
If you need to measure the current capability of the circuit, you need to place a 100u electro across the output and then fit your ammeter between the (filtered) positive rail and a 2200u.
When winding the transformer you must remember which end is the start of each winding. You can either scrape a large amount of enamel from the start end or apply “white-out.”
If the windings are connected to the rest of the parts incorrectly, the circuit will not oscillate. Simply reverse one of the windings (not both).
Both windings must be wound around the same way on the core of the transformer for the “start of winding” to apply. Either remember all the requirements or wind the transformer and reverse one winding if it doesn’t work.

You can also use 4 red or green LEDs to provide the reference voltage and this will work the same as the previous circuit except when the light intensity is low. It may tend to “lock-up” as the charging current equals the loss through the LEDs and the circuit will fail to “fire.” The inclusion of the flashing LED prevents this lock-up.
The circuit may also tend to “lock-up” at high solar levels due to the charging current being sufficient to keep the motor turning due to the high output of the solar cells. This is also due to the voltage across the motor keeping the PNP transistor turned ON. The solution is to provide slight resistance for the motor shaft so that “back emf” is not produced.
For Robot parts at very low prices see: Andy’s Robot Parts

Quick Links
Legal Stuff
Social Media