

Table Of Contents

Contents of Article
- Page 1: Basic Electronics
- The capacitor - how it works
- The Diode - how the diode works
- Every Circuit Symbols
- Soldering Videos
- Page 2: The Transistor
- PNP or NPN
- Transistor TEST
- Page 2a: The 555 IC
- Page 3: The Power Supply
- Page 4: Digital Electronics
- Page 5: Oscillators
- Page 6: Basic Electronics 50 Questions Test
- Page 7: using The Multimeter
- Page 8: Constructing a Project
- Page 9: Inductance
INDEX
THE DELAY - also called the DELAY CIRCUIT or TIMING CIRCUIT
There are many times when a circuit is needed to operate after a period of time.
In other words “turn ON” or operate a motor, globe, LED or relay.
This might be one second, one minute or one hour after a switch is pressed or a circuit is turned ON.
The circuit is required to activate a device and keep it turned ON for the remainder of the time until the circuit is turned OFF or reset.
The type of circuit we are talking about does not turn the device OFF or turn it ON and OFF. This is called cycling and is covered in another discussion. It just turns it ON.
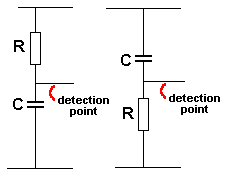
Fig 1. The Delay
THE DELAY
The circuit that does this is called a DELAY CIRCUIT or TIMING CIRCUIT or TRANSISTOR TIME DELAY or TIME CONSTANT or RC Delay Circuit.
There are only two components in this circuit. A capacitor and resistor in series.
All the other components that will be in the circuit are called the DETECTING COMPONENTS and they detect when a certain voltage is on the capacitor.
The capacitor can be almost any type, including electrolytics.
The resistor can be any value from a few ohms (R) to megohms (M).
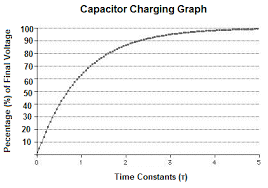
Capacitor Charging Graph
The voltage across the capacitor gradually rises. You can see the voltage across the capacitor does not increase at the same rate all the time. The increase gets less and less and less.
In other words it gets longer and longer for the capacitor to fully charge.
In fact it never fully charges and so we must pick a point at which we will detect a voltage on the capacitor.
This point has been chosen as 66% as you can see the graph is fairly straight up to this point.
This point is now marked on the graph as TIME CONSTANT ONE (1). Time Constant 2 is marked an equal distance across the graph. This is how the Time Constant values are added to the graph.
But we do not have to choose 66% - we can choose ANY voltage on the capacitor.
The resistor charges the capacitor and the DETECTING CIRCUIT detects when a certain voltage has been reached.
The resistor reduces or LIMITS the current flowing into the capacitor so the capacitor takes a long time to charge (or a short time).
If the value of this resistor is small (a few ohms) the capacitor will charge very quickly.
If the resistor is a very large value, the capacitor will take a long time to charge.
The voltage across the capacitor rises steadily until about 66% of rail voltage and then the rise gets slower and slower.
It does not matter what voltage you select for the detecting circuit but here are a few notes on how to do it.
You cannot select a voltage that is 100% of rail voltage because the capacitor never gets there.
The maximum can only be about 90%.
If you select 90%, the capacitor will take a long time to reach the required value and as the capacitor gets old, the time will get longer and longer. This is because some of the charging current will be lost as LEAKAGE inside the capacitor (electrolytic).
If you select say 66% of rail voltage, the capacitor will charge in ONE UNIT of time.
If you select 90%, the capacitor will take about 10 UNITS of TIME.
So, from a voltage of 66% to 90% you are relying on detecting a very small increase in voltage for each UNIT OF TIME.
And as the timing reaches 8 UNITS of TIME 9 UNITS OF TIME and 10UNITS OF TIME, the voltage is on a few percent of rail voltage. This value of voltage is very difficult to detect and it means long delays are not very accurate.
The DETECTION POINT for a TIME DELAY CIRCUIT is the join of the resistor and capacitor.
The DELAY CIRCUIT is actually called a HIGH IMPEDANCE CIRCUIT.
It is not a high impedance circuit in the normal meaning of the term.
It is a circuit that must be treated very carefully and MUST NOT BE LOADED.
If it is LOADED the current flowing into the capacitor (to charge it) will be diverted to the detecting component(s) and the capacitor may never charge to the required voltage.
This means the detecting circuit can only remove very little current during the detecting process.
This means the DETECTING CIRCUIT must be HIGH IMPEDANCE.
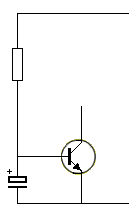
The Simplest Circuit
This circuit is the simplest DELAY CIRCUIT.
The resistor charges the capacitor (electrolytic) and the transistor turns ON when the voltage across the capacitor is a certain value.
This circuit is not very useful but it shows the transistor turns on a short period of time after the circuit is turned ON.
All we have to do is add more components to make the circuit A USEFUL DELAY CIRCUIT.
The detecting circuit is the TRANSISTOR. It must be HIGH GAIN because it can only take (or removed) one or a few microamps so it does not upset the charging of the capacitor (electrolytic). And the output of the circuit may need to drive a relay or globe or motor.
In other words, the input to the detecting circuit (this is the wire going to the base of the transistor) must be HIGH IMPEDANCE and the output is LOW IMPEDANCE - because a globe or motor or relay is classified as a low impedance device.
In other words the transistor is “connecting” a high impedance stage (the DELAY CIRCUIT) to a low impedance device and this is called “connecting” or “interfacing” and to do this the transistor must have GAIN - Gain is called AMPLIFICATION.
GOING OVER THIS AGAIN:
Connecting the DETECTING CIRCUIT must allow the DETECTION POINT to rise to the required value.
When it reaches the required voltage, the DETECTION CIRCUIT must “turn ON.” In other words it must send a “signal” to turn on a relay or other device.
To make The Simplest Circuit (above) into a useful circuit we must add 2 resistors to the “detecting line” (the base of the transistor) so the voltage on the capacitor can rise to say 66%.
At the moment The Simplest Circuit turns ON at 0.65v. In other words it will turn ON after a very short period of time and this is quite useless. We want to increase this time.
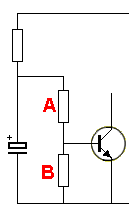
Adding a Voltage Divider
To make the transistor turn ON at say 66%, we need to add two resistors A and B.
These are called VOLTAGE DIVIDER resistors.
You will need to look at the section called THE VOLTAGE DIVIDER to understand how these two resistors work, but we will explain it briefly.
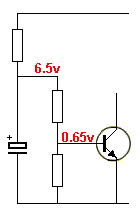
Voltages
We know the transistor turns ON when the base “sees” 0.65v. If we add 2 resistors we can detect when the voltage on the capacitor is 6.5v.
This turns a “useless” circuit into a DELAY CIRCUIT.
Resistor Values
To increase the detection voltage from 0.65v to 6.5v, we need 2 resistors with the ratio of 10:1. (We are keeping the discussion simple).
These two resistors do two things.
They increase the detection voltage by a value of 10 TIMES and they increase the impedance of the detection circuit to a value of about 1M.
This is exactly what we need to make a good DELAY CIRCUIT.
Another Delay Circuit
In place of the 2 resistors we can use a zener diode. It detects a voltage of 5v1 + 0.7v = 5v8.
The detecting circuit is made up of the 5v1 zener and base-emitter junction of the transistor.
These two components create a high impedance until a voltage of 5v8 because the zener takes no current until its “characteristic voltage” has been reached.
In other words, there are many ways to create a DELAY CIRCUIT.
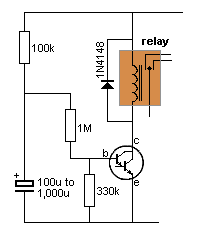
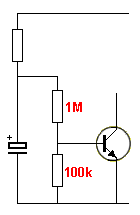
Yet another Delay Circuit
Yet another Delay Circuit
The 100k is the time delay resistor. The 1M is the “sense resistor” and the the 330k is the voltage divider resistor.
The base of the Darlington transistor detects 1.4v and the 1M/330k produces a voltage divider that requires 3 x 1.4v = 4.2v on the electrolytic. The 1M, 330k and transistor provide a fairly high impedance detecting circuit that does not inhibit the charging of the capacitor.
The circuit requires a supply of 12v.
The Darlington Transistor does just one thing. It allows a HIGH CURRENT load to be connected to the circuit. In other words, the LOAD can take about 100 times more current than the single transistor DELAY CIRCUITS above.
There is a lot more to understand about a DELAY CIRCUIT. We have only covered the BASICS.
Do not design a Delay Circuit yourself. Look on the internet and copy a circuit that is known to work.
There is a lot to understand about the VOLTAGE DIVIDER resistors and if the wrong values are chosen, the circuit will never “time out.”
There are actually 3 resistors in the VOLTAGE DIVIDING NETWORK and that is why this circuit is more complex than we have described.
GOING FURTHER
The DELAY CIRCUIT is the basis of an OSCILLATOR. When used in an oscillator circuit, the resistor and capacitor is (are) called a TIMING CIRCUIT.
It takes a certain amount of time for the capacitor to charge to a particular voltage (voltage across it). This voltage is detected by the circuit and now the circuit has components that discharge the capacitor. When the voltage across the capacitor is a very low value, the circuit detects this and allows the capacitor to charge again.
We can see from the graph above, the voltage on the capacitor increases quickly at the beginning but gets slower and slower, like an old man climbing a steep hill.
But this does not concern us. The time between the upper voltage and lower voltage are the only two values detected by the circuit.
The only thing that will change this interval of time is the value of the supply voltage. If the supply is increased by say a few volts, the time will increase. In other words, this type of circuit is VOLTAGE DEPENDENT. It is called a VOLTAGE DEPENDENT OSCILLATOR.
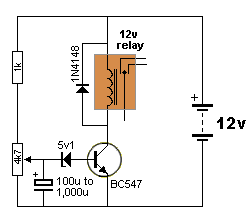
font face=“Arial”>TURN-OFF DELAYThis circuit will supply power to a project for a short period of time. The voltage across the project gradually dies (actually the current is the item that is reducing) and this will produce weird effects with some projects. The project remains active for a few seconds after the push button has been released.

The relay in this circuit will remain active for a few seconds after the push button has been released.
The value of the 1k resistor and electrolytic can be adjusted to suit individual requirements.
There is no “feed resistor” or “current limiting resistor” connected to the electrolytic. This means it will charge almost instantly to very nearly rail voltage.
Whenever you see a resistor and capacitor in series, you have to look further to see if it is part of a delay circuit.
If you see a resistor and capacitor in parallel, it could be part of an oscillator circuit.
These two components form the basics of electronics. If we did not have this simple feature of a capacitor taking a period of time to charge, everything in electronics would happen INSTANTLY and none of the electronic gadgets would have been invented.
There is a lot more to understand about a DELAY CIRCUIT. We have only covered the BASICS.
Do not design a Delay Circuit yourself. Look on the internet and copy a circuit that is known to work.
There is a lot to understand about the VOLTAGE DIVIDER resistors and if the wrong values are chosen, the circuit will never “time out.”
There are actually 3 resistors in the VOLTAGE DIVIDING NETWORK and that is why this circuit is more complex than we have described.
GOING FURTHER
The DELAY CIRCUIT is the basis of an OSCILLATOR. When used in an oscillator circuit, the resistor and capacitor is (are) called a TIMING CIRCUIT.
It takes a certain amount of time for the capacitor to charge to a particular voltage (voltage across it). This voltage is detected by the circuit and now the circuit has components that discharge the capacitor. When the voltage across the capacitor is a very low value, the circuit detects this and allows the capacitor to charge again.
We can see from the graph above, the voltage on the capacitor increases quickly at the beginning but gets slower and slower, like an old man climbing a steep hill.
But this does not concern us. The time between the upper voltage and lower voltage are the only two values detected by the circuit.
The only thing that will change this interval of time is the value of the supply voltage. If the supply is increased by say a few volts, the time will increase. In other words, this type of circuit is VOLTAGE DEPENDENT. It is called a VOLTAGE DEPENDENT OSCILLATOR.

SIMPLE FLASHER
Here is a very simple oscillator circuit that we have just talked about.It flashes a globe at a rate according to the value of the 180R and 2200u electrolytic.
The “detecting circuit” is the coil of the relay.
When more current flows through the coil, the relay “clicks in.” This causes the globe to turn ON and the electrolytic starts to get discharged. When the current drops to a fairly low value, the relay “drops out.” The globe turns OFF and the electrolytic starts to get charged again.
There is a GAP between these two current values in the coil of the relay and this is what gives the circuit a “flash rate” or “frequency.” The contacts of the relay allow the electrolytic to charge and discharge via the 180R.

Quick Links
Legal Stuff
Social Media