


Contents of Article
- Page 1: Basic Electronics
- The capacitor - how it works
- The Diode - how the diode works
- Every Circuit Symbols
- Soldering Videos
- Page 2: The Transistor
- PNP or NPN
- Transistor TEST
- Page 2a: The 555 IC
- Page 3: The Power Supply
- Page 4: Digital Electronics
- Page 5: Oscillators
- Page 6: Basic Electronics 50 Questions Test
- Page 7: using The Multimeter
- Page 8: Constructing a Project
- Page 9: Inductance
INDEX
- Active
- [Power](#Supply Rail)
The 555 IC is very popular, with over 150 different circuits designed around this 8-pin chip - so we are giving it a whole chapter.
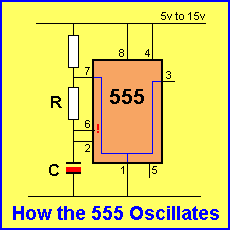
The 555 is an OSCILLATOR CHIP without the TIMING COMPONENTS.
When you add a resistor and capacitor, you create a TIME DELAY circuit because the capacitor takes a period of time to charge via the resistor.
The 555 is connected to the join of these two components and it monitors the voltage.
When the voltage is 2/3 of the supply voltage the chip TURNS OFF and the output goes LOW.
The chip then removes the CHARGING VOLTAGE and connects the resistor to 0v rail. The capacitor begins to discharge and when the voltage is 1/3 of supply voltage, the chip TURNS ON. The output goes HIGH and the charging resistor is connected to rail voltage to start the cycle again.
If the value of the capacitor and resistor are small (low values) the rate at which the 555 turns ON and OFF will be fast and the circuit is called an OSCILLATOR.
If the value of the resistor is high and the capacitor is above say 1u, the rate at which the 555 turns ON and OFF will be low and the circuit is called a TIMER.
The 555 can operate as a timer up to about 10 minutes and as an oscillator up to about 300kHz.
This gives an enormous range of capabilities and that’s why over 150 different projects have been designed around it.
There are a number of different 555 chips, but the cheapest is called a TTL device due to the components inside it and it takes about 10mA when in a circuit. There are low-current versions called CMOS (but the output current is very small) and a 14 pin TTL version containing two 555 devices.
We will be covering the cheapest and simplest version called: NE555, or HA555 or, SE555, or CA555 (P package or DIP package). Look for the price: about 25cents to 35 cents each.
eBay: 10 items for $1.20 with free postage!
NA555D or NA555P or NE555D are surface-mount. Cost: about 45 cents.

The 555 IC fitted to bread-board with pin 1 clearly marked with a dot.
Breadboard from eBay: $2.40 (free postage). You must get the breadboard with the positive and negative rails marked with red and blue lines.
Jumpers:

You can also get a pack of jumpers to connect the components. eBay: $1.70.
You have to understand how pins 2, 3, 6 and 7 work, especially pins 2 and 6. That’s why you need all the following animations.
Pin 3 is an output and will supply 200mA when it is HIGH and sink 200mA when it is LOW. Pin 7 is high and low at the same time as pin 3 but when it is HIGH, it is open-circuit and effectively “does not exist.” When it is LOW, it will sink about 150mA. It is called an “open-collector” pin - meaning something has to be connected to the pin and positive-rail.Need to watch these animations to understand how the 555 woks:
Watch this animation:
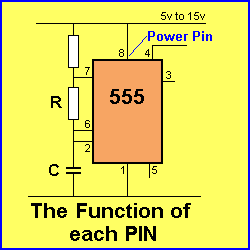
The first thing you have to understand is the function of each pin.
The 555 must be drawn as shown in the diagram so all the pins are in the correct position and they can be recognised as being a power pin, a low-voltage detector, a high-voltage detector etc and the value of the components connected to the pins will tell you the approximate frequency of the circuit.
Here is the name of each pin and its function.
This is an ANIMATION.
Watch it a few times to understand the function of each pin.
There is one more feature that needs to be discussed:
The 555 contains a FLIP-FLOP and the output can be either HIGH or LOW if the voltage on pins 2 and 6 are not at the correct levels.
If pin 6 is HIGH and pin 2 is LOW - the output will be HIGH - pin 2 is sending a “set” message
If pin 6 is HIGH and pin 2 is HIGH - the output will be LOW - pin 6 is sending a “reset” message
If pin 6 is LOW and pin 2 is LOW - the output will be HIGH - pin 2 is sending a “set” message
If pin 6 is LOW and pin 2 is HIGH - the output will be HIGH or LOW - this is because no pin is sending a “set” or “reset” message. The chip sometimes comes on in SET mode and sometimes in RESET mode.
Pin 2 OVER-RIDES pin 6.
When pin 2 is LOW the output of the chip is HIGH. The state of pin 6 does not matter.
The animation below shows Pins 2 and 6 connected to mid-rail voltage. This means they produce no “message” to the 555 and it will come on HIGH or LOW.
But when pin 2 see a LOW, the output goes HIGH (it does not matter if pin 6 is HIGH or LOW - pin 2 controls the 555).
The 555 is now “active” with output HIGH. When pin 6 sees a HIGH, the output goes LOW because pin 2 is not LOW and it does not control the 555. 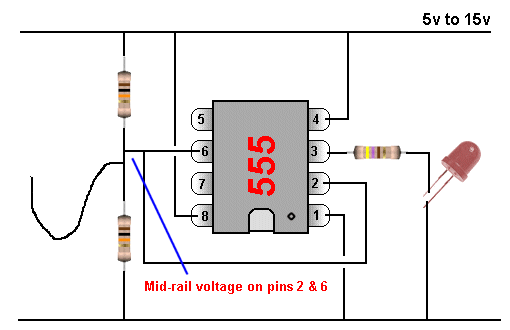
An animation of the 555:
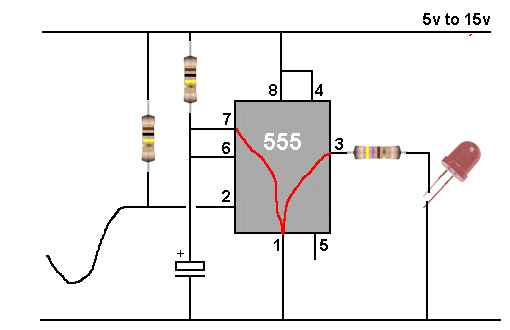
The capacitor charges via the two resistors.
Pins 2 and 6 are high impedance pins and do not put any load on the capacitor or affect the charging or discharging.
The voltage on the capacitor is LOW and pin 2 detects this to make the output pin 3 HIGH.
When the voltage on the capacitor is 2/3 of rail voltage, pin 6 detects this value and makes the output LOW. Pins 3 and 7 work in the same sequence and pin 7 discharges the capacitor until 1/3 of rail voltage is detected by pin 2 to make the output of the 555 HIGH for the next cycle. This is another ANIMATION.
Watch it a few times to understand how pin 7 discharges the capacitor.
Pin 4 must be connected to “power rail” for the chip to “work.” If it is connected to 0v, the chip does not work but still takes 10mA.Pin 5 can be connected to a 10n capacitor if you want the output waveform to be absolutely free from “noise,” but generally it is not connected. Too many circuits show a 10n connected to this pin when it is NOT necessary.
This animation shows a “one shot.”
Also called: “switch debounce” or “monostable” or “pulse extender.”
A “one shot” is a circuit that produces a HIGH for a short period of time after a switch is pressed. The switch must be pressed for a very short period of time (less than the length of the HIGH output). If the switch is pressed too long, the output will stay HIGH until the switch is released. The purpose of the circuit is to detect a very brief pulse and produce a clean output.
A switch is very noisy and when it is pressed, it sends lots of spikes and pulses during the time when the contacts are making connection and when they are separating. If a debounce circuit is not added, the result will be many pulses and a computer, for instance, will read this as a lot of pulses instead of a single pulse.

In this animation Pin 2 is LOW for too-long. See what happens to the output:
The output of the 555 does not go LOW until Pin 2 is removed from the 0v rail.

Quick Links
Legal Stuff
Social Media