

Table Of Contents
[Kits are available](mailto:colin@elechelp.com?Subject=Buying components for Reaction Timer&Body=Please e-mail the cost of components for Raction Timer by air mail to my country:****___**** and send details of how I can pay for it. My name is:____) for this project from Talking Electronics for $12.00 plus $4.50 postage.
This project uses an 8-pin microcontroller. All the timing, delays and detection is done with 6 in-out pins and the clever part is connecting two switches to a single input as well as some other features that will be discussed in the text.
The project detects your reaction time.
A white LED comes on for an unknown length of time and you need to hold down switch #1. This lets the project you are ready for a test.
The white LED goes out and a blue LED illuminates.
The time taken for you to release button #1 and press button #2 is recorded.
The display shows your time in milliseconds.
The single digit display shows 3 digits (one at a time) and this represents your reaction-time in milliseconds.
Press “START”
“Start” LED will illuminate for an unknown length of time.
When “STOP” LED illuminates, take your finger from “Start” button to “STOP” button.
Remove finger from “STOP” button.
The display will show timing in milliseconds (3 digits).
Display will turn off.
Press “START” for next attempt.
This is a very accurate and interesting project to test your reaction-time.
It’s interesting because you can compare your time against others in a challenge and find out if you have any co-ordination problems.
There are all sorts of things that can slow you down, including age, drugs, alcohol and nerve conditions.
You may not be aware of your condition and this is the perfect way to find out.
You may have noticed your lack of speedy response when driving or cycling or playing sport and this project will give you a precise indication of your capability.
But you may just want to test your capability and see if you can maintain a reaction-time with your friends or younger or older folk.
Test have shown that alcohol slows down your reaction-time considerably and you can prove this quite easily with a test.
This might make you aware of the dangers of driving when not fully attentive.
With this project you play against the “computer” and try to win.
Computers are ideal to show “intelligence.”
By coding all the possible combinations and outcomes of a particular situation, the micro is able to diagnose a situation very quickly and come up with an answer that appears to have intelligence.
Alternatively you can approach a problem mathematically and come up with a result.
Many games have an underlying “strategy” and this game is an example.
By knowing this strategy and producing simple routines to analyse each stage of the game we can achieve a result that does not need any complex mathematical interpretation.
The result is called “linear programming” in which the micro advances down the program according to the input it gets.
This part of the program requires very few instructions. The bulk of the instructions are needed to produce a display.
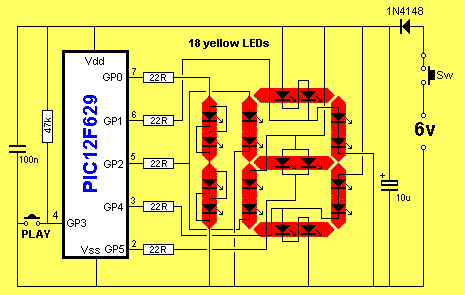
Since we have only 5 lines to drive 9 segments of a 1.5 digit display, we must use clever circuitry to illuminate any or all the 9 segments.
This is done in a form of scanning/multiplexing, that has never been presented before.
Obviously we cannot “dump” or dive the LEDs constantly because this will only illuminate a maximum of 5 segments.
We need to “time-share” the segments with two on each output. This provides up to 10 segments from 5 lines.
The LEDs on each output are arranged so one segment turns on when the output is HIGH and the other turns on when the output is LOW.
To prevent the LEDs turning on when the output is not driving either, we put two LEDs on each segment.
This means the characteristic voltage drop across 4 LEDs is about 7v and none will turn on.
The remainder of the program is taken up providing effects, such as pulsing the display, debouncing the switch and timing the players response then producing the computers response after 2 seconds.
The complete project
The surface-mount components are mounted on the underside
The PROGRAM
All the clever aspects of this project are in the program.
This is just one of our projects using the 8-pin PIC microcontroller PIC12F629. See Talking Electronics.com website for 20 more projects.
The PIC12F629 is just about the smallest micro in the PIC range and has 5 output lines and one input line.
This is all we have to control and display 12 items.
This means we have to be very clever and use skills called MULTIPLEXING and MULTI-TASKING to take it in turns to active the different items and since the program is executed very quickly, many the items seem to be activated at the same time.
Of course we can use an 18 pin chip with lots of inputs and outputs, but the skill in designing a good project is to use the smallest micro and introduce some clever programming.
That’s what we have done.
The START and STOP buttons are on the same input.
The program detects when “START” is pressed and an random time is generated for the illumination of the “START” LED.
After this timing period, the “START” LED is turned off and the STOP LED is illuminated.
The program checks to see the “START” button is still pressed after 50 milliseconds to make sure a false start has not occurred.
THE PIC MICROCONTROLLER
This project is one of a number of projects produced by TALKING ELECTRONICS to show how to convert a fantastic idea into a project, using one of the smallest microcontrollers on the market.
There are lots of micro’s and lots of courses on the web but none of them show you how to design projects like our range of 20 ideas.
Many of the courses revolve around robots, and that area is well presented and fully covered by micros that are not the PIC family.
The PIC micro was the first to be invented. It was copied by two other manufacturers and taken up, very successfully, by robot groups.
If you are interested in Robotics, go to: Arduino
The area we are covering is different. We are covering things like breath testing, lung capacity, simple games, aids and devices for the incapacitated, alarms, sounds and timers. And look through the program and study each of the sub-routines.
Each line is explained and this help you understand what each sub-routine is doing.
But you can’t just use one project.
You need to go through lots of projects and build up an understanding of what a sub-routine does.
In the end you will take one of the projects and remove some of the sub-routines and add sub-routines from different projects and gradually build up your own project.
This concept has never been discussed before but it is the only way to get into programming.
It reduces the learning curve enormously and by adding one sub-routine at a time, you can test the project and see how it is going, without getting frustrated.
It’s absolute madness to white a while program and turn it on.
Because it will not work. And you will not know where to start.
By testing a single sub-routine at a time and getting it to work, you can gradually build up a project.
Each new improvement needs to be called by a new name so you can go back to a previous copy if the thing dos not work.
I have often produced 100 “tries” as a project “comes along” and its very re-assuring to be able to go back if something fails.
We have also produced a very large guide called LIBRARY OF ROUTINES to help you produce your own sub-routines.
And you can also get assistance from Colin Mitchell
The CIRCUIT
The circuit has two tactile buttons, 14 LEDs to create a 7-segment display and LEDs for the timing as well as an 8-pin microcontroller
The display is made up of individual LEDs. This gives a voltage drop of approx 3.4v and a 22R current-limit resistor is needed.
4 LEDs across the supply require xxv for them to illuminate and that’s why they do not turn on as a group. The micro can individually activate either pair by the output line going either HIGH or LOW.
This line is toggles very quickly to provide a “pulse-line” for the two switches to detect which switch is pressed.
The diode on the input reduces the supply to 5.4v when 4 AA cells are used.
Reaction Timer Circuit
The display has 2 yellow LEDs in series for each segment
CONSTRUCTION
The project is built on a small PC board with the surface mount components on the underside. The surface mount LEDs are an old-style with three legs.
You just need tweezers, fine solder and a temperature-controller iron to produce a very neat result.
Place solder on one land then sit the component in place and heat the solder very quickly. The LEDs must be soldered very quickly otherwise they will lose their brightness. 3 extra LEDs are included in the kit as replacements for any LEDs that have been damaged.
MORE
For more details on modifying the program and burning the PIC chip, see Talking Electronics website and click on Elektor,EPE,Silicon Chip in the index.
You can find details of: PICkit-2 and Adapter connected for In-Circuit Programming at this link.
Here is the file you will need for “burning” your chip and/or modifying the program. It comes as .asm, .txt and .hex for using as a file to modify, or to read, or to burn a new chip:
;****************************************************************

    ;**Reaction Timer **

    for 12F629.asm
    ;  5-7-2014


    end
Reaction Timer Parts List
Cost: au$12.00 plus $4.50 postage
[Kits are available](mailto:colin@elechelp.com?Subject=Buying components for Reaction Timer&Body=Please e-mail the cost of Reaction Timer by air mail to my country:****___**** and send details of how I can pay for it. My name is:____)
5 - 22R SM resistors (220)
1 - 47k SM resistor (4702) or (473)
1 - 100n SM capacitor
1 - 1u SM tantalum capacitor
14 - Yellow SM LEDs
1 - SPDT mini slide switch
2 - mini tactile push buttons
1 - PIC12F629 chip (with React routine)
1 - 8 pin IC socket
1 - 1N4148 diode
2 - SM signal diodes
1 - 3mm white LED
1 - 3mm blue LED
2 - 3v battery holders
20cm - very fine solder
1 - Reaction Timer PC board
JUST THE MICRO:
Pre-programmed PIC12F629 micro with routine $5.00 plus $3.00 post
GOING FURTHER
This project is one of a number of projects using a PIC microcontroller.
The overall concept of Talking Electronics is to show what can be done with a “micro” and you can add this project to PIC Fx-1 where you can study the program and add extra routines to produce individual effects.
You can then “burn” or flash” your program into a new chip by using the PIC Fx-1 project and see what results you get.
This project has been designed for a greeting card. Instead of opening a $6.00 card to see the words “Happy Birthday,” you get a game using electronics.

Quick Links
Legal Stuff
Social Media