


Our other free eBooks,
Talking Electronics has produced two books on Model Railway Electronics.
They are Electronics for Model Railways-1 (pdf) and Electronics for Model Railways-2 (pdf)
These books have completely sold out so we have provided them in .doc format (Word) and .pdf
All the kits from the two books are still available and we get lots of orders, but you must make sure you are good at soldering and see what the module does, before ordering.
Some of the modules are available fully assembled and tested and some have been improved or simplified and you need to contact us before ordering anything.** email Colin Mitchell: [colin@elechelp.com](mailto:colin@elechelp.com?subject=Send your technical question to Colin:)
<!-- TODO FIXME COLIN: - make these web pages -->

- Electronics for Model Railways-1 .pdf (35MB) free to download

- Electronics for Model Railways-2 .pdf (56MB) free
For a list of every electronic symbol, see: Circuit Symbols.
For more articles and projects for the hobbyist:
- see TALKING ELECTRONICS WEBSITE
- email Colin Mitchell: [colin@elechelp.com](mailto:colin@elechelp.com?subject=Send your technical question to Colin:)
More than 24 CIRCUITS as of 20-8-2020
Talking Electronics website has the remaining 50 projects as kits and the instructions are available in the two books shown above. As well as more projects on the website.
Page of Contents
# This code block gets replaced with the TOC
exclude: Page of Contents
tight: true
ordered: true
from-heading: 2
to-heading: 6
class-name: "table-of-contents"
CONTENTS
- Arc Welder Simulator
- Aircraft Navigation Beacon
- Atlas #56 Switch
- Automatic Point
- Automatic Crossing Lights
- Automatic Reverser - To-Fro
- Bi-Coloured LEDs
- Boost Converter DC-to-DC
- [Capacitor Discharge Modules](#Points PartB) - 8 Types
- Capacitor Discharge Unit MkII
- Capacitor Discharge Unit MkII - mods
- Carriage Lighting
- CDU - discussion
- CDU for 4 points
- CDU MkII - Jim’s
- CDU 1,000u - slim
- CDU 1,000u - slim 2 to 5 Modules
- CDU 4,700u slimline
- CDU 18,000u - flat version
- CDU 18,000u - slimline version
- CDU 18,000u - slimline - AC or DC in
- CDU Jim’s CDU - lots of features
- CDU - for Kato Point Motor
- [Crossing Lights](#Jim’s Crossing Lights) - Jim’s
- Crossing Lights - 4 modules described
- Crossing Lights and Sound
- Current overload Detection
- Continuity Tester
- DCC Controller set-up a DCC layout
- DCC Motor Decoder
- DCC Point Controller - for Servo
- [Distribution Board](#Jim’s LEDs) - turn your LEDs up/down
- End of Track Connector
- Flashing Railroad Lights - a simple project
- Flashing Lights - a simple project
- Hall Device (Hall Switch)
- Hornby Point Motor
- Jim’s CDU MkII
- [Jim’s Crossing Lights](#Jim’s Crossing Lights) - for type A & B
- [Jim’s Slow Servo](#Jim’s Slow Servo)
- [JIM’s LEDs](#Jim’s LEDs) - distribution board
- Kato Distribution Board
- Kato Point Motor
- Kato Point Motor Controller
- Kitt Scanner
- LED Tester
- Lighthouse Light - single or double flash
- Linkage between servo and point
- Make your own Point Motor using a servo
- Model Railway Time
- Multimeter
- Overload Current Detection
- Point Controller - 555 IC 70°servo movement
- Point Controller - for 5 slow servos
- Point Motor Driver
- Police Lights
- Power Supply MkII
- PWM Throttle
- Reed Switch [Reed Switch](#Reed Switch - working)
- Resistor colours
- Reversing A Motor
- Scanner for Kitt Scanner project
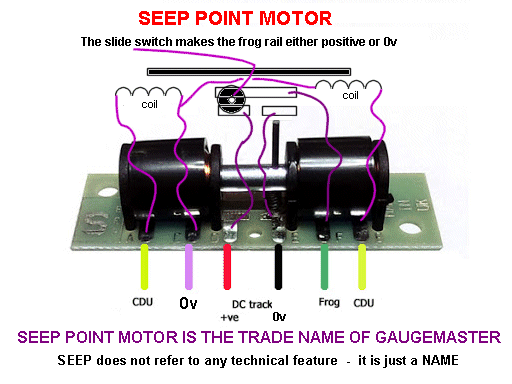
- Seep Point Motor
- Servo as Point Motor
- [Slow Servo](#Jim’s Slow Servo) - Jim’s
- Servo Speed - animate things
- Servo’s - a description and problems
- Shuttle
- [Signals - 6](#6 Signals)
- Stepper Motor - module
- Surface Mount Resistors
- Terminal Block
- Throttle
- Throttle with PWM
- To-Fro Automatic reverser
- Track Tester
- [Track Pick-off](#Track Pick-off) (voltage)
- Traffic Lights - a very simple project
- Train Detector - 7 different modules
- Train Throttle
- TurnTable
- Turtle - 2 servo’s. Slow motion switch
- [Voltage Reducer](#Voltage Reducer) - for CDU’s
- Wiring a Point Motor
- 1,000u CDU - slim
- 18,000u CDU - flat version
- 18,000u CDU - slimline version
- 18,000u CDU - slimline - AC or DC in
- 4 Points CDU
- 4-Way Traffic Lights
- 5 Points Controller - for slow servos
- [6 Signals](#6 Signals)
- [27MHz Link](#27MHz Link)
- 36v Plug Pack
INTRODUCTION
This e-book presents a lot of interesting projects for Model Railways.
Talking Electronics has produced two books for Model Railway enthusiasts (book-2 is now out of print).
The two books are:
Electronics for Model Railways-1
Electronics for Model Railways-2
Since releasing these two books, we have designed lots of extra projects and more are being released all the time.
There is a very large group of Model Railway enthusiasts around the world and nearly everyone’s layout includes more and more electronic devices, modules and controllers.
But a lot of enthusiasts are not electronically adept and have either not studied electronics or had the good-fortune to have built electronic projects.
That’s why many of the projects we have designed recently are available as a kit or already built and tested.
Even to put a kit together you have to be able to identify each part and fit it correctly as well as owning a fine tipped soldering iron and knowing how to solder quickly and cleanly to prevent overheating the component.
Most Model Railway magazines don’t have circuits and projects you can build, mainly because they don’t have the back-up of component suppliers, reliable kit suppliers or the staff needed to answer questions on fixing kits that don’t work.We have all these features at TALKING ELECTRONICS and everything is backed by emails and service.
Most emails from us are very short as we have hundreds of emails to attend to each week but you must reply with one question at a time and eventually your problem will be solved.
Colin Mitchell
If you have DCC Digital Command Control on your model railway, or are thinking about using it or starting a layout with this feature, here is a website dedicated to helping you:
http://www.dccconcepts.com.au/
Digital Command Control is a standard for a system to operate model railways so that two or more locomotives can be controlled independently on the same section of track.
Talking Electronics has a simple DCC controller for two trains on the same track and decoders that convert your DC locos to DCC.
But there are more than 3 different manufacturers of systems that are called “DCC” and each has a different set of “code-signals” to perform a particular operation.
The system (coding) we use is the USA: NMRA National Model Railroad Association
https://www.nmra.org/sites/default/files/standards/sandrp/pdf/s-9.1_electrical_standards_2006.pdf
And the hand-held COMMAND CONTROL, we use for testing all the modules is: NCE Power CAB.
HORNBY DCC has completely different DCC signals and is NOT the same as NRMA signals.
NOTE:
Many of the projects and circuit and ideas in this eBook are available from Talking Electronics as complete kits, fully assembled, or as components at very low prices.
Talking Electronics has sold over 300,000 kits during the past 45 years and about 100,000 have been Model Railway kits. You can now get many of the kits fully assembled and tested for those who have a layout but not a soldiering iron.
Many of the projects are so new and different and complex that you will not understand them fully. Email: Colin Mitchell and ask for assistance before buying or doing anything.
Here are some wonderful layouts and videos taken from the front and back of the trains on the layouts … . from MODEL RAILWAY LAYOUTS PLANS.com
http://modelrailwaylayoutsplans.com/dave-tidies-up-his-layout/?inf_contact_key=93a9574ff8f6930e95fe40eaba006a971b0a3f0fd3ee5d9b43fb34c6613498d7”
Video:
https://youtu.be/MnBfqBCWNp4
You must join: MODEL RAILWAY LAYOUTS PLANS.com because they send a new layout every day with videos.
This link show the enormous amount of wiring required for a layout with points and signals.
This is the latest: John Shows Us More Of His Stunning Layout
Here are 2 of the latest images:


There are 200 more photos of layouts on the website:
MODEL RAILWAY LAYOUTS PLANS.com and by joining them via email you will get an email each day with more wonderful layouts.
These layouts show the enthusiasm and skill and interest and dedication and endless amounts of money invested in this hobby.
Talking Electronics is only able to help with the electronics side-of-things and you will find most of the layouts in MODEL RAILWAY LAYOUTS PLANS.com have very little in the way of street lighting, billboard signs, crossing lights, boom gates etc because few people know about our range of products. Now you know, your layout can include lots more. So, don’t think you have “gone too far” until you see all the layouts and spent all your spare money for the next 5 years. Your layout can always be “passed-on” or sold, so nothing is wasted. The biggest electronics hobby is model railways. And the greatest joy is squatting-down and watching a train come “head-on.” The first time Edison presented a train like this on the “big screen,” women fainted. You will just be over-joyed with the realism it produces. And we have a To-Fro project to do this for you automatically.
Many hobbyists wonder how to start a track layout.
Rather than use the back of an old door with a single loop, you can get more track on an “L-shaped” table and start with a single track:
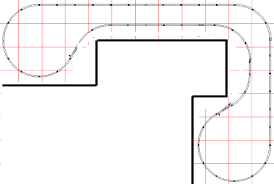

The next stage is to add points (turn-outs) or cross-overs:
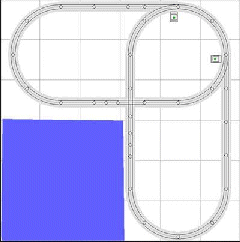
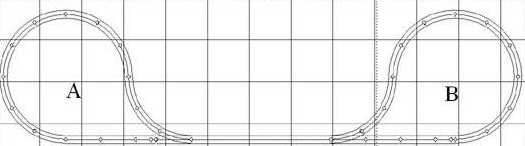
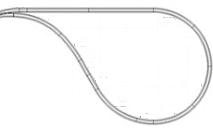
Or you can add reverse-loops:
Talking Electronics has many different modules to operate points remotely and you will find them all here, in this article, on the page you are now viewing. Here are some layouts from readers:


CHAPTER ONE - THE POWER SUPPLY
Every project needs POWER. Power is ENERGY (actually: Power over a period of TIME is energy) and it comes from a battery or a POWER SUPPLY.
We are going to describe a POWER SUPPLY that connects to the mains of your house.
A Power Supply provides TWO THINGS. It provide a VOLTAGE and a CURRENT.
The voltage can be oscillating “up-and-down” or “reversing” and we call this ALTERNATING VOLTAGE and it is given the letters AC. The letters AC actually mean ALTERNATING CURRENT and the term comes from the very beginning of supplying energy to houses when two rival companies had a war. One company supplied DIRECT VOLTAGE and the other supplied ALTERNATING VOLTAGE. The first was called DC and the second called AC.
The voltage at all power points of a house is ALTERNATING and to convert it to DC requires a transformer, a rectifier and a smoothing capacitor called an electrolytic.
We will not be concerned with any of these components but the three values we will be covering is: THE VOLTAGE THE CURRENT and if the output is AC or DC.
A POWER SUPPLY plugs into your wall socket and delivers a VOLTAGE, a CURRENT and lets you know if the output is AC or DC. A Power Supply can also be called a Wall Wart, Plug Pack, Adapter or “Converter.”
A POWER SUPPLY FOR YOUR MODEL RAILWAY
You will need at least 2 or 3 different power supplies for your layout. This is because a layout requires at least two different voltages.
Normally, these are very expensive, buy we are going to show how to use all sorts of “junk” and “discarded” power supplies from computers, shavers, toothbrushes, toys, printers, faxes, mobile phones, old electric drill chargers and anything you no-longer use, and convert them into a power supply.
They will cost you little or nothing and they will work PERFECTLY.
But you need to know what you are doing as there are lots of different options.
The Li-ion 4-cell power supply we will be describing is equal to $100 power supply (from a model railway supplier) and the $35 Power Supply (we will be describing) using 5 Li-ion cells can be used as a BENCH POWER SUPPLY for all your testing and is equal to a $100 product. And some of the other power supplies we will be describing will cost you either nothing or just a few dollars.
Once you have a power supply, we will describe the next item on your list, a THROTTLE. (This is covered in Chapter 4 - halfway down). This is the module that connects between a power supply and delivers a voltage and current to the track to control the speed of the loco.

A typical “Wall Wart” or “Plug Pack” or “Adapter”
Power supplies are also called wall warts, plug packs, chargers or adaptors and must be of the type that is SAFE. In other words, you must be able to touch the output wires and the tap in the kitchen and not get killed.
This is not a joke. If the adaptor is only designed to be used with a fully plastic item, it may be lacking isolation as you cannot touch any of the wiring. This will only refer to very old devices where a simple capacitor was used to convert the household voltage to a situation where the output current and voltage was fairly low when you measured across the two output wires. But when you measured between either wire and the frame of a toaster, the voltage was 315 volts !!!
Throw out anything that you are not absolutely sure is safe.
I had one customer blowing up one my modules because he has two plug packs and one was leaking. It put a high voltage on the module and damaged the microcontroller 5 times. I asked him to put the module on batteries to prove the problem was the plug packs. He changed the plug packs and fixed the problem.
Suppose you have a handful of say 10 different, old, unwanted, useless adaptors.
We are going to show how to connect two or three together to produce a voltage suitable for many of our railway projects.
Make 4 piles. The first will have current ratings from 100mA to 500mA.
The next will have current ratings from 600mA to 1 amp
The third pile will be 1 amp and higher.
And the fourth pile is for those adaptors that deliver AC.
From these piles you will be able to make a power supply using two adaptors by wiring the outputs IN SERIES.
Many of the CDU projects from Talking Electronics need an input of 20v DC to 25v DC. The current can be as low as 100mA as the electrolytics in the CDU will take up to 1 amp if the the power supply can deliver this current, but if the available current is 100mA, the CDU will simply take longer to charge the electrolytics.
So, almost any power supply can be used and it is the voltage that is needed so the electrolytics charge to the maximum.
If you have two 12v DC adaptors with a current rating from 100mA to 1 amp, they can be combined together by connecting the output wires IN SERIES. If one adaptor is 100mA and the other 1amp, they can be combined and all that will happen is the output current will be limited to 100mA. You can even connect 3 adaptors in series to get a total voltage of 25v.
This is one way to use low-output-voltage adaptors to power the CDU project on your model railway.
Some adaptors are only 3v to 4v to 5v and they can all be combined.
USING DC ADAPTORS IN PARALLEL
You can also connect adaptors in PARALLEL - DC adapters. This involves connecting the negative output of one to the negative of the other and the two positives together.
Ideally, the output voltage of each adaptor should be the same as this will equalise the load-sharing.
But many adaptors have a high output voltage that drops as the load is applied.
For instance a 12v 500mA adaptor can be as high as 17v on no-load and this voltage will drop to 12v when 500mA is flowing.
The other adaptor may be 14v on no-load and 12v when 500mA is flowing.
These two adaptors can produce a 12v 1 amp power supply ONLY IF the actual sharing between the two is EQUAL. Otherwise the output voltage will be 17v on no-load and gradually drop to 12v as the current flowing to the load increases to 1 amp. And the current-sharing will change from 0:100 % to something nearing 50:50 %
It is pointless placing a 12v and 5v adaptor in parallel as the 5v adapter will never deliver any current.
THE SOLUTION
The two adapter share 50:50 when the output voltage is exactly the same. This will never be the case but no damage will be done if each adapter has a diode on the output that prevents one adapter passing any current to the other. You will lose about 0.7v and the output voltage will be 0.7v lower than previously, but it will allow two adaptors to be placed in parallel.
What will happen is this: The adapter with the higher voltage will deliver ALL the current. As you increase the velocity of the loco, the increased current will cause the output voltage to reduce and when it matches the output voltage of the second plug-pack, the two will share the current. In reality the second plug-pack will simply “start-delivering” and the voltage will not reduce much further.
If you want to see if each adaptor is supplying equal current, replace the diodes with two small “one ohm” resistors (one in each line) and operate your loco. Feel each resistor and see if they are getting “equally-hot.”
Here is a typical 18v power supply for a model railway. This is the ideal supply, but it is expensive and our aim is to show how to produce the same output voltage by using much cheaper items (Plug Packs etc.)

18v Power Supply
USING AC ADAPTORS IN PARALLEL
You can connect AC adapters in parallel, providing they produce the same output.
The only way to check this is to connect them together at one end and flick the other two leads to make them spark. If they produce a large spark, you need to change the leads from one adapter.
If you flick the leads and a small spark is created, they do not match perfectly and one or both will get hotter than normal as current will flow through the secondary windings.
It is very difficult to make any other tests without using a multimeter.
When you connect one end of each together and connect a multimeter (set to low AC voltage) to the other two leads, the meter should NOT SHOW any voltage. This means the output of each adapter is rising and falling at the same time and with the same amplitude.
USING DC ADAPTORS IN SERIES
Here are two Plug Packs connected in series:


You can connect any TWO or THREE together and the output voltage will be the sum of all the voltages and the current will be determined by the lowest current of the 3 adapters.
This is very handy for CAPACITOR DISCHARGE UNITS as they need a voltage of approx 16v to 25v DC to fully charge the capacitors.
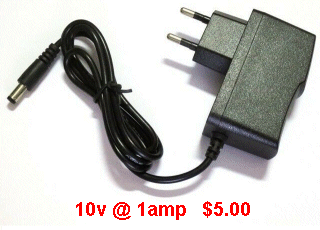
If you do not have any old Plug Packs, you can buy new ones on eBay for a few dollars.
You can buy 1Amp or 2Amp Plug Packs.
You will need:
- 1 x 12v adapter and 1 x 5v adapter for a THROTTLE.
- 2 x 12v 1Amp adapters for a Capacitor Discharge Unit.
- Total of 4 Plug Packs.
Here are some examples:


THE BEST ADAPTOR:
The best DC adapter for all the CDU modules is a 24v or 30v supply made from two 12v adaptors in series of three 10v adaptors in series.
If the CDU module has an on-board regulator, the 30v supply is the best as it will charge the electros to a maximum of 27v.
For all the other CDU modules, you should use two 12v adaptors in series and the electros will charge to about 23v.
NOTE: Sometimes you will use a charger (wall wort) (or two in series) to charge a Capacitor Discharge Unit and the inrush current will be more than 1 amp and one of the chargers will “close-down” and fail to deliver its voltage. The solution is to add a 12 ohm resistor for 12v, 18 ohm for 18v or 24 ohm for 24v that is soldered to the positive lead. This will limit the current to 1 amp on turn-on.
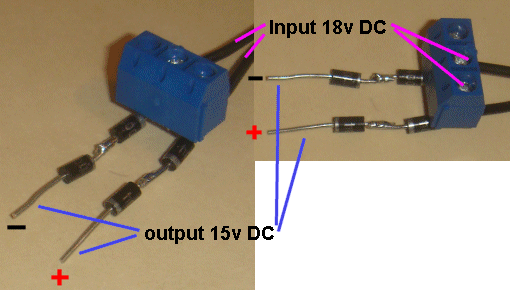
The $2.50 plug Pack above was purchased as 12v @ 1 amp. It was easily opened-up via a screw and clip, to reveal the PC board shown below.
The output voltage is determined by the zener diode at the front of the board. The 12v zener was replaced with 15v and now the output is 15v DC. I would limit the current to 800mA, but a 15v supply can be connected to many of the throttle circuits covered later in this article to give 0v to 12v DC output. The zener diode is “sitting high” to show the diode in this discussion and also to allow test chips to measure the voltage across it. It was then resoldered close to the board and the cover replaced. This module is LIVE when out of the case, so don’t touch anything.

The new 15v zener converts this power adapter to 15v output.
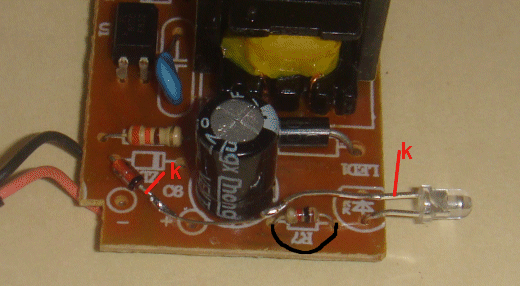
You can also use a white LED in series with the 12v zener diode to get 15v output. Note the cathode of the zener is connected to the cathode of the LED and the 1k current-limiting resistor is linked with a jumper (it is not used).
Thus the 15v output drives the LED (3v drop) and the 12v zener drops 12v. The anode of the zener is connected to 0v.
The result is 15v output.
CONNECTING A BATTERY CHARGER
A 12v battery charger is NOT a 12v DC power supply.
Firstly, it is NOT DC but a voltage called PULSING DC or PULSATING DC. It can also be called UNFILTERED DC.
One lead is always considered to be at 0v and the other lead rises from zero to about 18v and falls to zero. For 50Hz mains it produces 100 peaks per second.
If you measure this voltage with a DC multimeter you will get a reading of about 12v because the meter trying to read the maximum. If you put a large electrolytic across the output, you will see the 18v reading.
The electrolytic is storing the peaks.
If you connect this battery charger to a project, the electrolytics in the project will store the voltage and the project will see 18v. If the electrolytics are large (say 1,000u for each amp required), the voltage will be quite smooth and suitable for the project.
But you must remember, the input voltage is about 18v.
When you connect a battery to the 12v battery charger, each cell produces a characteristic voltage of about 2.1v. This is called the electronegativity of the cell to produce 12.6v for the 6-cell battery. It is the battery that prevents the reading rising above about 12v. When the battery gets fully charged, this reading will rise to about 13.6v but when the battery charger is removed the voltage is 12.6v.
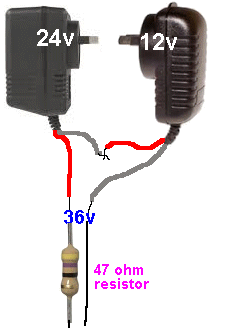
36V !!
Some of the CDU projects can be supplied with 30v to 36v DC to fully charge the electrolytic(s).
You can make a 36v supply very cheaply by using 24v and 12v plug packs and these are available on eBay for less than $10.00 (for both) including postage.
Simply connect the leads as shown in the following diagram to get 36v.
Some of these plug packs have a current detecting overload circuit and “shut-down” if the current is more than 1 amp (even for a millisecond).
To prevent this we add a 47 ohm resistor.
This “trick” only applies when you are using the plug packs for our CDU modules as the high current is only required for a few seconds and then falls to a very low value and the resistor will not get warm when used for this particular application.
THE ALTERNATIVE TO A WALL WORT
Because a Wall Wort producing 13v AC or 27v DC is fairly difficult to obtain (almost impossible) Talking Electronics has produced a number of CDU modules that accept almost any voltage (AC or DC or DCC) from 9v to 15v (either AC or DC) and the on-board voltage generating circuit will produce an output of exactly 27v DC.
The latest module to have this feature is [JIM’s CDU MkII](#Jim’s CDU MkII) and it has a mini trim pot to adjust the output voltage from 13v to 27v DC to cater for all different types of solenoid points.
This module has on-board push-switches to control the position of the point and each module is designed to be connected to a single point or two or three points that ALL need to be activated AT THE SAME TIME. You can see the project [HERE](#Jim’s CDU MkII).
This is just one way to get around the problem for the moment, but at some point in your plans to produce a large layout, you will need a POWER SUPPLY. You can spend a lot of money on a POWER SUPPLY but Talking Electronics is always aiming to show the cheapest and best way to get something at the lowest cost.
Let’s look at what we are talking about:
BENCH POWER SUPPLY
A Bench Power Supply is the name given to a power supply that looks like the following images:


They come in all sorts of arrangements and offer current limiting and output voltages from 0v to 35v (or higher) at 1 amp to 10 Amp or more.
But these cost a lot and you can build a similar “instrument” (a piece of test gear is called an INSTRUMENT) for less and since it will be “out of a case” you will be constantly reminded of how it has been put together.
Power Supply MkII
0-12v DC(voltage adjustable) 0-1Amp(current adjustable) Power Supply MkII kit from Talking Electronics for $20.00 plus $7.50 postage. Click HERE for details.
(see the full article HERE)
The following project is a 0v to 12v BENCH POWER SUPPLY with current limiting and has an output of 1 amp. This is sufficient for all types of testing and you can increase the values by referring to the circuit.
The whole idea is to create projects at the lowest cost and have them open for viewing so you can remember how they were assembled.
This is the cheapest, safest Power Supply you can get.
It will deliver 0-12v at 1amp and you can limit the current to a few milliamp so you will not damage a project you are designing.
It has 14v at 5 amp - called an AUXILIARY OUTPUT - that connects directly to 4 cells and you need to be careful as the Li-ion cells are capable of delivering up to 50 amps if the wires are shorted.
This project is called a BENCH POWER SUPPLY as it is a handy piece of TEST EQUIPMENT that is designed to deliver a controlled voltage for a project you are developing.
It is not a continuous power supply as the cells need to be charged (when the indicator LED does not illuminate).
The Li-ion cells are available on eBay for a few dollars each and you can buy a single-cell charger for a few dollars. These chargers are microcontroller based and they stop charging when the cell is fully charged. You cannot charge the cells from a “battery charger.”
You can also get a single-cell charger PCB that connects to your laptop USB socket and it will charge a cell very quickly. But you will only be able to charge one cell at a time.
All these things are covered later in the article.

You can use 2 x 470R @ 0.25watt or 1 x 1k @ 0.5watt

The new PC board uses 1k (in place of 220R shown above as the current limiting resistor for the white LED) to keep the brightness low to stop blinding you.
PARTS LIST - Power Supply MkII
$20.00 plus $7.50 postage.
Click HERE for details**
4 - 1R 0.25 watt resistors
1 - 4R7
1 - 100R
1 - 220R to be replaced with 1k
(the old board shows 220R - new board uses 1k)
2 - 470R (or use 1k @ 0.5watt resistor)
1 - 1k (as shown in circuit above)
1 - 22k
1 - 150k
2 - 500R trim pots
2 - knobs to suit
1 - 3v9 zener
1 - 6v2 zener
1 - 9v zener
1 - BC338 transistor
1 - TIP31 transistor
1 - BD679 transistor
1 - 3mm white LED
4 - 2-screw terminal blocks
2 - heat fins
4 - sets of nuts and bolts and 5 washers
4 - hook-up wire for battery boxes (to replace the rubbish on the battery boxes)
2 - side-view panel meters and 2 stickers and foam tape to hold them in position
1 - toggle switch
10cm 0.5mm tinned copper wire for meters
30cm fine solder
Backing card and 4 feet and foam tape
1 - Power Supply MkII PC Board
Trickle Charger Components are included:
- 2 - 180R4 - 3v9 zeners
- 2 - 9v zeners
- 3 - 3mm white LEDs
- Trickle Charger PCB
Single-cell charger kit $7.00:
- 1 - USB voltage/current monitor module
- 1 - single cell charger PC board
- 1 - single cell battery box
- 1 - 1R0 5-watt wire wound resistor
These parts are not included in the kit:
- 5 - 18650 Li-ion cells
- 1 - 4-cell battery box
- 1 - single cell battery holder
- 1 - 4 cell charger
- 1 - single cell charger
or
USB charger module and single cell battery box
These items can be bought on eBay.
Here is a set of 4 Li-ion cells. Just use the 4 lower cells in a 4-cell carrier. The top cell is just to increase the voltage slightly so the project will produce slightly more than 12v at 1 amp.

You can buy Li-ion cells for about $2.50 each on eBay. They have a capacity of about 2 Amp-hour to 3 amp-hour.
The 4-cell carrier can be bought on eBay for about $2.50
The following 4-cell charger can be bought on eBay for about $3.50.
This will charge the cells at about 70mA to 150mA and it will take about 24 hours to fully charge a depleted set of cells.

The charger below will charge a single cell at about 500mA to 700mA and connects to your USB port on a laptop. You can only charge one cell at a time with this arrangement.

The 1 ohm resistor will discharge the cell quickly. The cell voltage must not go below a minimum voltage of 2.8v. You need to place a voltmeter across the resistor while discharging to make sure you do not discharge the cell below its recommended minimum. The module in the photo charges the cell quite quickly and at 4.2v the cell is charged to 90% (or more) and the circuit turns OFF.
You must use a charger that turns OFF when the cell is charged as this type of cell cannot be left charging on a “trickle charger” as the cell will produce internal “whiskers” and it will get damaged.
More details of the project shown above can be found HERE. It describes a 1 amp adjustable POWER SUPPLY that can be used to power your locos or as a BENCH POWER SUPPLY for all your testing.
CURRENT
How much current do you need? That is: how many AMPS do you need?
A small loco takes 300mA to 600mA and you need a 1AMP supply to make sure the necessary current can be supplied as the motor will take 800mA to 900mA when starting and accelerating and when hauling a number of coaches.
For a DC layout, you will generally only be running one loco at a time and a 1-Amp supply will be sufficient.
The current values mentioned above apply when the supply is 12v.
If the supply drops to say 10v, the current will be less and if the supply increases to 14v, the current will increase by a considerable amount (when the same motor is connected). It is impossible to state the actual values because the current taken by a motor increases and decreases due to the load and this load is not only the velocity of the train, but the acceleration and inclination of the track and also the rpm of the motor (as it takes more energy to rotate at higher rpm) and lots more current when the motor is “loaded.”
AC TO DC
Before we finish, there is a bit of theory that needs to be understood.
We have mentioned the AC voltage and DC voltage on (or for) many of the projects.
The two values are a little bit different and you may be wondering why.
The technical reason is this: When you deliver 10v AC to a circuit that has diodes and capacitors (electrolytics) that convert the voltage to DC, the output is 40% higher than “10” because the 10v AC is actually 14v at the instant when the voltage is rising to a maximum and the capacitors get charged to this value.
There is a loss of about 1.5v across the diodes in the circuit and the output becomes 12.5v
Quite often the manufacturer of the 10v AC transformer will add a few extra turns and the voltage will be 13v AC (under no load). This is done because the output drops when full current is delivered (because the transformer is very poor quality) and this will ensure the output never goes below 10v AC. It drops from 13v to 10v - under full load.
However the 13v AC will produce 18.2v AC minus 1.5v = 16.7v DC when unloaded and if you deliver more than 13v AC, the resulting unloaded voltage may be too high for some of the electronic components - especially IC’s.
CONCLUSION
You need to buy or make 2 POWER SUPPLIES:
15v to 17v @ 1 amp POWER SUPPLY for a throttle (to drive a loco - suitable for 1 or 2 locos).24v POWER SUPPLY for a Capacitor Discharge Unit. (less than 100mA needed)
Cost will less than $15.00 for up to 4 Plug Packs. (see above for details of the Plug Packs you need to buy.
If you build a Bench Power Supply (see Power Supply MkII) you will have an adjustable output voltage (0v to 12v DC) and you will be able to limit the current (from 30mA to 1 amp) so the project you are testing will not be damaged.
When you have the 2 Power Supplies, you can decide on the Capacitor Discharge Units and the Throttle module.
Under NO circumstances should you build a power supply with soldered wires or bare joints or bare leads going to the mains or any wiring with bare MAINS connections. One day a child may come and play with your equipment and touch exposed wires and get thrown across the room.
Always use Plug Packs (Wall Warts) or Power Supplies in a professional case. They are called “double insulated” and that means they do not have an earth lead. It also infers they do not have a metal case and this makes them extremely safe.
CAPACITOR-INPUT POWER SUPPLIES
You may find instructions or a circuit on the web for a CAPACITOR-INPUT POWER SUPPLY.
This is a power supply with just a single or even 2 capacitors connected to the mains, followed by a bridge and an electrolytic. There is no transformer in this type of power supply and although you think the capacitor separates the mains from the 12v output, IT DOES NOT.
It does reduce the voltage of the mains to say 12v DC after the bridge, but if you touch either of the output wires and a water tap or kettle or toaster, you will get a jolt of 240v AC and although the current may be less than 100mA, you only need 15mA to kill you. It’s the duration of the electric shock that is finally fatal and if you are under a railway layout and cannot remove your hand fast enough, you will get fried.
Another point to remember. This has NEVER been mentioned before. The output of a cap-fed power supply is only 12v when the diode bridge and 12v zener is connected. If any of these wires are cut, the “12v section” becomes 336 volts !! The 12v zener is called the LOAD and when you connect your project to this power supply, the current passing through the zener is now diverted from the zener and to your project. But if the zener “blows up” and then your project “blows up” you will have 336volts on your project.
This type of power supply is illegal in many countries and hopefully you will never see one. BUT this comment is to inform you: NOT TO BUILD A CAPACITOR-INPUT POWER SUPPLY.
BOOST CONVERTER
Finally we have a module that will answer a lot of your problems.
It is a DC to DC converter that converts a low voltage DC to a higher voltage DC. Commonly called a BOOST CONVERTER. (A converter that converts a high voltage DC to a low voltage DC is called a BUCK CONVERTER).
All our Capacitor Discharge Units now come with a Boost Converter module connected to the input terminals of the CDU module.
Here is an example:

The input wires (on the right) will accept a DC voltage from 5v to 20v DC (from a plug pack or wall wort) and produce an output voltage that has been adjusted by the 10-turn pot. We set the output voltage to 26.5v so the electrolytics on the CDU module see a voltage of 25v (after the input diodes).
This has now solved all our problems of getting the right voltage for the CDU modules so they produce the full output.
The boost module can deliver up to 2 amps and this means the CDU module will charge very quickly (if required). However any plug pack can be used and even a 200mA plug pack @ 5v will charge the module in less than a few seconds. The speed of charge (recovery) will depend on the voltage and current capability of the plug pack and the number of electrolytics on the module and the microfarad value of each electrolytic.
CHAPTER TWO
THE POINT
Using a motor to control a point
**This is PART “A” of our discussion on controlling a point.
They are called POINT CONTROLLERS
(see [PART “B”](#Points PartB) to control a point containing a solenoid)
POINTS - TURNOUTSTalking Electronics makes 8 different modules to assist and change and active the points in your layout (to suit different voltages and different situations). That’s why you have to read Part “A” and Part “B”**
A Point Controller is a “device” or “MOTOR” or “SOLENOID” that changes the point from “ahead” to “Siding.”
The ACTUATING MECHANISM can be a double-acting solenoid to move the rails from one position to the other. Or it can be done with a motor and gearbox or a micro motor and gearbox or a SERVO or even a LINEAR ACTUATOR. These all come in different sizes and at different costs.
That’s why there is a number of different projects.
This section does not cover the SOLENOID POINT. See Chapter Three to control a SOLENOID POINT with a CAPACITOR DISCHARGE UNIT.
All layouts need a point or lots of points so you can make an impressive layout and have the trains leave and enter the main line and provide shunting yards and loops and interconnecting lines.
There are so many choices for a point and so many different expenses that we have simplified everything and created the best control modules on the market at the lowest cost for all the different situations.
WHERE DO YOU START?
Start by buying the cheapest left or right hand point FOR MANUAL OPERATION. This is the version we will convert to either remote or automatic operation.

This is a MANUAL POINT
If you have a solenoid operated point, we will cover it later:

This is a point with a solenoid actuator to move the rails. We will cover this later in the article. We will firstly cover a MOTOR to activate the point.
CHOICE NUMBER 1
This module converts a manual point into a remotely controlled point.
There are a number of modules available and the differences will be cost, size, and fast or slowing changing of the point.The first choice is: POINT CONTROLLER using 3v MOTOR and WORM GEARBOX for $20.50.
Click [Here](mailto:colin@elechelp.com?Subject=Buying Point Controller using Motor and worm gearbox $20.50 plus $6.50 postage &Body=Please email the cost of Point Comtroller using Motor and worm gearbox by air mail to my country:**___****and send details of how I can pay for it. My name is:____) to order.**
We connect a motor and worm gearbox as shown in the following image to the actuating lever on the point:

Image shows the control rod on the gearbox is bent to fit the push-bar of the point.
The movement of the control rod will activate the point.
You have to provide some “springyness” to the push-bar so that a train coming in the wrong direction will (from the right) will separate the rails and not be derailed.

The arm (lever) on the output of the gearbox is activated about 90° but will move less than this when restricted by the “throw” of the lever connected to the point.
Cut the arm to length and bend it carefully by using a pair of pliers to hold the arm and don’t let it move where it is held by the plastic output gear.
Mount the motor and gearbox with double-sided tape when adjusting its position and finally use glue to hold it in place.
The two 500R pots on the latest PC board (not shown) allow you to adjust the strength of the “throw” of the arm.
The following image is the module that controls and limits the motor’s operation. It allows the motor to be connected to a 9v to 16v AC or DC supply.

The module with motor/gearbox is available from Talking Electronics
for $25.00 including postage.

You get a micro motor with worm gearbox and module and DPDT push-push switch and the position of the point is shown on the red and green LEDs on the module. The movement of the point is fairly rapid. There are other modules with slow movement. 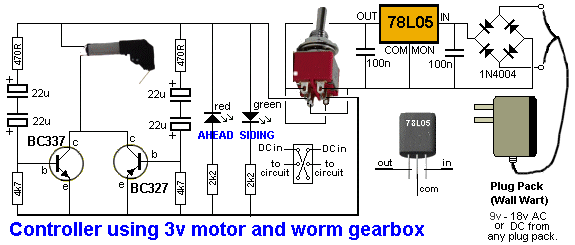
The circuit above uses a 3v micro motor with worm gearbox. The latest PC board has a number of improvements with two 500R pots to adjust the strength of the throw of the arm.
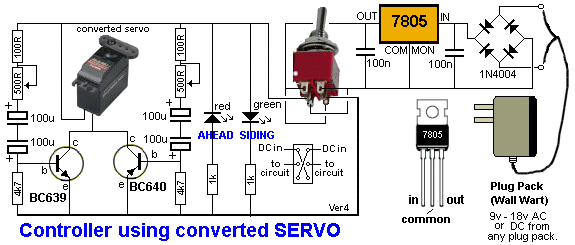
CHOICE NUMBER 2
In place of the micro motor and worm gearbox shown above, you can use a converted servo, as shown in the following image. The servo is converted to a MOTOR and GEARBOX.This module is called POINT CONTROLLER using converted SERVO for $19.00 plus $6.50 postage.
Click [Here](mailto:colin@elechelp.com?Subject=Buying Point Controller using converted Servo $19.00 plus $6.50 postage &Body=Please email the cost of Point Controller using converted Servo by air mail to my country:**___****and send details of how I can pay for it. My name is:____) to order.**

The activating module comes with a push-push switch and knob, that clicks when pushed and unclicks when pushed again.
The module limits the output arm of the servo to less than 45 degrees and the position of the point is shown on the red and green LEDs. A length of gold wire is included for the linkage.
The movement of the point is fairly rapid. There are other modules with slow movement.
CHOICE NUMBER 3
This module is identical to Choice Number 2, but this has two mini trim pots to adjust the amount of travel of the arm on the servo..
This choice is: POINT CONTROLLER using converted SERVO ver 4 for $21.50.
Click [Here](mailto:colin@elechelp.com?Subject=Buying Point Controller using converted servo Ver4 $21.50 plus $6.50 postage &Body=Please email the cost of Point Comtroller using Motor and worm gearbox by air mail to my country:**___****and send details of how I can pay for it. My name is:____) to order.**
The Printed Circuit Board has 2 x 500R mini trim pots to adjust the amount of travel of the output arm.

CHOICE NUMBER 4
This module is called POINT CONTROLLER using 555 IC for $18.00 plus $6.50 postage.
Click [Here](mailto:colin@elechelp.com?Subject=Buying Point Controller using 555 IC $18.00 plus $6.50 postage &Body=Please email the cost of Point Controller using 555 IC by air mail to my country:**___****and send details of how I can pay for it. My name is:____) to order.**
The on-board toggle switch changes the point via a servo fairly slowly and this is the main difference from the other modules. The servo and gold-wire linkage are included with the module. The module outputs a PWM signal to the servo to provide a limit-to-rotation in both directions and this is adjustable on the new version via mini trim pot (not shown on photo).

The on-board LEDs show the position of the point.
CHOICE NUMBER 5
This module is called POINT CONTROLLER using 555 IC with mini trim pots Ver4 for $20.00. (plus postage $6.50).
Click [Here](mailto:colin@elechelp.com?Subject=Buying Point Controller using 555 with mini trim pots and converted Servo $20.00 plus $6.50 postage &Body=Please email the cost of Point Controller using 555 with mini trim pots and converted Servo by air mail to my country:**___****and send details of how I can pay for it. My name is:____) to order.**

Click [Here](mailto:colin@elechelp.com?Subject=Buying Point Controller using 555 IC ver4 $20.00 plus $6.50 postage &Body=Please email the cost of Point Controller using 555 IC ver4 by air mail to my country:**___****and send details of how I can pay for it. My name is:____) to order.
This is the latest version with mini trim pots to adjust the end positions of the converted servo**.
CHOICE NUMBER 6
If you want the servo to move slowly to produce a realistic effect, we have a module called JIM’s SLOW SERVO for $xx0.00 including module, servos and extension lead.
Click [Here](mailto:colin@elechelp.com?Subject=Buying 5 Point Controller $40.00 plus $6.50 postage &Body=Please email the cost of 5 Point Controller by air mail to my country:**___****and send details of how I can pay for it. My name is:____) to order.**
This module allows the servo to move very slowly. (PC Boards are currently being produced)
CHOICE NUMBER 7
If your layout has a number of points that need controlling, we have a 5 SERVO Controller module that controls 5 servo’s separately with very slow action.
This module is called 5 POINT CONTROLLER for $45.00 including module with microcontroller, 5 servos and 5 extension leads. The servos provided with this module are the small 9g version as these servos are guaranteed to work very very slowly from a particular manufacturer. The servos are $2.50 each and the extension leads for the servos are $1.50 each. You can also get aluminium brackets to hold the servo under your layout for $2.50 each.
The 5 POINT CONTROLLER costs $20.00 if you have your own servos, but remember we test all modules with the very small servos before posting, to make sure they all respond to the PWM signals. The new module uses a PIC16F628 microcontroller as it has more input/output lines and the on-board LEDs show the position of each point. Click [Here](mailto:colin@elechelp.com?Subject=Buying 5 Point Controller $45.00 plus $6.50 postage &Body=Please email the cost of 5 Point Controller by air mail to my country:**___****and send details of how I can pay for it. My name is:____) to order.**

The on-board tactile buttons need to be pressed for about 1/2 second for the program to recognise the button and activate the servo to set the point to the correct position. You need to set each point so that the PC board reflects the correct position of the point. Do this will all 5 points and you are ready to drive the loco.
SUMMARY
A manual point costs between $15.00 and $25.00. (you can buy these from any model railway shop) The modules above cater for all sorts of different requirements (such as speed of activation, cost, 1 or 5 points) and this means a remotely activated point can be added to your layout for as little as $40.00
But there are other options, so keep reading.
And there are a number of options for a point that has SOLENOID OPERATION - and this is covered next.
POINT MOTORS
Here are 4 common POINT MOTORS.
They can be connected to our CDU Modules to produce fast switching of the rails and at the same time the CDU Module prevents the solenoids getting hot or warm.

CHAPTER THREE
THE POINT
Controlling a SOLENOID point using a CDU module
This is PART “B” of our discussion on controlling a point.
This Part uses a Capacitor Discharge circuit to control a solenoid on your point to prevent it “burning out.”
You must read all of this discussion as some modules can be wired to operate many points (one after the other) while some modules can only be connected to ONE POINT.
[Here is the module to operate a KATO point motor.]
(see [PART “A”](#Points PartA) to control a point with a motor)
The most common type of point motor is a solenoid that moves the rails from one position to the other.
It is also called a TURN-OUT MOTOR:
This is s PL-11 Point Motor

- Here is the inside of a PL-11 POINT MOTOR.
- It must be activated for less than 1 second.
- It was activated for 4 seconds and it MELTED !!
- The plastic core melted and bubbled through the coil and the activating rod is FROZEN. That’s what this article is all about.
- If you add a CDU module to activate these POINT MOTORS they will not get damaged.

PECO PL-10 or PL-34 POINT MOTOR and the 3 wires needed to activate the two solenoids.
They are called PULL SOLENOIDS because the core is not a magnet.
The SOLENOID Point Motor consists of two coils of wire that alternately pull a metal rod into the middle of the solenoid and at the same time change the position of the point.
It is also called a double-acting solenoid because it will both PUSH and PULL.
The “core” or “plunger” is not a magnet and it will only PULL into a solenoid. The solenoid will accept AC or DC and it can also be called an ELECTROMAGNET.
Because an electromagnet only “pulls,” you need two to produce PUSH and PULL motion. It is really PULL-PULL motion. The core only PULLS into a solenoid. (When the core is a magnet, you can get push-pull action with a single winding)
But because the core in the solenoid point motor is classified as a SOFT IRON CORE, you need 2 coils.
But the problem is the coils have very low resistance.
The resistance of the coil is about 4.5 ohms for some types and 11 ohms for others and when connected to 12v, the current will be nearly 1 to 3 amps. They must only be activated for less than half a second and if the 12v is connected for more than 10 seconds, the plastic case will start to smell and melt. In a few more seconds the solenoid will be completely damaged. The photo above was damaged in 4 seconds !!
To prevent this from occurring, you need an electronic module that delivers the current for a very short period of time (so that nothing gets warm).
This module is called a CAPACITOR DISCHARGE UNIT and it contains 2 or more 1,000u (or 2,200u or 4,700u) electrolytic capacitors that deliver the required energy.
These capacitors get charged slowly and when they are fully charged, you can press a switch and operate the point. It does not matter how long you hold the switch because the capacitors are drained in less than a second.
If you operate some of the solenoid point motors DIRECTLY from the 12v train supply or the 16v AC supply from the train transformer, some will take more than 3 amps and produce a more than 30 watts of heat. This is equal to a small soldering iron and it will quickly melt the plastic case.
If you already have a PASSING SWITCH or a “spring return toggle switch” with a centre-off position, it will work perfectly, but if you have visitors working the control panel, they may leave the switch ON or change it very slowly and it can cause the solenoid to heat up.
To prevent any of these catastrophes, we have designed a number of CDU - CAPACITOR DISCHARGE UNITS to operate the points safely. These CDU modules are connected between the
PASSING SWITCH and the power supply to give you double protection.
So, it’s: POWER SUPPLY, CDU MODULE, PASSING SWITCH, POINT.
PRE-VOLTAGE MODULE
After 20 years of selling CDU modules, we found a pre-voltage module in the form of a BOOST MODULE that will convert any voltage from 3v DC to an output of 27v DC.
This has changed our range of CDU modules enormously. The photo shows the pre-voltage module connected to CDU Module MkIIB however it can be connected to ALL our modules to make them operate at full output, no matter what voltage power supply you are using.
Previously it was very difficult to get 16v to 24v supplies but now the problem is solved.
You can ask for the pre-voltage module for any of the CDU modules you have already purchased.
The output voltage of the pre-voltage module is increased when the screw of the 10-turn put is rotated ANTICLOCKWISE and and you have to keep turning and turning and turning the screw as the voltage only increases when the wiper inside the case is very very near the end of its travel.
You need to monitor the output voltage as it will increase to 40v from some modules and this is too high for the electrolytics in the CDU module.
STRENGTH OF A CDU
Here’s a way to understand the “strength” of a CDU.
It’s only an approximate comparison, but it will help you.
We take the simplest CDU with 2 x 1,000u electrolytics and charge them to 25v. We say this will operate ONE POINT.
If we have 2 x 1,000u electrolytics and charge them to 35v, we can operate TWO POINTS at the same time. This is because the voltage has increased from 25v to 35v and the voltage plays a BIG part in producing the energy.
If we have 2 x 2,200u and charge them to 25v, we can operate TWO POINTS at the same time.
If we have 2 x 2,200u and charge them to 35v, we can operate FOUR POINTS at the same time.
If we have 1 x 4,700u and charge it to 25v, we can operate FOUR POINTS at the same time.
If you have an old-style point, it can require more energy than a new style.
And N-gauge points may require less energy than HO-points.
It is not wise to operate 3 or more points at the same time from a single supply-line (from a CDU) as there is nothing in the system to share the energy equally. It may work, simply because you are over-supplying the energy.
REDUCING THE ENERGY
If the point “bangs too hard,” the energy from the CDU can be decreased by [reducing the voltage](#Voltage Reducer). You can use a lower voltage supply. If you are using AC, the voltage on the capacitors will be about 40% more than the AC reading of the supply you are using. This is because the AC voltage is rising and falling and the CDU detects the “top of the wave” whereas the multimeter reading is a value below the top of the wave. And the CDU charges the capacitors to to peak voltage produced by the AC.
If you add a diode between the wire going to the positive terminal of the CDU and the actual positive terminal of the CDU, the voltage will be reduced by 0.7v. The cathode of the diode must be connected to the positive of the CDU. Keep adding diodes in series and after about 5 diodes it will start to have an effect. If the voltage is AC, the voltage will reduce by about 1v per diode.
OVER-VOLTAGE
Capacitor Discharge Units (CDU’s) contain electrolytics with a high capacitance and it is important NOT to charge them to a voltage higher than the VOLTAGE RATING on the component. For instance, a 4,700u 25v electrolytic should not be charged to a voltage higher than 27v. And a 1,000u 35v electrolytic should not be charged to a voltage higher than 38v. A customer charged a 1,000u 25v to 42v and it got very hot !!!! I had to replace it as it started to leak internally and continued to get hot, even at 25v. So, it was permanently damaged.
When you connect a CDU to a power supply, take a reading of the output voltage as this will be the voltage across the electrolytics and do not exceed the voltages I have suggested above. If the end-cap is bulging and not FLAT, is has been overheated and may leak or explode at any time. If it gets hot, even if the rated voltage is across it, the electrolytic is leaking internally and may explode. An electrolytic in our modules should remain cold at all times.
Using a DC supply (such as from a wall wort or plug pack) is the easiest way to deliver the right voltage.
You can get 24v 1 amp wall worts on eBay for less than $5.00 delivered and this will give you 23v to 24v on the electrolytics.
Some CDU’s have voltage doubling on the AC input terminals and a voltage as low as 12v AC will produce up to 40v DC on the electrolytics because the 12v AC can be 15vAC on no load and when this is doubled and converted to DC it will become as high as 40vDC. This is too high for any of our electrolytics. That’s why the CDU specifies 8v to 12v AC as this will produce 22vDC to 34vDC.
Our CDU’s put virtually no load on a power supply and this definitely occurs when the CDU is fully charged and thus the power supply will deliver it no-load voltage and the electrolytics will be charged to a maximum.
THE SIZE OF WIRE
The size of the conductors in the wring to a point-motor is not very critical. You can buy light-duty, medium-duty and heavy duty hook-up wire. The resistance of these will be different but it will not affect the operation of a point. A point motor may be 3-4 ohms resistance and the wiring may be 2 ohms and the point motor will get less energy. But this loss can be overcome by increasing the voltage to the CDU.
The reason why we have three different gauges of hook-up wire is this:
The thickness of any type of wire and wiring is worked out when a constant current is flowing for a long period of time. This current will gradually increase the temperature of the wire and it must not get too hot. A point motor may take 3 amps and when delivered via a 1 amp light-duty cable, the operation will be so short that the wire will not have time to heat-up.
Thick wires and leads are only needed when supplying current to the track as you may be driving a train for a few minutes.
TYPES OF CDU’s
We have designed more than 15 different CDU modules to cater for hobbyists requiring to operate new or old points and also KATO points.
Every new model is cheaper to keep the customers happy and offer different mounting features.
They also cover AC and DC supply-lines and a whole range of voltages.
They all do exactly the same job when you compare the total capacitance and the operating voltage of 25v or 35v.
HOW THE ‘ENERGY’ WORKS
A CDU delivers ENERGY to a point motor. A Point Motor is a SOLENOID and it can be called an ELECTROMAGNET and is similar to the crane that picks up scrap metal via an electromagnet and delivers it to a ship at the dock to take overseas for re-manufacture.
But an electrolytic is not like a battery. A battery delivers a high voltage and a high current for a considerable period of time at the beginning, when it is full charged.
An electrolytic delivers a high voltage and high current for a very short period of time in our CDU projects.
That’s because it stores 1/1,000th the energy of a battery.
So we have to take this into consideration.
A point motor takes time to move from one position to the other. During this time the voltage will fall and the current will decrease.
If the voltage drops too much before the point reaches the other position, it will no travel the full distance.
This can be fixed by increasing the voltage to the maximum of the electrolytics or adding more electros.
You need to listen to the “click” “click” of the point before fitting the CDU and maintain the same sound.
The aim is to get the point to “click” and stay in the position via what we call a “toggle mechanism” or “over-centre cam” where the armature of the solenoid keeps a very small amount of pressure on the point so the loco is not derailed.
Too much capacitance can cause the armature to bounce away from the end position and too little capacitance can prevent the armature reaching the end of its travel.
That’s why you have to match up the CDU with the point.
CHOICE NUMBER 8
The simplest and cheapest CAPACITOR DISCHARGE UNIT MkIIB is shown in the following image: CDU MkIIBM $14.50 plus $6.50 (BM means built and tested - made up)
Click [Here](mailto:colin@elechelp.com?Subject=Buying Capacitor Discharge Unit MkIIB $14.50 plus $6.50 postage &Body=Please email the cost of Capacitor Discharge Unit MkIIB by air mail to my country:**___****and send details of how I can pay for it. My name is:____) to order.**

This is CDU MkIIBM $14.50 plus $6.50 fully assembled
The screw terminals make it easy to fit to your layout.
Here are the connections to the Power Supply and point:
The two push switches in the wiring diagram above are also shown in the two following diagrams:

The PECO Passing switch only makes contact when the red lever touches and pushes the contact. This occurs when the lever is in the “12 O’Clock” position and you must move it past this position to prevent the point motor “burning-out.”


The green wire is called the COMMON

A single CDU can be used to operate 2 or more point motors provided you allow a few seconds been each activation, for the CDU to re-charge.
Our CDU module fits between the Power Supply and the switch or switches to a SOLENOID POINT MOTOR. It is designed to deliver a short pulse of energy to the solenoid to change the position of the point. A Passing Switch will deliver a pulse of energy but if it gets stuck in the mid-position, our CDU will prevent the point motor “burning out.”
If you do not include a Capacitor Discharge Unit, and you activate any type of switch for more than 10 seconds, the flow of current will heat up the solenoid and “burn it out.” The CDU prevents this.
To go over it again, the CDU module can be used with a PECO PASSING SWITCH so that if the lever is moved too slowly or kept at “12 O’clock” too long, the CDU will only allow a short pulse of energy. And you have double protection !!
CAPACITOR DISCHARGE UNIT MkII - MODIFICATION
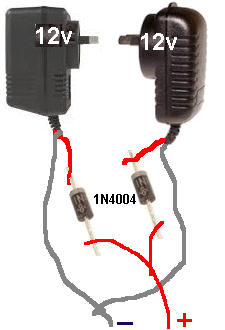
If your transformer does not supply 15vAC to 16vAC, you can increase the input voltage by adding a 100u to 220u electrolytic and 1N4004 diode to the input to create a voltage doubling arrangement. You can also change one or both the 1,000u electrolytics for 2,200u. This will deliver a much larger pulse to the point-motor and guarantee operation.

By adding one power diode and 220u electrolytic, the 16v AC input will be “doubled.” You need to ask for 35v electrolytics before you do this as the final voltage on them will be very close to 30v to 35v DC
If you ask for 35v electrolytics, you can supply the module with 35v from one or two plug packs.
You cannot get a single 35v plug pack but you can get 12v and 24v or use 3 x 12v plug packs.
Here is the authors solution to providing 36v:

The image shows a 24v plug pack and 12v plug pack from this supplier:
https://www.aliexpress.com/item/33019625426.html?spm=a2g0s.12269583.0.0.20bf3cb13mMIx6
Universal EU US Plug Switching Adapter AC 220V-240V To 5 V 12 V 24V Volt Power Supply DC 5V 12V 24V 1A 2A 3A 5A Power Adapter
Output Voltage 12v Current 1A $2.30Universal EU US Plug Switching Adapter AC 220V-240V To 5 V 12 V 24V Volt Power Supply DC 5V 12V 24V 1A 2A 3A 5A Power Adapter
Output Voltage 24v US Plug Current 1A $3.60
The adapter costs less than $1.00 (you need 2) and you need to order the type to suit your wall socket:
https://www.aliexpress.com/item/32842341038.html?spm=a2g0s.9042311.0.0.27424c4d2OjUuW
This gives you a 36v supply for less than $10.00
You just need to wire the outputs in series.
If one of the plug packs does not turn on when connected to a Capacitor Discharge Unit, it will be due to the high in-rush current being detected by the over-load section.
The answer is to add a 22 ohm or 27 ohm resistor in series. This will limit the current to 1 amp and the resistor will not get warm because the current reduces to a very small value within 5 seconds.
CHOICE NUMBER 9
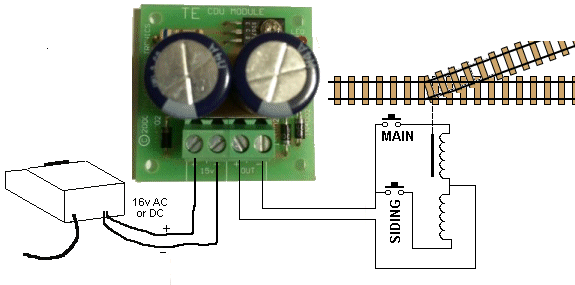
If you want to use a toggle switch and 2 LEDs to show the position of a point, this POINT MOTOR CONTROLLER Module offers these features
POINT MOTOR CONTROLLER $13.50 plus $6.50
Click [Here](mailto:colin@elechelp.com?Subject=Buying Point Motor Controller with SPDT switch $13.50 plus $6.50 postage &Body=Please email the cost of Point Motor Controller with SPDT switch by air mail to my country:**___****and send details of how I can pay for it. My name is:____) to order.
You can also buy the module fully built and tested with toggle switch on an extension lead for $20.50 plus $6.50 postage.**
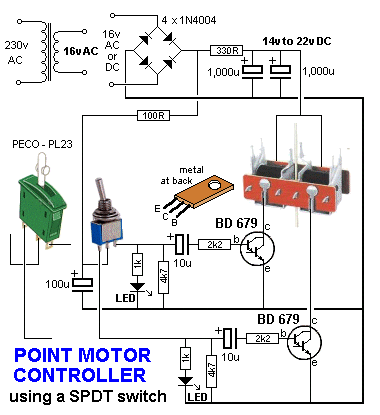
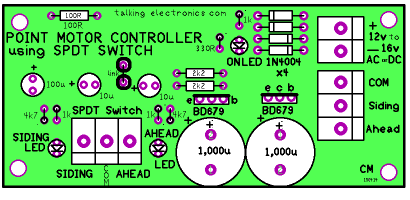
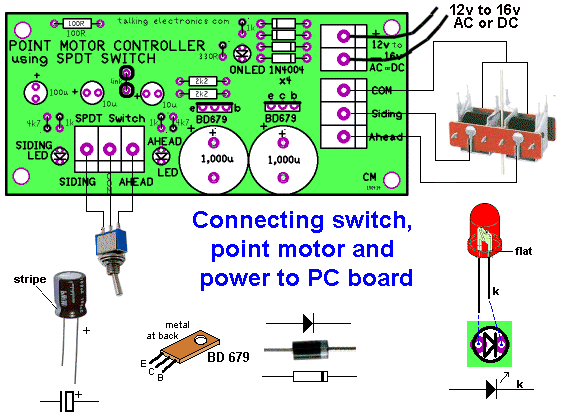
Note: The common to the solenoid is fitted to the top screw terminal.
The amount of energy delivered to the solenoid depends on the voltage delivered to the module. For 12v DC supply, the solenoid will work very delicately and will be suitable for small solenoids used in “Z-scale.” Supplying 16v AC will deliver FOUR times more energy and will be suitable for larger scales and can operate 2 points.
The 100R resistor determines the amount of energy delivered. Increasing the 100R to 150R or 220R increasing the timing and thus the amount of energy delivered.
See the full article: HERE
CHOICE NUMBER 10
Talking Electronics has an In-line version that takes up less space on your console. This In-line CDU module has two LEDs that show the position of the point. It is fitted to your control panel and the LEDs show the position of a point. This very handy for a point that cannot be seen from the control area.
The module is very slim and more than one can be placed side-by-side to control all the points in your layout. Each module is connected directly to a point.
It is called CDU In-Line and costs $12.50 plus $6.50 postage. It is shown in the following image:
Click [Here](mailto:colin@elechelp.com?Subject=Buying CDU In-line with 8 x 470u electros $12.50 plus $6.50 postage &Body=Please email the cost of CDU In-line with 8 x 470u electros by air mail to my country:**___****and send details of how I can pay for it. My name is:____) to order.**

The input voltage needs to be 12v to 16v AC or DC and you may need two adaptors in series to get this voltage. See Chapter 1 for the Plug Packs (or Choice Number 11).
CHOICE NUMBER 11
For layouts that need 2 or more points changed at the same time, a larger version is available with 2 x 4700u electro’s:
It is CAPACITOR DISCHARGE UNIT MkIII and is shown in the following image:
CDU MkIII fully built and tested $16.50 plus $6.50 postage
Click [Here](mailto:colin@elechelp.com?Subject=Buying Capacitor Discharge Unit MkIII $16.50 plus $6.50 postage &Body=Please email the cost of Capacitor Discharge Unit MkIII by air mail to my country:**___****and send details of how I can pay for it. My name is:____) to order.**

CDU MkIII fully built and tested $16.50 plus $6.50 postage
Connecting CDU MkIII to 24v DC supply

Connecting CDU MkIII to 14v - 16v AC supply
You can use the “accessories” output of a train transformer if it is DC (14v DC to 24v DC) or if the accessories output is AC (14v AC to 18v AC). The module has been tested up to 20v AC but it is best to keep to 18v AC max.
If you use a 24v plug pack and 12v Plug pack, the voltage to the module will be too high and the zeners will get HOT.
Here is a solution from Steve Galka:
This principle applies to all CDU’s but it does limit the “inrush current” and you can email me if you are adding a VOLTAGE DIVIDER to another project to see if any reduction in operation will occur.
A larger CDU is also available from Talking Electronics, to change up to 8 points at the same time:
CHOICE NUMBER 12
It is CDU 18,000u Flat version (built and tested) and costs $18.50 plus $6.50 postage. It is shown in the following image:
Click [Here](mailto:colin@elechelp.com?Subject=Buying CDU 18,000 flat version $18.50 plus $6.50 postage &Body=Please email the cost of CDU 18,000u flat version by air mail to my country:**___****and send details of how I can pay for it. My name is:____) to order.**
Click [Here](mailto:colin@elechelp.com?Subject=Buying CDU 18,000 flat version $18.50 plus $7.00 for the switch module plus $6.50 postage &Body=Please email the cost of CDU 18,000u flat version by air mail to my country:**___****and send details of how I can pay for it. My name is:____) to order Module and switch module.**

CDU Module 18,000 fully built and tested $18.50 plus $6.50 postage

This Capacitor Discharge Unit is easy to connect to your layout with screw terminals.
You need two push switches to change the position of the point. The LED on the board shows the electrolytics are charged.
SPECIAL FEATURES
Input voltage can be AC or DC. But you MUST use the correct set of terminals. It did not work for one customer because he connected DC to the AC terminals. There is a 100u electrolytic on the AC terminals and “it will not let the DC in.” The 100u is for a voltage-doubling network at the side of the board as shown in the image above.
Three sets of input terminals are provided.
- 8v to 12v AC
- 13v to 20v AC
- 12v to 30v DC
The project comes with instructions for connecting to a plug pack (wall wart) plus information to connect two plug packs (in series) to get the required voltage.
The CDU 18,000u has zener-diode regulation to prevent over-charging.
If you supply a DC voltage above 25v, this voltage is called “OVERHEAD.” It is voltage that is not needed by the module and will be “lost” in the resistors. However it will allow the module to charge quicker as it will supply current right up to the time when the electros are 99% charged. And then they will charge to a full 100% very quickly. If you supply 32v, for example, the electros will charge to 26.5v and the remaining 5.5v (slightly less than this) will be dropped across the 330R combination of 1k resistors to allow a “bleed current” of 16mA to flow. This will also flow through the zeners but nothing will get hot.
However it will protect the electros from seeing a voltage of 32v as this will leak through the dielectric of the electros and they will heat up and explode.
A Switch Module can be fitted to this CDU to activate the solenoid point and also show the position of the point via two LEDs:


The SWITCH MODULE (shown in the images above) connects to 18,000u CDU for $7.00 extra.
This switch module shows the position of the point via two high bright LEDs and it controls (limits) the energy to a point to prevent the rails “bouncing back” due to too much energy being supplied.
CHOICE NUMBER 13
A slimline version of CDU 18,000u is available from Talking Electronics, to change up to 8 points at the same time:
It has the same capacity (4 x 4700u electrolytics - the same storage capacity as choice number 12) but only one input option: 15v AC.
It is CDU 18,000u Slimline and costs $19.00 plus $6.50 postage. It is shown in the following image:
Click [Here](mailto:colin@elechelp.com?Subject=Buying CDU 18,000u slimline $19.00 plus $6.50 postage &Body=Please email the cost of CDU 18,000u slimline by air mail to my country:**___****and send details of how I can pay for it. My name is:____) to order.**
Click [Here](mailto:colin@elechelp.com?Subject=Buying CDU 18,000 slimline $19.00 plus $7.00 for the switch module plus $6.50 postage &Body=Please email the cost of CDU 18,000u slimline version by air mail to my country:**___****and send details of how I can pay for it. My name is:____) to order Module and switch module.**

CHOICE NUMBER 14
A NEW version off CDU 18,000u Slimline MkII has both AC input and DC input and you can decide which input to use. The DC input can be 12v DC to 16v DC and the AC input can be 15v AC from a train transformer.
The circuit on the underside of the PC board DOUBLES the DC voltage and the chip has a maximum operating voltage of 18v. But we do not want to exceed 15.5v as the chip will be damaged if it sees more than 18v. The on-board zener regulator limits the voltage on the electro’s to 25.5v and 15.5v will deliver 25v, due to 5v losses in the circuitry.
CDU 18,000u Slimline MkII costs $19.50 plus $6.50 postage.
It is shown in the following image:
Click [Here](mailto:colin@elechelp.com?Subject=Buying CDU 18,000u slimline MkII $19.50 plus $6.50 postage &Body=Please email the cost of CDU 18,000u slimline MkII by air mail to my country:**___****and send details of how I can pay for it. My name is:____) to order.**


The DC input voltage for CDU 18,000u Slimline MkII must be 16v MAXIMUM and each module comes with a VOLTAGE REDUCER module so you can adjust the voltage on the module to 15.5v
VOLTAGE REDUCER
The VOLTAGE REDUCER MODULE consists of a 3-terminal block and 4 power diodes and screws into the 3-terminal block on the module.
This is how the Voltage Reducer Module works:
Each diode reduces the incoming voltage by 0.75v, making a total of 3v.
When you get CDU 18,000u Slimline - MkII, check the voltage of your power supply (before touching the module) and make sure it is less than 18v. The voltage reducer module only works for voltages: 16v, 17v and 18v.
If it is 18v, connect the VOLTAGE REDUCER to CDU 18,000u Slimline - MkII as shown in the following image:

If the input voltage is 17v, you can remove one of the diodes by soldering a link across one of the diodes (to short it out), as shown in the following image:

If the input voltage is 16v you can remove 2 diodes and if it is 15v, you do not need the VOLTAGE REDUCER MODULE.
If you want to deliver 15.5v DC to CDU 18,000u Slimline - MkII with two plug packs, here is the circuit:
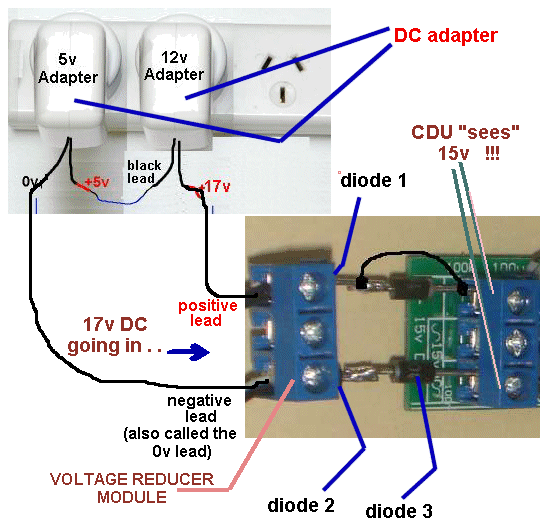
An easy way to get 15.5v for CDU 18,000u Slimline - MkII is with two plug packs - 5v and 12v.
You can also use three 5v plug packs and you will find many of these in your parts-bin from old mobile phones !!!!
A Switch Module can be fitted to this CDU to activate the solenoid point and also show the position of the point via two LEDs:

The SWITCH MODULE (shown in the images above) connects to 18,000u SLIMLINE CDU for $7.00 extra.
This switch module shows the position of the point via two high bright LEDs and it controls (limits) the energy to a point to prevent the rails “bouncing back” due to too much energy being supplied.
CHOICE NUMBER 15
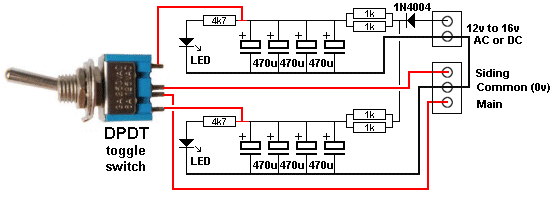
1,000u Capacitor Discharge Unit with SPDT Switch SLIM
Click [HERE](mailto:colin@elechelp.com?Subject=Buying 1,000u CDU - slim $10.60%20plus%20$6.50%20postage%20&Body=Please%20e-mail%20the%20cost%20of%20Buying 1,000u CDU - slim $10.60%20plus%20$6.50%20postage%20by%20air%20mail%20to%20my%20country:**___****%20%20and%20send%20details%20of%20how%20I%20can%20pay%20for%20it.%20My%20name%20is:____) to buy.**
Fully built and tested for $10.60 plus $6.50 postage.
We are constantly updating and improving and adding to our range of modules and this one combines three features at a LOWER COST - amazing !!
The name: Capacitor Discharge Unit with SPDT Switch - SLIM has been chosen to identify it from all the other CDU modules made by Talking Electronics.
It combines a number of features with a clever circuit to allow a single 1,000u to be charged to 35v and produce sufficient energy to operate a point. It also has an on-board mini toggle switch and two indicator LEDs - this reduces your wiring.
The circuit also includes a voltage doubling arrangement for 12vAC to 15v AC - (from a train power supply) and two indicator LEDs to show the position of the point.
The mini toggle switch can be easily fitted to your console and small holes on each side of the switch used for the LEDs to shine through the console.
All these features are in this narrow PC board so that a row of these modules can be aligned on a panel to show the position of the points.
This module reduces your wiring considerably as only 3 wires are needed for each point and a common “bus” of positive and negative to the modules.


A close-up of the switch, showing the leads soldered to the tabs on the switch


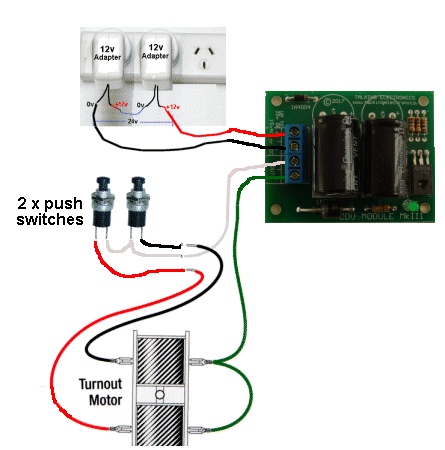
All the components fit on the PC board and the module comes with 2 x 1,000u electrolytics. The input can be 12vAC to 15vAC or 20vDC to 35vDC.
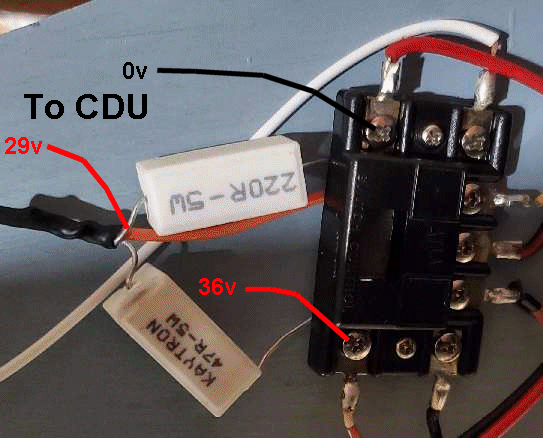
You can make a 12v 24v or 36v supply very cheaply by using 24v and 12v plug packs. These are available on eBay for less than $10.00 (combined) including postage.
If you are making 36v, simply connect the leads as shown in the following diagram.
Some of these plug packs have a current detecting overload circuit and “shut-down” if the current is more than 1 amp (even for a millisecond).
To prevent this we add a 47 ohm resistor.
This only applies when you are using the plug packs for our CDU modules (like this project) as the high current is only required for less than a second and then falls to a very small value. The resistor will not get warm when used in this particular application.
Using an old Printer Power Supply
You can use a discarded Printer Power supply for many of the CDU modules. Make sure the electros are 35v. I have highlighted the voltage and the current capability (625mA) of this printer supply and it is ideal. You cannot use it on any of the throttle modules as the current is not very high but it is ideal for a CDU module as the current requirement is less than 100mA to charge the electros.

There are lots of other power supplies from discarded electronic equipment and you just have check everything before you throw it out.
CHOICE NUMBER 15A
2 MODULES
This CDU now comes as 2-modules with a face place and 5 modules with a face plate.
This module requires 25v supply and to get the required energy to change a point, the electrolytics are 2,200u.


2 MODULES
1 - faceplate $2.00
1 - power supply module $5.50
first switch module $5.00
second switch module $5.00
Click HERE to buy
2 MODULES
fully built and tested:
$19.50
Click HERE to buy
5 MODULES


5 MODULES
1 - faceplate $3.50
1 - power supply module $5.50
first switch module $5.00
second switch module $5.00
third switch module $5.00
fourth switch module $5.00
fifth switch module $5.00Total: $34.00
Click HERE to buy
5 MODULES
fully built and tested:
$39.50
Click HERE to buy
You can mount 2 or 5 modules “side-by-side” and use the face-plate shown in the photo below to connect them together and fit them to your console.
Here’s what you need:
- 1 - faceplate $2.00 for 2 modules $3.50 for 5 modules
- 1 - power supply module $5.50
- 5 - switch module $5.00 x 5 = $25.00 You can operate 5 points for a total of $34.00 and that is less than $7 per point.
The face-plate means there is no drilling needed and a simple cut-out in your console will allow the face plate to be added.
A new face-plate with track ID has been introduced:
- The 2-module face-plate costs $2.00
- or 5-module face-plate $3.50

The circuit for the 5-Modules version has 2 x 2,200u electrolytics in the power supply section because the charging of the 2,200u (in the second part of the circuit shown above), when the switch is in the “MAIN” position, will take a lot of energy from the 2,200u in the power supply and the voltage across it will dip 50% (theoretically). When 5 modules are connected to the power supply, this will be passed to the other modules and affect the operation of the other points at a time when they should not be affected.
To prevent this we have used two 2,200u electrolytics in the power supply. The voltage will theoretically drop 30% but the other points are not affected. When 5 modules are connected, the 1,000u in each module will reduce the “dip” considerably.
One customer wanted to use a 2-leaded bi-polar LED.
Here is the modification:
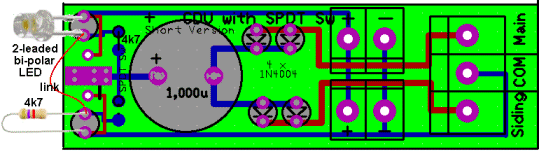
FITTING A BI-POLAR LED
Use 2 x 4k7 resistors and note the lower resistor fits into the holes identified for a LED. A jumper wire is needed to complete the mod.
USING ATLAS #56 SWITCH
At first inspection, this switch may not appear to be suitable. But here is the secret of its operation.
When you slide the switch to the left or right NOTHING HAPPENS.
You need to push the switch for 0.5seconds for it to make contact and the energy from the CDU changes the point.
If you push the switch for more than 1 second, all the energy from the CDU will pass to the point in less than 1 second and the extended time of pressing will not damage anything.
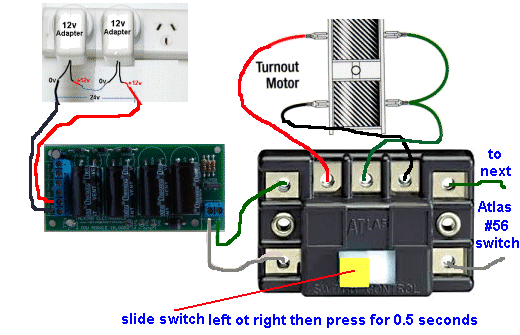
CHOICE NUMBER 16
CDU 4700u Slimline
Buy a kit: [CDU 4700u Slimline](mailto:colin@elechelp.com?Subject=Buying CDU 4700u Slimline:$10.50 plus $5.50 postage. Fully assembled and tested &Body=Please e-mail the cost of sending CDU 4700u Slimline by air mail to my country:****___**** and send details of how I can pay for it. My name is:____) $10.50 plus $5.50 postFully assembled and tested
This CDU (Capacitor Discharge Unit) module has been designed with voltage-doubling components so you can use the 12v DC or 15v AC terminals of your train power supply. It also has voltage regulating to prevent over-charging the electrolytic and an indicator LED to show when the electrolytic is fully charged.
The 4,700u electrolytic is adequate for a single point and can be connected to two points at the same time, if needed.
You just need two push-buttons (switches) and twin flex (wire) to activate your solenoid point (point motor).


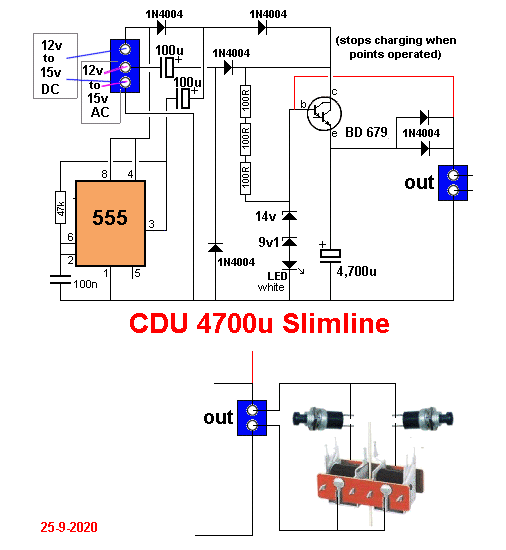
The advantage of this module is the input voltage.
It can be 12v to 16v DC or up to 15v AC and the circuitry will double the voltage
CHOICE NUMBER 17
Jim’s CDU MkII
Buy a kit: [Jim’s CDU MkII](mailto:colin@elechelp.com?Subject=Buying Jim’s CDU MkII kit:$24.50 plus $6.50 postage. Fully assembled and tested: $30.50 &Body=Please e-mail the cost of sending Jim’s CDU MkII kit by air mail to my country:****___**** and send details of how I can pay for it. My name is:____) $24.50 plus $6.50 postFully assembled and tested: $30.50 plus $6.50 post
This project combines a number of features from three of the projects we have previously designed for Model Railway Hobbyists. It is available as a kit or fully built and tested.
Now you can have 3 features in one module.
The first feature is the power supply. This module connects to your track and you don’t have to provide 15v AC or a higher voltage to charge the electrolytics. The module has an on-board charging and voltage generating section that accepts almost any voltage and charges the electrolytics to a maximum of 27v.
The next feature is the variable voltage (or maximum voltage) for the electro’s. You can reduce the voltage to as low as 13v for those solenoid points that do not need a large amount of energy for their activation.
The third feature is the reed switch inputs. This allows the module to be used automatically to control a solenoid point so the point gets changed correctly when the train approaches from the other direction.
And lastly, the kit comes with a TRACK-PICKOFF MkII connector that fits between the sleepers and connects to the rails with springy connectors.
THE CIRCUIT
All the work is done with the microcontroller.
The charging of the electro’s - the timing to activate the solenoid and the detection of the reed switches.
The rail voltage is passed to the project via a bridge and this allows AC, DC or DCC to be converted into DC and stored to a small extent in the first 100u. The 100u on the output of the 78L05 provides a small amount of reservoir for the micro and we are assuming the train will be moving most of the time to maintain supply for the micro.
The micro drives a BC 338 transistor with short pulses to allow current to flow into (through) the inductor and produce magnetic flux. When the transistor turns OFF, the magnetic field collapses and produces a very high voltage spike. This spike passes through the high-speed 4004 diode and into the 4,700u electros. The spike is really about 50v but the energy in the spike is converted into charging current and the electros would charge to more the 40v. But they will explode if the voltage rises above 30v so the voltage on the electros is monitored by the 100k resistor and 10k pot.
The PIC micro detects a HIGH when an input is 2.2v and the 10k pot can be adjusted produce a voltage from 13v to 27v.
The project takes a very small amount of energy from the track during the charging process and this will not be noticed when powering a train around the layout.
The indicator LEDs on pins 2 and 5 are output devices as GP2 and GP5 are constantly changed from input to output lines. They normally illuminate one of the LEDs, but every 100mS, the program converts the lines to input to detect if a reed switch has been activated.
When they are input lines, we want them to have 0v on them and the 10k resistors across the LEDs provide this feature. Without the 10k resistors, the impedance of the LEDs is very high and the input lines can “float” and if a white LED is used as an indicator, this “float” voltage can be as high as 3.3v. The micro sees any voltage above 2.2v as a HIGH and the circuit would not work correctly.
If a reed switch is activated, the line will be HIGH and the program will respond accordingly.
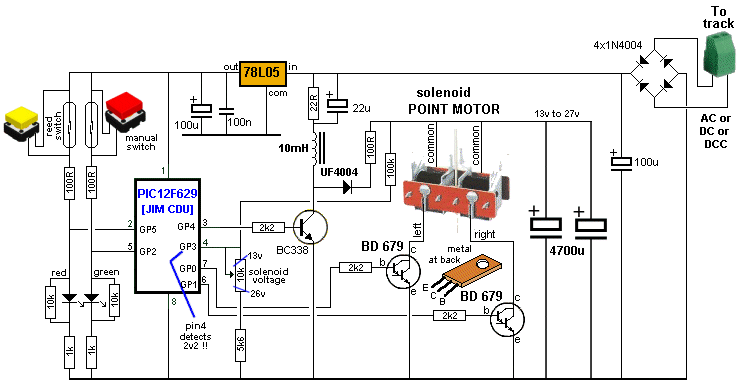
JIM’s CDU MkII circuit
SOLDERING THE KIT
Soldering these kits is simple if you have a bit of experience in soldering small components because all the parts are identified on the PC Board. You will need tweezers for the surface-mount components. We supply solder THAT IS NOT CHINESE SOLDER. Do not use Chinese solder as it does not contain the correct percentage of tin and lead and it does not “run” or melt or flow properly and does not produce a shiny joint. It did not work for me and I threw it in the trash. The frustration of trying to get a shiny joint was enormous.
The first things you add to the board are the 13 surface mount resistors. Add a small amount of solder to one land for each resistor and pick them up with tweezers with the numbers showing and solder one end with the solder that is already on the land. Then go around and solder the other ends by adding a small amount of solder to each resistor. Watch the solder “click” onto the resistor and it will look a little bit like a skateboard ramp.
The rest of the components are through-hole and it does not matter if you start at one end of the board or with the small components first.
Every component is identified on the board and most of the parts have to be fitted around the correct way - so look at the legend on the board.
The LEDs must be soldered very quickly otherwise they will be damaged.
The mark of a well-designed PCB is being able to put it together with a handful of parts and no other reference.
And the mark of a well-designed circuit is 100% operation with every board. You cannot afford to be messing around, “adjusting” the component values and trying to work out why it does not work.
That’s why every value has a reason and a purpose. This can only be gained by working on hundreds of circuits and gaining the experience, knowledge and understanding.
The circuits are provided with all the projects to give you this experience.
And to help you fix something, if it “blows up.”

 The photo’s above show the complete module (before all the leads are connected). The electro’s will be bent over and laying flat above the top of the board on modules pre-built and posted through the mail as they are too tall to be posted when they are upright.
The mini trim pot can be adjusted from 13v to 27v so the electros hold the right amount of energy for the point you are using. This is the first module on the market to provide this adjustment as some points bounce too much if the voltage is too high.
POWER CONNECTOR
The power for this project can come from a power supply 9v to 15v AC or DC or DCC. In fact it can be ANYTHING !!
You can also connect the project to the track with a very small THIN PC board that fits between the sleepers. It is called Track Pick-Off MkII. It has two springy clips that touch the inner parts of the rails and make electrical contact. .
The PC board comes with the two springy clips soldered in place and you need to remove the plastic from between two sleepers to allow the board to fit (as shown in the photo below). Twist the board into position and give the spring clip a twist with a pair of pliers so it pushes against the rail.

This track pick-off is called BETWEEN SLEEPERS


A close-up of the springy gold wires and the
fine screened lead
Alternatively, you can ask for Track Pick-off “using Rail Joiners.” You will need to get to the track, remove the rail joiners that presently connect the rails, and fit the track jointers as shown in the following image:

This track pick-off is called “using Rail Joiners”
PARTS LIST - Jim’s CDU MkII
$24.50 plus $6.50 post
[Order a kit](mailto:colin@elechelp.com?Subject=Buying Jim’s CDU MkII $24.50 plus $6.50 postage&Body=Please e-mail the cost of sending Jim’sCDU MkII kit $24.50 plus $6.50 air mail to my country:**___**** and send details of how I can pay for it. My name is:____)**
1 - 22R surface mount
2 - 100R
1 - 220R
2 - 1k
3 - 2k2
1 - 5k6
2 - 10k
1 - 100k
1 - 100k mini trim pot
1 - 100n monoblock
1 - 22u
2 - 100u
2 - 4,700u 25v electrolytics
4 - 1N4004 power diodes
1 - UF4004 high speed 1amp diode
1 - 78L05 5v regulator
1 - BC338
2 - BD679 transistors
1 - PIC12F629 micro with “JimCDU”
1 - 3mm red LED
1 - 3mm green LED
3 - 2-way screw terminal blocks
1 - 3-way screw terminal block
1 - slide switch
2 - tactile switches
1 - 10mH choke
1 - 8 pin IC socket
30cm very fine solder
1 - Jim’s CDU MkII PCB extras $4.50:
- 2 - 2-way screw terminal blocks
- 2 - reed switches
- 2 - super-magnets
- 2 - 1.2m screened lead for reed switches
- 1- Track Pick-off MkII PCB with springy connectors called “Between Sleepers”
or
1- Track Pick-off called “Between Sleepers” (tell us the one you want) - 1m - fine screened power lead for above
- 2 - tactile switches for remote operation
- 1 - PCB to mount the 2 tactile switches
- 1 - 3m flat lead for switches (4 core)
CONCLUSION
This is a very interesting project to convert a solenoid operated point into semi-automatic operation by adding the two reed switches so the train will set the point correctly when entering the point from the opposite direction.
The module shows the position of the point via a red and green LED and it’s very easy to set-up with the Power Connector and extension switches.
CHOICE NUMBER 18
This module operates a SERVO very slowly. All the other modules operate the servo fairly quickly.
SLOW SERVO
Buy [Jim’s Slow Servo](mailto:colin@elechelp.com?Subject=Buying Jim’s Slow Servo $31.50 plus $6.50 postage. Fully assembled and tested &Body=Please e-mail the cost of sending Jim’s Slow Servo by air mail to my country:****___**** and send details of how I can pay for it. My name is:____) $31.50 plus $6.50 postFully assembled and tested with servo and leads

The original circuit used two 555 IC’s. The new and improved circuit uses a microcontroller and 15 fewer components !! That’s why some of the components are no longer required.
The top terminal block on the left connects to a reed switch and this activates the servo slowly to change the position of the point to allow the train to come back into a point with the rails in the correct position.
The other terminal block on the left connects to a switch on your control panel to activates the point manually so you can send the loco to the siding.
The top terminal block on the right connects to a reed switch to allow the train to come to a point with the rails in the correct position.
The other terminal block connects to your control panel.
The module comes with a servo, extension lead for the servo, gold push-rod for servo, leads to your panel for the Main and Siding switches, 2 reed switches on 1200mm leads and two very strong rare-earth magnets: 10mm diameter x 1mm thick.
There are many ways to mount the servo and one customer asked about “N Scale code 55 track.” Here is the solution:

The shortest arm (supplied with the servo) can be cut with one hole remaining and the gold 0.7mm wire wound around the arm with plenty to fit into the lever on the point. Allow the 0.7mm wire to produce a “spring tension” to keep the point, in each direction, with a little bit of tension and this will allow the arm to rotate about 70 degrees.
CHOICE NUMBER 19
This module operates a SERVO very slowly. All the other modules operate the servo fairly quickly.
TURTLE - SLOW MOTION SWITCH MACHINE
This is another slow servo point motor and controller
Buy [Turtle](mailto:colin@elechelp.com?Subject=Buying Turtle - Slow Motion Switch Machine $30.50 usd plus $7.50 usd postage. Fully assembled and tested &Body=Please e-mail the cost of sending Turtle - Slow Motion Switch Machine by air mail to my country:**___**** and send details of how I can pay for it. My name is:____) $30.50 plus $7.50 post**
Fully assembled and tested with servo and leads
The SLOW MOTION SWITCH MACHINE costs $8.50 usd and comes with 2 metre of 3-core lead.
The CONTROL MODULE costs $22.00 usd and will operate one or two SLOW MOTION SWITCH MACHINES.
Shipping $7.50 usd for any number of Slow Motion Switch Machines.**
This is the latest Slow Motion Switch Machine using digital control to the motor.
It is very small and measures only 31mm (1.25in).

It comes with 3 small screws for easy fitting to the underside of your layout.

You also need a control module containing 2 switches and microcontroller and power supply.

The module is fully assembled but the two switches are in a separate bag (with fine solder 3 screws and extension lead) as they are too tall to be shipped as a small packet from Australia.
You need to fit the two switches to the small front-panel and use the nuts to get the height so the LEDs fit through the holes.
The LEDs show the position of the point.

The switch MUST be fitted so the letters “C” “NO” and “NC” can be seen as per the image above. They will not work if fitted the wrong way around. These are special switches - push switches - and not toggle switches. Push the legs through the holes of the printed circuit board and before you solder the pins, try the operation of the module. When you know it operates correctly, solder the pins with the fine solder provided.
You can also get a version of SLOW MOTION SWITCH MACHINE for the topside of your layout - ask for details when ordering.
MOUNTING
The board is mounted on your control panel through a small rectangular hole with 2 mounting screws and the larger board sits behind the panel.
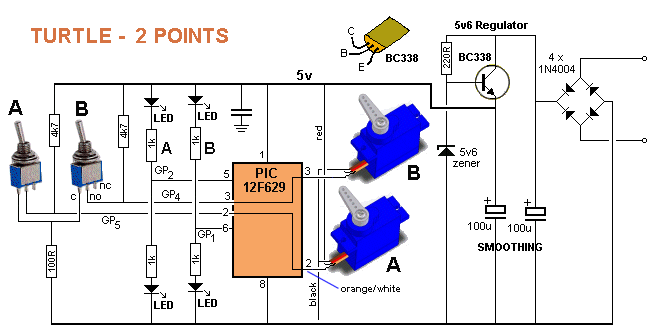
TURTLE - 2 POINTS CIRCUIT
All the work is done by the microcontroller.
- Press the left push-button and the SLOW MOTION SWITCH MACHINE moves the point to the Main line.
- Push the switch again and the electronics makes the SLOW MOTION SWITCH MACHINE move the point to the Siding.
- The second push-switch operates the other SLOW MOTION SWITCH MACHINE in the same way.
CHOICE NUMBER 20
5 Point Controller for Servos
This module operates 1,2,3,4, or 5 servos very slowly.

The module (containing the electronics) costs $25.00 USD (built and tested).

You can also get special slow-motion servos with 70 degree activation for $2.50 each and brackets for under your layout for $2.50 each. We also have 2 metre extension leads for $2.00 extra.
SETTING-UP INSTRUCTIONS
Connect the battery-snap (provided on the module) to 12v battery made up of say 8 AA cells. This is just an initial test to make sure everything works and nothing gets too hot.
If the voltage is not high enough (from flat batteries), the LEDs will just flash.
Later you can connect the module to a 12v power supply.
The LEDs will illuminate and now you need to move each point motor in both directions so the LEDs on the board correspond to the position of the point.
Push the first switch for at least 0.5 seconds to allow the program to recognise the button.
Push it again. The point motor will reverse and the LED on the board will indicate the position of the point. Repeat with all the buttons.
You can’t just press the button quickly. You need to push it for 0.5 seconds to allow the program to detect the button.
Now you can extend each point motor with the extension leads provided.
You can get brackets to hold the point motor under the layout as shown in the image above.
Each time you turn on the module, you need to “synchronise” the point with the LEDs on the PC board by pressing each button to move the point in both directions. Wait for the servo to travel and STOP, before pressing the button again.
- 5 Point Controller for Servos: $25.00 USD
- 5 Slow-motion Servos $12.50 USD
- 5 2metre extension leads $10.00 USD
- 5 Brackets $12.50 USD
Shipping: $8.50 USD for all items
Buy [5 Point Controller for Servos](mailto:colin@elechelp.com?Subject=Buying 5 Point Controller for Servos $25.00usd plus $6.50usd postage. Fully assembled and tested &Body=Please e-mail the cost of sending 5 point Controller for Slow Servos by air mail to my country:**___**** and send details of how I can pay for it. My name is:____)**
$25.00usd plus $6.50usd post
CHOICE NUMBER 21
Automatic Point
Automatic Point is available as a kit from:
Talking Electronics for $29.50 incl reed switches and servo.
Click HERE for details.
Turn your manually-operated point into an automatically operated point.
Here is a typical turn-out.

You can convert it to an automatic point, with over-ride via two push-buttons and it will cost less than buying a solenoid actuator for the point, plus a CDU module.
AUTOMATIC POINT project comes with 2 reed switches and a motor/gearbox and when the train approaches the point from the siding or via the other rail entering the point, the loco is detected and the circuit changes the point to accept the train. This prevent derailments and saves you having to remember to constantly change the point.
You will have to manually choose when to send the train to the siding.
The project only prevents a derailment when returning.
AUTOMATIC POINT is powered by the track voltage and will operate on a voltage between 9v and 16v DC. It has a 100u storage capacitor to allow the circuit to work when the rail voltage is intermittent.
The servo takes less current and less voltage than a solenoid operated point and that makes it ideal for remote points. You can use thin cable for the wiring.

Turn your manual point into an AUTOMATIC POINT
When a train comes from direction A or B, the point gets automatically set to prevent a derailment.
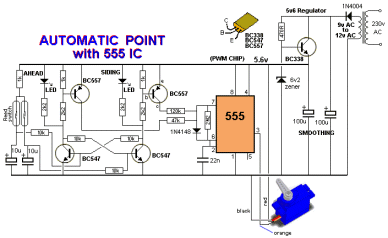
Click for large image
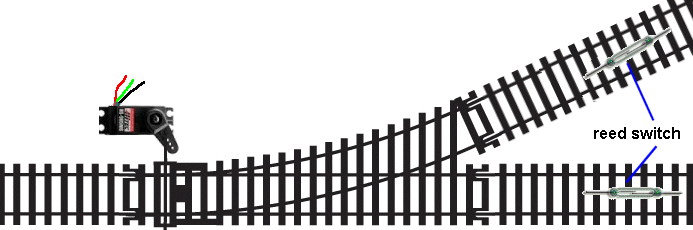
There are many ways to position the servo to allow the lever to control the point.
Placing the servo on its side will give better alignment, as shown below:

The image on the left is just an example to show the connection of the servo to the point. The servo can lay down to take up less room.

The servo rotates less than 70° and the gold wire is called the “linkage.”
Any electro-mechanical device (motor, solenoid, servo) that operates a point is called a SWITCH MACHINE.
This project will only operate a normal (unconverted) SERVO as the circuit sends PWM signals to the servo to set its angle of rotation.
Talking Electronics has other projects that operate a motor and gearbox or a solenoid, but this project is specially designed to turn a manual point into an automatic point at the lowest cost.
The servo can be placed under your layout or in a plastic model such as a Platelayers Hut.

A platelayers hut can be used to hide the servo
There are many ways to connect the servo to the “switching lever” and here’s one way that adjusts the movement of the arm on the servo to the travel needed by the switching lever.
It consists of a machine pin fitted to your layout and another machine pin fitted into it. This forms a pivot and you can adjust the travel by providing the correct ratio for the gold wire before the pivot and after the pivot.
This arrangement also puts a small amount of tension on the rails, allowing the loco to pass if the point is not set correctly.
The following images clearly show how the 3.7g SERVO is connected to the point via a LINKAGE:


The Machine pin in the centre of the linkage acts as a pivot and the “crank” in the lever is simply to align the activating arm to the slider on the track.
The gold wire is soldered to the pin so it does not change alignment.


THE SUPPLY
The supply for this project is 9v to 16v DC - but it is best to deliver a maximum of 12v. A voltage higher than 12v will make the 470R and BC338 slightly hotter.
You can deliver 12v AC as the diode and 100u will convert this to a DC voltage and the BC338 will smooth the output with the aid of the 6v2 zener diode.
Nothing in the circuit is susceptible to a small amount of ripple, so AC input is not a problem. CONSTRUCTIONAssembly of the PC board is straightforward.
Fit the resistors first and then the electros, transistors, LEDs and diodes. The last parts to fit are the terminal blocks and switches.
You will need wiring to a 12v supply and you will need to connect the mini reed switches to the screened audio cable and add metal ends to the wires so they can be fitted to the screw terminals.
All these parts are included in the kit as well as 2 very strong super magnets. These are to be fitted under two locos.

Everything fits neatly on the board
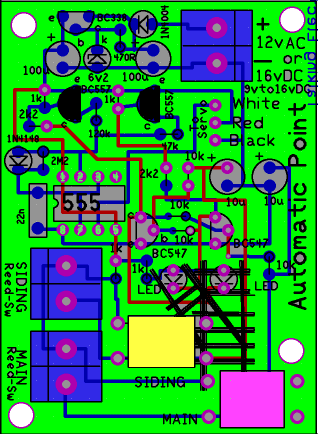
All the components are clearly identified.

The two reed switches are carefully soldered to the leads (very fine screened audio lead).
2 very strong rare-earth magnets operate the reed switches at 2-3cm (reed switches separately with 2 magnets cost $4.00)
SETTING-UP THE MAGNETS
The kit comes with 2 x 10mm super magnets about 1mm thick and to get the best magnetism from these magnets, place them on the bench about 5mm apart with one magnet having the North pole up and the other South pole up.
Don’t worry yet. When the opposite poles are up, the reed switch will activate when it is lowered over the magnets at 10mm distance. If no reaction, flip one magnet over. The response will be dramatic. Now glue the magnets to the underside of a loco with N-pole up and the other S-pole up.
One up and one down creates a circular magnetic path through the “leaves” of the reed switch and makes one leaf “N” at the tip and the other “S” at the tip and the two leaves click together.
FITTING the REED SWITCHES
Fit the two reed switches near the point but give the servo time to change the point before the loco gets to the point.
Connect the 12v supply and one of the LEDs will illuminate. It indicates the position of the point.
Press the other button and the point will change. Drive the train through the point (from left to right) and when you return from the siding, the point will be ready for the train.
PARTS LIST - Automatic Point
$29.50 including reed switches and servo.
Click HERE to buy the kit.
1 - 470R
4 - 1k
2 - 2k2
4 - 10k
1 - 47k
1 - 120k
1 - 2M2
1 - 22n ceramic capacitor
2 - 10u electrolytics
2 - 100u electrolytics
1 - 1N 4148 diode
1 - 1N 4004 diode
1 - 6v2 zener
2 - BC547 transistors
2 - BC557 transistors
1 - BC338 transistor
1 - 555 IC
1 - 8 pin IC socket
1 - 3mm white LED
1 - 3mm blue LED
2 - 40cm lengths twin hook-up flex
3 - 60cm lengths screened lead
2 - reed switches
2 - rare-earth magnets
3 - 2-screw terminal blocks
2 - large push buttons with caps
1 - servo with “arms” and 2cm gold wire
1 - 3-pin 90° male connector for servo
30cm fine solder
1 - Automatic Point PC Board
CHOICE NUMBER 22
The next module changes the point automatically and has 3 other features so you can design a layout with a loop.
This module is called: [LOOP with 2 RELAYS and MOTOR](//TODO FIXME COLIN).
You can use either a 3v micro motor and gearbox or a SERVO or a converted SERVO.
You need a loop at the end of your layout and you can select either a SERVO or a converted SERVO to do the activation. The project also comes with a 2-aspect signal.
Loop with 2 Relays and Motor costs $xx.50 plus $6.50 postage. It is shown in the following image:
Click [Here](mailto:colin@elechelp.com?Subject=Buying CDU 18,000u slimline $22.00 plus $6.50 postage Body=Please email the cost of CDU 18,000u slimline by air mail to my country:**___****and send details of how I can pay for it. My name is:____) to order.**
CHOICE NUMBER 23
4 Points CDU Controller

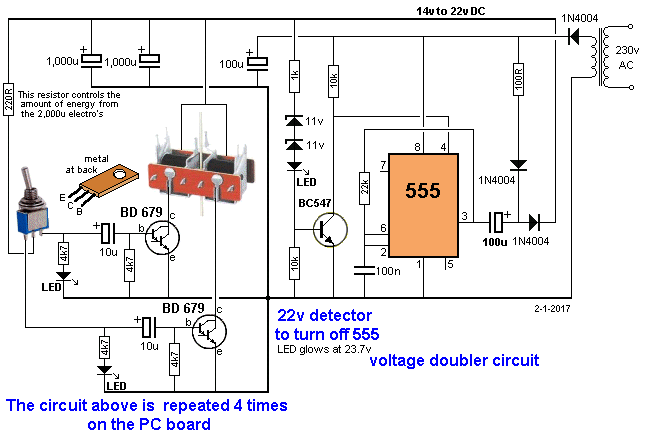
This module will change the position of 4 point motors via the 4 toggle switches and the LEDs on the board show the position of the point. The module comes with the switches separate in a plastic bag because they are too tall to post in out small posting box. You can solder the switches to the board or fir them to your control panel and use 3-core ribbon cable. The two outer wires of each point are connected to the 2-terminals above and the 4 middle wires of the points connect to the 2-terminal block on the left of the module.
The circuit has been included so you know how it connects to the solenoid points.
The oscillator circuit using the 555 increases the input voltage to 25v.
It is fully built and tested for $35.00 usd plus $8.50 usd postage
Please log into your paypal account and send a payment to colin@elechelp.com for $43.50 usd
CHOICE NUMBER 24
There is another COMPLETELY DIFFERENT type of Point Motor. It is used for a KATO point - to change the direction of the point.
Kato point motors operate completely differently and you need a different type of circuit to operate it.
It has a magnetic PUSH ROD. In other words, the plunger is MAGNETIC. And this means the single solenoid is classified as DOUBLE ACTING. The single solenoid consists of a single winding and has just 2 wires and it operates by reversing the supply. Reversing the supply reverses the magnetic lines of force and this causes the plunger to be attracted or repelled.
- We have designed a module to operate up to 4 points.
- You can get the module for 1 point, 2 points, 3 points, or 4 point.
- Only the components for 1 point will be fitted for $10.00
- The components for 2 points will be fitted for $15.00
- The components for 3 points will be fitted for $20.00
- And the components for 4 points will be fitted for $25.00
- These points are operated separately and individually by toggle switches (4 switches).
KATO 4-POINT CONTROLLER
[Modules are available](mailto:colin@elechelp.com?Subject=Buying Kato Point Controller Module $25.00 plus $6.50 postage &Body=Please e-mail the cost of Kato Point Controller Module $25.00 plus $6.50 postage by air mail to my country:**___**** and send details of how I can pay for it. My name is:____)** for this project from
Talking Electronics for $25.00 plus $6.50 postage.
This module controls 4 Kato points. (It does not work with any other type of point because KATO points work by REVERSING THE SUPPLY. All other points work by alternately pulsing one or the other coils to get two-way operation.)
INSTRUCTIONS
Connect the supply to the terminals (at the end of the module).
The Supply can be a Plug Pack (wall wart) or from your train transformer.
It can be AC or DC.
The AC wires can be connected either way around.
The DC wires will not work if connected the wrong way so you will soon find your mistake. Connect the Kato Point Motor to the terminals at the top of the module with the wires either way around.The module will work with voltages in the range 10v AC to 12v AC or 12v DC to 15v DC and even higher.
The 1,000u electros are 35v so you can use a supply up to 35v.
But 35v may be too much for your Point Motor.
If the Point Motor “bangs” too hard in each direction, you can reduce the voltage.
Switch all the toggle switches to the UP POSITION so that none of the electros get charged at the moment and none of the Point Motors operate.
Now change any of the points to “main,” allowing half a second for the circuit to do its job.
If all the toggle switches are DOWN when power is applied, it will put a lot of strain on your power supply as all the Point Motors will try to get activated at the same time.

The KATO solenoid

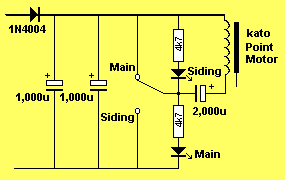
The KATO Point Motor Circuit.
The output section is is multiplied 4 times on the PC board.
The CIRCUIT
The circuit is very simple, but it is very clever. The electrolytic gets charged when the toggle switch is in the “down position” and the charging current flows through the solenoid from the supply to the electro.
This makes it change the point to the siding.
When the switch is in the “up position,” the energy in the 2,000u electrolytic (this is 2 x 1,000u electrolytics) flows out and through the solenoid, from the lower wire to the wire connected to the supply. This is in the opposite direction to previously and is actually a VOLTAGE REVERSAL. And because the voltage is reversed, the current flows in the opposite direction.
This activates the solenoid in the opposite direction and the point changes to the main line.
This very simple circuit does TWO THINGS. It supplies a pulse of energy so the solenoid does not get hot and creates a voltage reversal so the solenoid activates in both directions.
The LEDs on the board show the position of the point.
The power diode does two things. It allows AC to be connected and although only the positive cycles charge the 1,000u electrolytic, this is sufficient for the circuit to operate perfectly. The diode also prevents DC connection around the wrong way. DC around the wrong way will not illuminate the LEDs and the 2,000u will leak when voltage is applied in the wrong direction and not charge properly.
The 1,000u also reduces the impedance of the supply so the 2,000u can charge quickly and operate the point motor.
Getting a Point Motor to activate depends on the voltage you deliver to the module.
Kato Point Motors are very delicate and do not require a lot of energy for their activation, and you should start with a 12v supply.
If you think the Point does not respond and “click” strongly, you can increase the supply by adding a 5v plug pack in series with the 12v plug pack to get 18v.
If you are operating 2, 3 or 4 points at the same time, you will need to increase the supply voltage, maybe up to 24v. The maximum voltage is 35v - 36v and this is obtained by connecting a 24v and 12v plug pack in series.
You can use AC from any source, but remember, any AC voltage will be converted to the voltage marked on the supply PLUS 50 PERCENT MORE!!!!
Only use the minimum voltage needed and this is found by decreasing the voltage until you do not get reliable operation, then increasing the voltage by an extra 3v to 6v.
None of these voltages will damage or over-heat the point motor, they will simply make the point “click” or “bang” loudly in each direction.
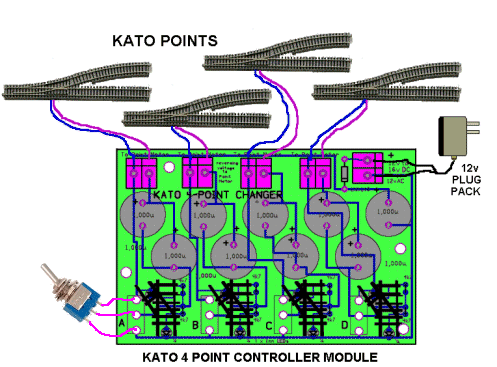
Connecting the Kato points to the module
The module is supplied with the components soldered to the PC board, but the toggle switches are supplied separately as they are too tall for the posting box. This allows you to solder them to the PC board or fit them to your control panel. The new PCB has 2 x 1,000u in the power supply


You can buy this module for 1, 2, 3 or 4 Point Motors and only the necessary components will be fitted.
[Modules are available](mailto:colin@elechelp.com?Subject=Buying Kato Point Controller Module $25.00 plus $6.50 postage &Body=Please e-mail the cost of Kato Point Controller Module $25.00 plus $6.50 postage by air mail to my country:**___**** and send details of how I can pay for it. My name is:____)** for this project from Talking Electronics for $25.00 plus $6.50 postage.
Understanding KATO
Here is some helpful information about KATO
The KATO Throttle is called KATO POWER PACK
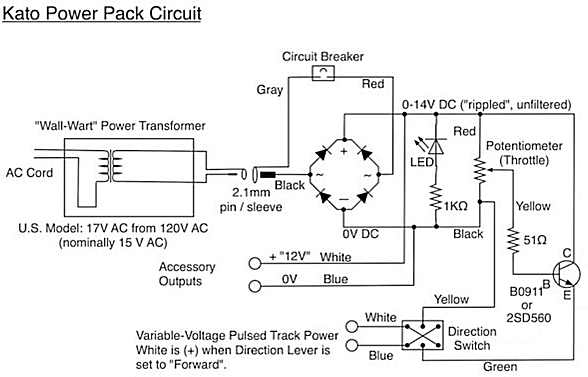

It requires a 15v AC “plug Pack” for the best performance, but the input can be as low as 12v DC.
With 12v DC, the output will be 12v = 0.7v - 0.7 - 1.5v = 9.1v due to the voltage drops across the components.
With 17v AC the output voltage will be PULSED DC. In other words it will be a DC voltage that is rising from 0v to a maximum, 100 times a second. This is ideal for powering the motor of a loco.
It will rise to a maximum of 22v and even though it is not at this level at all times, the effect of 22v pulsed DC will be much more than 9.1v DC.
The “Power Pack” is claimed to be rated at 1.5 amps, but the diodes are 1 amp and because they are on long leads, they will get very hot when more than 700mA flows. This “Power Pack” is certainly less than a 1-amp controller.
The KATO “Power Pack” come in 8 different models KATO 7078535 Fahrregler regelbar, Kato 22-012 Power Pack, Kato N - 20-004, Kato 22-018 and many more.
They all the have same 1 amp diodes but there are two different power transistors.
The 2SD560 is a Darlington transistor and the correct symbol is:
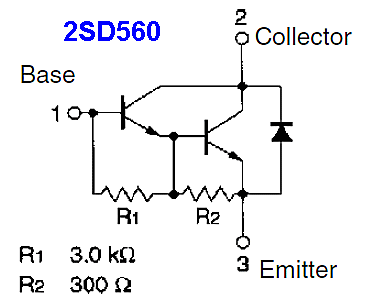
A Kato 22-018 Power Pack is available on eBay for $40.00 shipped and you will need an AC plug pack
The KATO 12v AC plug pack costs $25.00 to $40.00 on eBay BUT is for 100v AC and is not much use in the rest of the world. The advertisers don’t tell you it’s for 100v AC. There is NO 240v version.


What you need is a transformer as shown above. It converts 240v AC to 12v (or 15v) at about 1 amp.
https://www.aliexpress.com/item/1697253744.html
These cost about $20.00 (shipped) by Aliexpress.
You can now see the difficulty in using the KATO POWER PACK.
Now we come to adding a KATO TURNOUT CONTROL SWITCH. The photo below shows 5 switches added to a KATO Power Pack.

These switches have two studs on each side and they click into the studs on the right-hand-side of the Power Pack. The two terminals called 0v and 12v on the circuit above are the studs and are not 12v (as explained above) but possibly about 14v pulsed DC.

The KATO 24-840 Turnout Control Switch (shown above) is actually a PASSING SWITCH and only makes contact when the lever is a little-bit down from the top and a little bit up from the bottom. These switches cost about $8.00 on eBay.
Here is the equivalent of how the switch works. It is equal to a change-over switch (to reverse the polarity) and a “touch switch” to deliver a pulse:
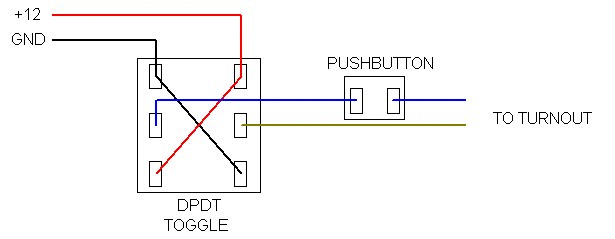
If you don’t have a KATO POWER PACK, you can buy a Kato 24-829 Accessory Adapter. It is also called Kato 24-842 DC Converter. It contains 4 diodes and converts an AC voltage to PULSED DC. The Passing Switches will then send the pulsing DC “around one way” to the point via a pulse or “around the other way” via a pulse. Here is a Kato 24-829 Accessory Adapter clicked onto two KATO 24-840 Turnout Control Switches.

You can see the DC Converter has click fittings on both sides
If you have 15v AC from a “TRAIN TRANSFORMER,” you can connect the 15v to the two wires coming from the back of the Kato 24-829 Accessory Adapter. If you have 12v DC, you can connect to the two wires (around either way) but the output will be 10.5v DC. This will be sufficient to pulse the KATO POINT MOTORS (solenoids).

Talking Electronics has designed a number of modules to replace KATO modules.
THROTTLE WITH PWM
Built and Tested: $35.00 plus $6.50 postage.
Click [HERE](mailto:colin@elechelp.com?Subject=Buying%20Throttle%20with%20PWM built and tested $35.00 plus%20$6.50%20postage%20&Body=Please%20e-mail%20the%20cost%20of%20Buying%20Throttle%20with%20PWM%20kit%20$28.50%20plus%20$6.50%20postage%20by%20air%20mail%20to%20my%20country:**___****%20%20and%20send%20details%20of%20how%20I%20can%20pay%20for%20it.%20My%20name%20is:____) to buy a module.

_This module takes the place of a Kato 22-018 Power Pack** and uses a readily available 15v DC plug Pack._
4-POINT CONTROLLER FOR KATO POINTS
[Modules are available](mailto:colin@elechelp.com?Subject=Buying Kato Point Controller Module $25.00 plus $6.50 postage &Body=Please e-mail the cost of Kato Point Controller Module $25.00 plus $6.50 postage by air mail to my country:****___**** and send details of how I can pay for it. My name is:____) for $25.00 plus $6.50 postage, built and tested for 4 points.
This is cheaper than 4 KATO 24-840 Turnout Control Switches.
You can use the 15v DC plug Pack from the Throttle with PWM module shown above.
You don’t need the Kato 24-829 Accessory Adapter
KATO DISTRIBUTION BOARD $18.00 plus $4.50 postage
[Buy Here](mailto:colin@elechelp.com?Subject=Buying Kato Distribution Board $18.00 plus $4.50 postage &Body=Please e-mail the cost of Kato Distribution Board $18.00 plus $4.50 postage by air mail to my country:**___**** and send details of how I can pay for it. My name is:____)**

This module will allow you to illuminate all your LEDs.
There are 4 separate brightness controls. Two controls have shafts that can be easily adjusted and two controls are via mini trim pots.
The Distribution Board comes fully built and has sample LEDs to show the brightness.
6 flying leads can be fitted into the JST 2mm sockets and 12 sets of LEDs can be fitted into the screw terminals.
The end of the module has 12 sets of female machine pins and you can insert 0.5mm wire into them.
The input voltage can be 9v AC or DC up to more than 20v as the 7805 regulator delivers 5v to all the LEDs. As you add more LEDs, the regulator might get warm and you can add a heatsink if you cannot hold it in your fingers.
These modules are very popular as they solve the problem of illuminating stations, roads and scenes with the appropriate level of brightness. You can use any colour LEDs as each section is individually protected with a current-limiting resistor.
$18.00 plus $4.50 postage
[Buy Here](mailto:colin@elechelp.com?Subject=Buying Kato Distribution Board $18.00 plus $4.50 postage &Body=Please e-mail the cost of Kato Distribution Board $18.00 plus $4.50 postage by air mail to my country:**___**** and send details of how I can pay for it. My name is:____)**
FREE THINGS !!!
Some of the modules and power supplies come with free wire and switches and terminal blocks to make connection easy.
Hook-up wire and stranded wire is very expensive by the metre and the length we supply will get out out of trouble.
The spring-terminals connector block are very cleverly designed. But you have to be an Einstein to work out where to put the wire.
When you push the lever (button) on the top, the metal spring produces a gap just below the button and when released, the spring digs into the wire and you cannot remove it. You will get some of these FREE when you buy the modules. The wire will be different colours and different thickness.


Here is another clear picture of how to fit the wires into the terminal block.
The wires go above the metal spring and just below the “push-button.”
When you push the lever on the top of the terminal block, the spring is depressed and a it creates a space for the wire. Releasing the lever grips the wire very tightly by the edge (end) of the flat spring.
Let’s look at the 20 choices and describe the differences.
You will see some choices turn a manual point into a remotely-operated point and some prevent a solenoid point: “burning out.”
These choices are classified as the BASIC DESIGNS.
They are the simplest designs to do the simplest job.
Later, we will explain modules that change the point slowly and modules that automatically change the point when the loco approaches and modules that show the position of the point on your control panel.
For a simple layout and those who are just starting to improve their layout, the choices above will provide the answer to remotely control a point and also show its position on your control panel.
Read the features of each module and make sure you have the required voltage available. You can get almost any voltage (and current) from one or two PLUG PACKS. These provide safety and security and prevent you being able to touch the 110v or 240v MAINS.
Under NO circumstances should you make your own POWER SUPPLY with soldered wiring and leads around your control panel carrying MAINS VOLTAGES. One day a young visitor may come in and be looking and feeling around your wiring and touch something LIVE !!!
WIRING A POINT MOTOR
Point Motors take a high current when they are operated for the very short time they are intended to work.
Most point Motors have a coil resistance of about 3.8 ohms and when operated on a supply of 12v, this will allow 3 amps to flow.
Normally, wiring for 3 amp will require medium duty hook-up wire because the current will be flowing for a long period of time and thick wire prevents it getting hot. But with a solenoid-type Point Motor, it is only activated for less than a second.
This means thin hook-up wire is perfectly suitable.
3 metres of thin hook-up wire will have a resistance of about 1 ohm and if 3 amps flows, the voltage drop across the wire will be 3 volts.
But most Capacitor Discharge Units are charged to a voltage higher than 12v and can be 24v.
If we take 24v, the current will be 5 amps and the voltage drop will be 5v.
This gives the solenoid 19v.
The Capacitor Discharge Unit is designed to give 24v at the beginning of the pulse and gradually drop to almost zero after less than 1 second.
This give the solenoid Point Motor an initial kick to start moving and then the current gradually reduces so the “end clunk” is not so strong.
This means the wiring to the Point Motor can be almost any thickness as it has very little effect on the operation of the solenoid.
CHAPTER FOUR
THROTTLES
Talking Electronics has produced a number of different TRAIN THROTTLES.
These need either AC or DC input and produce 0v to 12v DC output.
If you have an AC supply such as: 10v AC to 12v AC, the Throttle Circuit below will produce an output of 0v to 12v DC - that is what it is designed to do.
If you have a 12v DC supply, the voltage-drops across the input power diodes and the control circuitry, will reduce the output to about 10v DC.
This means you need an input voltage of 14v DC, to get 12v out, and this will require 2 adaptors in series or a set of 4 Li-ion cells.
The POWER SUPPLY project described above uses 4 Li-ion cells to provide a voltage of about 14.2v DC to 14.8v DC and is adjustable. It can be used as a TRAIN THROTTLE.
Most locos take about 300mA to 500mA and need a voltage of about 12v for full speed.
A 1Amp power supply will just be capable of operating two loco’s.
There are two types of TRAIN THROTTLE:
- TypeA produces an output 0v to 12v DC and you need a reversing switch to reverse the train.
- TypeB has a control with 0v in centre-position and “left” reverses the train at a gradual increase and “right” drives the train forward at an increasing velocity. No change-over switch needed.
This type of Train Throttle can be PWM and provides pulses of energy. It “kicks” the motor in bursts of about 600Hz and allows it to start the train very slowly. The “kicks” are very rapid and sometimes you can hear the “buzz” from the motor.
These circuits require an input voltage of 14v DC, so the full 12v DC can be delivered to the motor (as up to 2v DC is lost in the circuitry).
Here is a circuit and photo for typeA and the wiring for the reversing switch:

Two Amp Power Supply circuit diagram. It is also called 2-amp THROTTLE

The completed project, showing the placement of the parts
The input voltage can be AC or DC.
The DC voltage needs to be at least 16v6 to get 12v DC out. If you supply 17v to 20v DC, nothing will be damaged. Just the 470R resistor will get slightly hotter when the input voltage is above 18v.
The 2-Amp POWER SUPPLY project is HERE
Kits come with 0-2 Amp meter to show the current. The ammeter is not a square meter as shown above but a side-meter as shown in the POWER SUPPLY project. But it is FREE, so don’t complain.
$12.50 USD plus $6.50 USD postage.
Click [Here](mailto:colin@elechelp.com?Subject=Buying 2 amp Power Supply with free ammeter $12.50 USD plus $6.50 USD postage &Body=Please email the cost of 2 amp Power Supply with free ammeter by air mail to my country:**___****and send details of how I can pay for it. My name is:____) to order.**
You will need a double-pole double-throw toggle switch to reverse the train. Ask for it.
$2.50 extra.
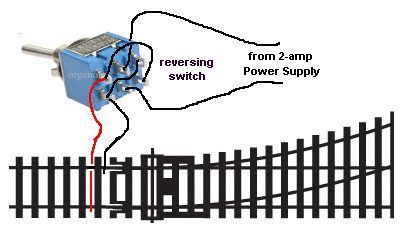
Connecting a reversing switch
TRAIN THROTTLE No2
(kit: $18.00 with leads)
Click [Here](mailto:colin@elechelp.com?Subject=Buying Train Throttle No 2 $18.00 plus $6.50 postage &Body=Please email the cost of Train Throttle No 2 by air mail to my country:**___****and send details of how I can pay for it. My name is:____) to order.**
See the project: HERE
**This circuit connects an AC transformer (or a DC supply) to a track to provide a voltage from 0v to max voltage (depending on the voltage of the transformer).
The transformer can be AC or DC and any voltage from 12v to 18v.
The throttle handle connects to the 1k pot.
The diode on the output protects the transistors from reverse polarity (if another controller is also connected to the rails).
The circuit is limited to about 1amp due to the 1N4004 diodes.
Here are two controllers that may be available from Model Railway suppliers and hobby shops. They are expensive but look really nice.
In this article we are showing you everything because some hobbyists want to build it themselves and others want to buy a ready-made item.
Transformer with 12v AC output and 18v AC

An impressive throttle can be built by using the following circuit and the THROTTLE PC Board in the kit (the lever handle shown above is not available).
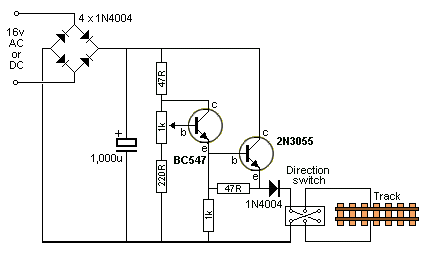
Train Throttle Circuit
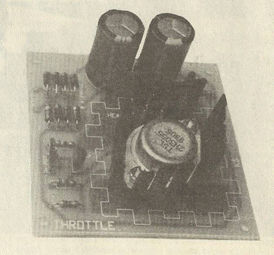
The 8 power diodes are now replaced by 4 x 1N5404
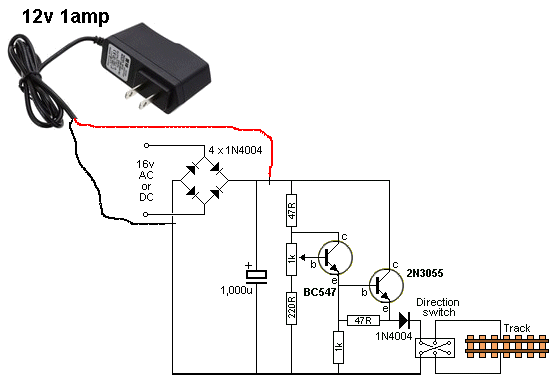
AC plug packs are very difficult to buy, but 12v 1-amp DC or 2-amp DC can be purchased at very low cost.
You can increase the output by 1.5v if you connect the positive and negative leads of the DC plug pack to the following points on the PC:
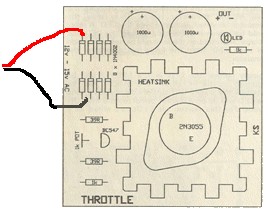
The layout of the PC Board.
You can connect the plug pack directly to the points shown on the diagram above. You do not have to remove the diodes.
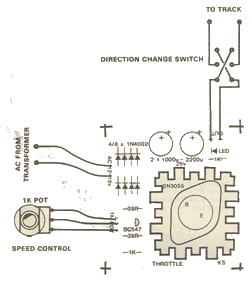
Wiring the pot, power input wires and reversing switch to the PC board

The control knob for the Throttle kit
The $2.50 plug Pack above was purchased as 12v @ 1 amp.
It was easily opened-up via a screw and clip, to reveal the PC board shown below.
The output voltage is determined by the zener diode at the front of the board. The 12v zener was replaced with 15v and now the output is 15v DC. I would limit the current to 800mA, but a 15v supply can be connected to many of the throttle circuits to give 0v to 13v DC output.
The new 15v zener converts this power adapter to 15v output.
You can also use a white LED in series with the 12v zener diode to get 15v output. Note the cathode of the zener is connected to the cathode of the LED and the 1k current-limiting resistor is linked with a jumper.
This gives you a very low cost throttle.
THROTTLE WITH PWM
Kit: $28.50 plus $6.50 postage.
Click HERE to buy a kit.
Built and Tested: $35.00 plus $6.50 postage.
Click [HERE](mailto:colin@elechelp.com?Subject=Buying%20Throttle%20with%20PWM built and tested $35.00 plus%20$6.50%20postage%20&Body=Please%20e-mail%20the%20cost%20of%20Buying%20Throttle%20with%20PWM%20kit%20$28.50%20plus%20$6.50%20postage%20by%20air%20mail%20to%20my%20country:**___****%20%20and%20send%20details%20of%20how%20I%20can%20pay%20for%20it.%20My%20name%20is:____) to buy a module.**
This is our latest design with forward and reverse via the yellow CONTROL POT. This project does not need a reversing switch as the pot provides zero speed when at 12 O’clock and reverse when turned to the left and forward when turned to the right. The output is Pulse Width Modulated (PWM) to give the loco smooth starting.
By this we mean the motor gets pulses from the throttle that allow it to start very slowly.
The module is capable of delivering 3 amps (due to the thickness of the tracks) and the power diodes are 5 amp. Additional heatsink fins will be needed for currents above 2 amp. But we suggest a 1-amp supply for most loco’s.
The 4 FETs on the output bridge are capable of handing more than 10 amp and the trackwork on the board can be modified to handle 5 amps by soldering tinned copper wire along the tracks identified with additional solder pads. This means the controller can be used for garden layouts where the loco will draw 5 amps. If you want to control more than 5 amps, you will need to connect the supply directly to the MOSFETs in the bridge and by-pass the 5 amp diodes.
The switch at the right is the on-off switch. The two LEDs on the board indicate forward and reverse, in case you cannot see the loco on a large layout.
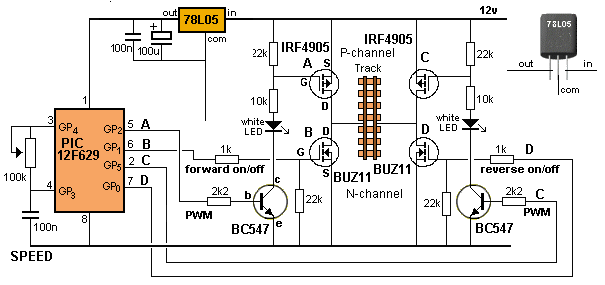

All the digital signals are controlled (and generated) by the microcontroller and the pot determines the timing of the waveform and the activation of the H-bridge.
The two lower MOSFETs turn ON or OFF to take one or other of the output leads to 0v. At the same time the top, opposite, MOSFET is switched ON and OFF at a fairly low frequency (about 600Hz) to provide pulses to the motor.
The ON-time is increased, compared to the OFF-time to increase the speed of the loco.
The THROTTLE WITH PWM module comes with connectors that are fitted in place of rail joiners to deliver the voltage from the throttle to the track.
NEW VERSION
The latest version was requested by a customer. He wanted the control facing the front:


The cost is the same for either module but you must specify which version you want. The switch and knob are not attached when posted as the module must be less than 2cm high for posting in the box we use.
Both modules come with the TRACK PICK-OFF (shown below) to deliver the output of the module to your layout.

Connect a plug pack and the throttle project is ready.
This type gives better current capability.
You can request the following type if you do not want to use the rail joiners:

It will just pass 1 amp.
IMPORTANT NOTE:
Do not use a CAR GLOBE to detect the voltage on the rails of your layout.
One customer used a small globe and constantly blew up the PWM THROTTLE!
Even a small 5watt or 21watt globe can blow it up.
IT ACTS LIKE A SHORT-CIRCUIT
The reason is this:
The resistance of a globe is 10% to 20% of the resistance when it is illuminated. This means a globe take 10 times or 5 times more current when it is cold because the filament is nichrome wire or tungsten and all metals increase in resistance when they are heated.
This means a 21watt globe can take 10 amps or more when it is cold.
This puts enormous strain on the power supply and if it reduces in voltage the FETs do not turn ON fully and they blow up INSTANTLY.
We have a TRACK TESTER to test the voltage.
UPGRADE YOUR CONTROLLER
The following images of controller are called DC CONTROLLERS. They increase and decrease the DC voltage and most have a reversing switch. There is nothing wrong with these controllers, but if you want to start the train very slowly, and have a controller-knob that has both forward and reverse, THROTTLE WITH PWM is the upgrade.
If you have one of the controllers shown below or a similar type that has a 0-100 scale AND a reversing switch, you can connect its output to the input of THROTTLE WITH PWM and get the new features.
HERE’S WHAT TO DO
Connect your throttle to the mains and turn the knob or lever to maximum.
Measure the voltage coming out of the throttle and make sure you identify the positive lead.
Now turn it off and connect the positive lead to the ”+” DC screw terminal on THROTTLE WITH PWM module.
Now connect the other lead to the ”-” DC terminal on THROTTLE WITH PWM module.
Put your throttle under your layout, making sure you do not touch the handle or the reversing switch.
Now connect your track to the two screw terminals marked “to track” on the THROTTLE WITH PWM module.
The THROTTLE WITH PWM module will use your throttle as a power supply and deliver PWM to your layout via the forward/reverse knob on THROTTLE WITH PWM.

The above 7 controllers are suitable for adding to THROTTLE WITH PWM module
Some of the following controllers deliver just 7v and some are up to 16v AC output and/or 16v DC output. They all have forward/reverse on the control handle so the only improvement you will get by connecting to the THROTTLE WITH PWM module above is PWM. PWM will allow your train to start very slowly as the pulses overcome some of the friction by pulsing the motor with strong bursts and this gets the train moving.
Any controller with forward/reverse on the handle will require AC input.


Here is the wiring from your controller to THROTTLE WITH PWM module to provide PWM and forward/reverse via yellow control knob.
The module also comes with track connector as shown above.
When everything is connected, the voltage to the track will be slightly less than the output voltage of the Athearn controller, due to the voltage drop across the diodes on the PWM module.
The Transformer
You can find suitable transformers in the oddest of places. Here is a 12v, 4-amp transformer from a 50 watt down-light. The light was replaced with a 10 watt LED light and it produced 3 times more light !!
The 50 watt transformer makes an ideal supply for a throttle and at 4 amps, it has enough current for other locos too.
The 12v2 AC produces 18v DC after rectification minus 2v to 3v drop across the diodes in the bridge.
The circuitry in the throttle drops another 2v and the output was measured as 13.5v DC.
All our down-lights were replaced with 5watt or 10 watt LED lights and the rooms are much brighter, with a whiter light and the wattage is less than 25% than before. Now we have 6 transformers.
Transformers like this can be found in all sorts of equipment and they are ideal for the throttles we have described. You just have to look for them.

Servo Speed (slow) Controller
[Buy a Module](mailto:colin@elechelp.com?Subject=Buying%20Servo%20Speed Module $25.00%20plus%20$6.50%20postage&Body=Please%20e-mail%20the%20cost%20of%20Servo%20Speed Module by air%20mail%20to%20my%20country:**___****%20%20and%20send%20details%20of%20how%20I%20can%20pay%20for%20it.%20My%20name%20is:____)
Fully Built $25.00 plus $6.50 postage**
Sometimes you want a servo to rotate slowly to produce animation that is realistic for the scale model you are designing.
This project provides different speeds.
It also has a repeat feature that activates the servo back-and-forth at the speed you have chosen.
It allows you to ANIMATE things.
The output of the servo moves about 70 degrees as this will give the greatest “throw.” You can select the hole on the arm to produce the travel you want.
The repeat feature allows you to produce models with “pumping action” or “see-saw” action as a servo is smaller and cheaper than buying a motor and gearbox.
You can use it to control a point or a set of boom gates as well as swing-gates or a drawbridge or crane or a “see-saw” action. It has so much potential. You can get a smaller servo or a linear-movement servo for very tight spaces, but there is nothing cheaper than the standard 9G servo.
Here is a set of gates controlled by 4 servos.
https://youtu.be/bc6jyj93Ee4
Our module can be used to control this:

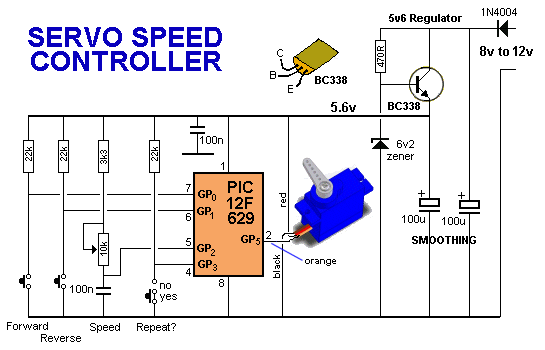
All the functions are in the PIC12F629 microcontroller

The module comes with 2 Test Switches and extension lead for servo, plus the servo and 0.6mm and 0.7mm push rods. You just need a 8v to 12v supply.

All the complex electronics in the project above can be reduced by using our module and a servo.
CHAPTER FIVE
DCC
DCC stands for Digital Command Control and basically means you can control more than one train on the same track.
It is expensive to add this feature to your layout as you need a COMMAND CONTROLLER and a loco that has a DIGITAL DECODER fitted inside the loco. A command controller is about $200 and a loco with a Digital Decoder fitted is about $200 and you need two locos to take advantage of this system.
I have used a COMMAND CONTROLLER ”NCE POWER CAB” and is is very slow and messy as it is designed for a single person to control two trains.
But what if you have two “drivers?” … . two hobbyists who want to drive the two trains at the same time?
All the controllers on the market do not allow this feature.
But Talking Electronics has produced a very simple Dual DCC Controller for two DCC Decoders for locos that do not have a decoder.
Here is the Dual DCC controller:
[Buy Dual DCC Controller](mailto:colin@elechelp.com?Subject=Buying Dual DCC Controller fully built $43.00 plus%20$6.50%20postage&Body=Please%20e-mail%20the%20cost%20of%20 Dual DCC Controller by air%20mail%20to%20my%20country:**___****%20%20and%20send%20details%20of%20how%20I%20can%20pay%20for%20it.%20My%20name%20is:____)
Fully Built $43.00 plus $6.50 postage**

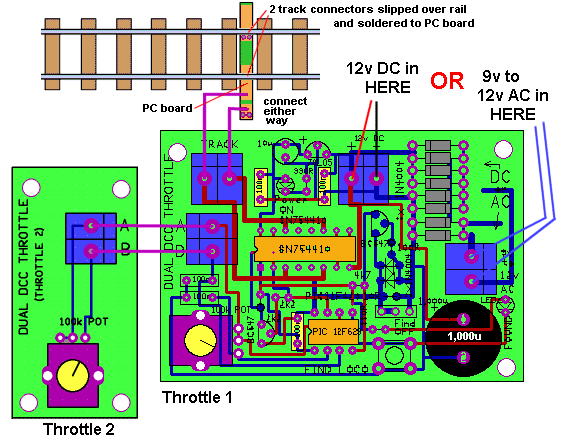
This Dual DCC controller will control 2 locos at the same time and is an ideal way to create a DCC set-up. And the cost is just $43.00 AUD plus $6.50 posted worldwide.
It can also be used with 2 DCC locos that you have converted from DC to DCC via two Motor Decoders shown below.
The only additional item you require is a 12v DC supply from a SLA battery or a 15.9v DC supply from 4 Li-Ion cells (18650) or a 15v AC supply from a train transformer.
DCC Decoder for Motor
[Buy DCC Decoder for Motor](mailto:colin@elechelp.com?Subject=Buying DCC Decoder for Motor fully built $18.00 plus%20$4.50%20postage&Body=Please%20e-mail%20the%20cost%20of%20 DCC Decoder for Motor by air%20mail%20to%20my%20country:**___****%20%20and%20send%20details%20of%20how%20I%20can%20pay%20for%20it.%20My%20name%20is:____)
Fully Built $18.00 plus $4.50 postage**
This is a 1amp decoder NOT 500mA as per most of the small decoders advertised.
The output has 3amp FETs so the output stays as “cold as a frog.”
Lots of these decoders have been sold and you can create a new DCC section using the controller and decoders because it is very easy to set-up and can be used by your friends, children or as test set-up as no programming is required and both controller can be used at the same time. It is much easier to use than all the hand-held controllers on the market and puts new life into two of your DC locos. (Don’t forget: they have to be converted to DCC.)


The Decoder can be put into a Coal Tender
You can turn a DC Loco into a DCC loco with this universal Motor Decoder for $18.00 plus $4.50 postage worldwide.
All you have to do is cut the two wires to the motor and insert the module.
The image above shows 2 screened leads (equal to 4 wires) from the loco. These 4 go to the input and output of the module.
The module is fitted in the tender if there is insufficient room inside the loco.
INSTRUCTIONS FOR INSTALLING THE MOTOR DECODER:
When you receive your Motor Decoder, it will have an address such as 3, 5, 31, 32, 33, 34, 35, 36. You can request any address when buying the module.
The Decoder comes with leads and alligator clips so you can test everything before installation. The leads near the 4 power diodes clip onto the two rails of your DCC layout.
- Place a NEW 1 metre length of track next to your layout.
- Place the DC loco on the new track.
- Connect the other two leads to this new track.
- Now set your controller to address show on the chip and use the throttle knob to drive the loco forward and reverse.
- Make sure you are happy with the performance.
- Now open the loco and cut the two wires to the motor.
- Make sure no wires are connected to the chassis.
- Now connect the two wires next to the 4 power diodes on the Motor Decoder to the DCC track. Connect the other 2 wires and alligator clips to the motor.
- Place the “bogey” (motor and wheels) on the DCC track and carefully make the loco move back and forth very slightly.
You have now proven the Motor Decoder will work correctly when fitted inside the loco or in a coal tender or any suitable carriage behind the loco.
The cost of a DCC layout will be about $43 + $18 + $18 + power supply + postage.
DCC POINT CHANGER using a servo
Talking Electronics has produced a module that detects the DCC signal on the track and changes a point.
But to explain this we have to start at the beginning.
To operate the DCC Point Changer you need a DCC Controller such as NCE POWER CAB. There are a number of suitable types, BUT NOT A HORNBY CONTROLLER.
The Power Cab has a keyboard to select an address and these address are generally the address of a loco. But the same range of addresses can be used to access other items such as the operation of a point.
We have used address “40” to operate our DCC POINT CHANGER using a servo, shown below.
You can have 1, 2, 3, 4, or 5 DCC POINT CHANGERS on this address and to operate each point, the keys 1, 2, 3, 4, 5 are used in TOGGLE MODE. By pressing key, the first POINT CHANGER will activate the point. But you will not know the position of the point, if you cannot see it move.
So we have a DCC Point Identification module that picks up the signal from the track and shows the result on a display.

You need 4 things:
DCC POINT CONTROLLER - such as NCE Power CAB
DCC POINT CHANGER with a servo
DCC POINT IDENTIFICATION Module
Track pick-off for each DCC POINT CHANGER**

TO SERVO
DCC POINT CHANGER using a servo
Buy DCC Point Changer with servo: [DCC Point Changer with Servo](mailto:colin@elechelp.com?Subject=Buying%20DCC%20Point%20Changer%20with%20Servo%20$20.50%20&Body=Please%20e-mail%20the%20cost%20of%20sending%20DCC%20Point%20Changer%20with%20Servo%20$6.50%20air%20mail%20to%20my%20country:**___****%20%20and%20send%20details%20of%20how%20I%20can%20pay%20for%20it.%20My%20name%20is:____)
$20.50 plus $6.50 post**
If you have 5 DCC points, you will need to order:
- DCC POINT CHANGER using a servo with address 40 - toggle key1
- DCC POINT CHANGER using a servo with address 40 - toggle key2
- DCC POINT CHANGER using a servo with address 40 - toggle key3
- DCC POINT CHANGER using a servo with address 40 - toggle key4
- DCC POINT CHANGER using a servo with address 40 - toggle key5
If you have more DCC points, you will need to order:
- DCC POINT CHANGER using a servo with address 41 - toggle key1
- DCC POINT CHANGER using a servo with address 41 - toggle key2
- DCC POINT CHANGER using a servo with address 41 - toggle key3
- DCC POINT CHANGER using a servo with address 41 - toggle key4
- DCC POINT CHANGER using a servo with address 41 - toggle key5
You will also need a connection to the track to pick-off the signal to operate the DCC Point Changer and also power the servo.
Track Pick-Off MkI has two track joiners soldered to the board and this is fitted between two sections of your layout.
The images below shows and how it it fitted to the track.
Comes with 1.5metres of screened lead
Track Pick-Off MkII. It has two springy clips that touch the inner parts of the rails and make electrical contact.
The board comes with the two clips soldered in place and you need to remove the plastic from between two sleepers to allow the board to fit. Twist the board into position and give the spring clip a twist with a pair of pliers so it pushes against the rail.
Track pick-off $1.50 each [Track pick-off](mailto:colin@elechelp.com?Subject=Buying Track Pick off $1.50 each &Body=Please%20e-mail%20the%20cost%20of%20sending Track Pick off at $1.50 each to%20my%20country:**___****%20%20and%20send%20details%20of%20how%20I%20can%20pay%20for%20it.%20My%20name%20is:____)** Let me know who many and which type.

DCC POINT IDENTIFICATION Module
Buy: [DCC Point Indicator](mailto:colin@elechelp.com?Subject=Buying%20$10.50%20DCC%20Point%20Indicator%20 plus $6.50 postage&Body=Please%20e-mail%20the%20cost%20of%20sending%20$10.50%20DCC%20Point%20Indicator%20by air%20mail%20to%20my%20country:****___****%20%20and%20send%20details%20of%20how%20I%20can%20pay%20for%20it.%20My%20name%20is:____)
$10.50 plus $6.50 post
CROSSING LIGHTS
We have designed 4 different CROSSING LIGHTS MODULES to cover the different requests from customers.
You need to read through the details of each module before ordering.
Some are low-cost and operate all the time. Others are activated by the train and some automatically turn off after 20 to 60 seconds - the choice is yours. You can buy the ready-built and tested modules for less than a kit of parts.
You can buy a module with just Crossing Lights or Lights and Sound and finally a set of modules with Lights and Sound and Boom Gates.
You can add these modules to a larger order and pay only one postage. Email talking electronics before making any large order to get the best costing.
email: Colin Mitchell
1: Crossing Lights 2-Transistor
$5.00 plus $4.50 postage
[Buy: Crossing Lights - 2 Transistor](mailto:colin@elechelp.com?subject=Buying Crossing Lights - 2 Transistor $5.00 plus $4.50 post &Body=Please%20e-mail%20the%20cost%20of%20buying Crossing Lights - 2 Transistor by%20air%20mail%20to%20my%20country:**___****%20%20and%20send%20details%20of%20how%20I%20can%20pay%20for%20it.%20My%20name%20is:____)
 **
**


This is the simplest and cheapest CROSSING LIGHTS Module.
It uses a 2-transistor flip flop circuit and the mini trim pot adjusts the brightness of the LEDs and the flash-rate (at the same time).
It operates all the time when the supply is connected and does not have any train detection feature. It connects to 9v - 12v DC and you need an on-off switch to turn it off.
Cost:$5.00usd plus $4.50usd shipping
The module comes with 2mm and 3mm LEDs and you can buy components from Talking Electronics to make your own Crossing Lights.
2: Crossing Lights - Surface Mount 555
$5.00 plus $4.50 postage
[Buy: Crossing Lights -](mailto:colin@elechelp.com?subject=Buying Crossing Lights - SM 555 $5.00 plus $4.50 post &Body=Please%20e-mail%20the%20cost%20of%20buying Crossing Lights - SM 555 by%20air%20mail%20to%20my%20country:**___****%20%20and%20send%20details%20of%20how%20I%20can%20pay%20for%20it.%20My%20name%20is:____) [SM 555](mailto:colin@elechelp.com?subject=Buying Crossing Lights - SM 555 $5.00 plus $4.50 post &Body=Please%20e-mail%20the%20cost%20of%20buying Crossing Lights - SM 555 by%20air%20mail%20to%20my%20country:****___****%20%20and%20send%20details%20of%20how%20I%20can%20pay%20for%20it.%20My%20name%20is:____)**

This is the surface mount version of the low-cost CROSSING LIGHTS above.
It operates all the time when the supply is connected and does not have any train detection feature.
The mini trim pot adjusts the flash-rate of the LEDs
The module comes with 2mm and 3mm LEDs.
Cost:$5.00usd plus $4.50usd shipping
You can buy components from Talking Electronics to make your own Crossing Lights.
3: Crossing Lights 3v
$15.00 plus $6.50 postage
[Buy: Crossing Lights - 3v](mailto:colin@elechelp.com?subject=Buying Crossing Lights - 3v $15.00 plus $6.50 post &Body=Please%20e-mail%20the%20cost%20of%20buying Crossing Lights - 3v by%20air%20mail%20to%20my%20country:**___****%20%20and%20send%20details%20of%20how%20I%20can%20pay%20for%20it.%20My%20name%20is:____)**

Crossing Lights 3v Module and two reed switches with 12mm super magnets. The LEDs are connected to 600mm leads
This is a self-contained module.
Fit the reed switches between the rails and place a super-magnet under the loco.
It is activated by the train.
It turns off automatically after the train has passed and no on-off switch is needed.
The module comes with a 3v cell in a coin-holder and is self-contained and starts-and-stops by the action of the train.
Cost:$15.00usd plus $6.50usd shipping.
Talking Electronics has components to make your own Crossing Light for the LEDs.
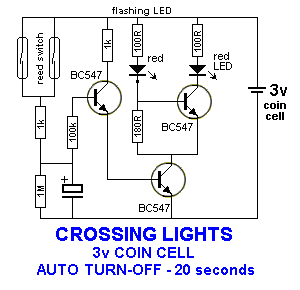
4: Crossing Lights - 555
$15.00 plus $6.50 postage
[Buy: Crossing Lights - 555](mailto:colin@elechelp.com?subject=Buying Crossing Lights - 555 $15.00 plus $6.50 post &Body=Please%20e-mail%20the%20cost%20of%20buying Crossing Lights- 555 by%20air%20mail%20to%20my%20country:**___****%20%20and%20send%20details%20of%20how%20I%20can%20pay%20for%20it.%20My%20name%20is:____)**


This module is connected to 9v to 12v supply. The module turns off automatically after 30 seconds but the 555 IC takes 5 - 10mA when “shut down” and that’s why you need to use your train power supply.
Fit the reed switches between the rails and place a super-magnet under the loco.
Talking Electronics has components to make your own Crossing Lights for the LEDs.
CROSSING SIGNALS also called CROSSING LIGHTS
The 4 modules above will need CROSSING SIGNALS.
The simplest CROSSING SIGNAL is 2-head. These signals cost about $15.00 from suppliers on eBay.


You can make your own from a kit of parts from Talking Electronics for $5.00 plus postage.
You will need tools, soldering iron and black spray paint to complete the signal.
TRAIN DETECTORS
Train Detectors are mainly used to watch the passage of a train around your layout via a series of LEDs in your console.
This is very handy when parts of your layout are not visible from where you are standing and this can be an “L-shaped” layout, around a corner. Lucky for those who have such a large layout. Some enthusiasts have even broken through the wall of one room to continue the layout in the next room. These are the sort of layouts where a TRAIN DETECTOR is very important.
We have designed more than 7 different modules to cover your requirements and they start with a single circuit on a small printed circuit board.
There are 5 different sensors, 5 different outputs, a delay option, a relay version and two isolated options for the larger modules.
The detectors detect the presence of the loco. They are one of the following:
- Reed Switches, or
- IR Detection on one side of the track, or
- IR Detection across the track or
- IR Detection under the track.
The output can be:
- Just illuminating a LED
- Up to 50mA to supply current for another module
- Up to 100mA
- Up to 1 amp or
- Three amps or more
The output can have a delay features where it is ON for 2 seconds to 2 minutes.
The output can isolated or non-isolated.
This gives more than 10 different options and you have to read this article to work out which module will be the most suitable for your application.
Reed switches are the cheapest but you have to put a magnet under each loco.
IR modules detect a beam of light and by using an Infra-red beam, the natural lighting on your layout will not effect the operation of the sensor.
If the Infra-red transmitter and receiver are together, the beam is bounced off the loco and this is called REFLECTIVE DETECTION.
If the beam is across the track, the beam is cut by the loco. This is called BROKEN BEAM DETECTION. The beam across the track will also work for two tracks.
If the Infra-red transmitter and receiver are between the rails, it is called REFLECTIVE DETECTION.
All our detectors are very sensitive but some are more sensitive than others and you have to test a module and ask for an exchange if you want the other form of detection.
The IR detectors also have two different levels of sensitivity as one form of transmission is a constant beam while the other is coded (pulsed) at 38kHz and it does not pick up incident interference (such as light-levels).
DECIDING ON THE MODULE FOR YOUR APPLICATION
Here’s how to decide on the module you need:
Firstly you have to work out what you want to turn ON when the train approaches. Is it LEDs or globes or a motor?
Then you have to know what current your device takes. Normally this is of no concern, but some of the Train Detector Modules have a transistor switch and the capability of the switch may be limited to 50mA, 100mA or 200mA. One module will handle 3 Amps or more.
Then you have to decide if you want REED SWITCHES or Infra-red sensors.
The simplest is a set of two reed switches. This will detect the train in both directions. They are placed either side of the crossing and detect the on-coming loco.
If you want to pay a little more, you can have 2 IR detectors.
Then you have to decide if you want a DELAY feature.
Some modules have an on-time (also called a DELAY) from 1 second to 30 seconds.
You may want to activate a set of lights at a station as the train passes or a windmill or a set of crossing lights and some of our modules provide an activation for a period of time. You select the DELAY TIME by adjusting the mini trim pot on the module.
Now that you know all the features of the modules, you can select the right one to suit your application.
There is one final option. Two modules have an ISOLATION feature where the output (the output is a SWITCH) is totally isolated from the electronics of the module and this means you can turn on a device that has its own power supply.
The output of some Train Detector modules is a SWITCH - just like the wires from a reed switch, or the connections on the output of a relay.
Other Train Detector “supply” the current (and voltage) to the module being activated. And this “supply” comes from the power rail of the Train Detector module.
If you do not know what you want, you need to email us with your details so you get the correct module.
THIS IS HOW THE TRAIN DETECTOR WORKS:
When the Train Detector module detects a loco, the resistance between the two output connections is very low. (The OUTPUT of the Train Detector module). We say “low” because the switching device may be a transistor (in the circuit of the Train Detector). It will be zero ohms when the switching device is a relay.
When the “switch” in the Train Detector module is a relay, you can connect the two wires (to the device you are activating) around either way. But in our case the relay is a CMOS relay and the connections must be around the correct way.
When the “switch” in the Train Detector module is a transistor, you must connect the two wires (to the module you are activating) around the way we will explain in an accompanying diagram. This is because the transistor only becomes a “switch” in one direction.
If the module you want to control is powered by a different power supply to the supply for the Train Detector, you will need to buy the OPTO or RELAY VERSION. This version is classified as ISOLATED.
Finally, you need to know if you want the Train Detector to be able to switch a very small current - such as 50mA or a higher current - such as 500mA or 1 amp.
If you buy the relay module, it will switch everything, but the other modules are cheaper.
Finally, you can buy a module that remains active (switched) for 1 sec to 30 seconds. This is called DELAY TIME or ON-TIME.
IR DETECTOR
Since you cannot see the Infra-red beam of the Train Detectors, we have designed a detector that you move around in front of the beam and work out where it is the brightest. This detector also works for 38kHz beams. It is essential for detecting problems. Ask us about the kit.
And we also have a LED TESTER that will illuminate and test LEDs and also test leads for continuity. Ask us about the kit.
Now we come the modules:
Modules
THE FIRST TYPE
This is our simplest and cheapest TRAIN DETECTOR. It is called TRAIN DETECTOR with reed switch. It is fully built and tested and costs $8.00 plus $6.50 postage.

You will get the module on a Printed Circuit Board. The photo shows the prototype with one reed switch and 2 super magnets 12mm diam x 1mm thick.
The “105” mini trim pot is the DELAY - from a few seconds to about 120 seconds.
It comes with a reed switch on 1500mm lead and two very strong super magnets that fit under two of your locos.
Here is the circuit:
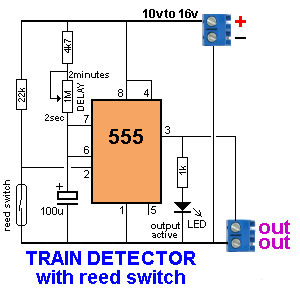
The output goes HIGH when the loco is detected and stays HIGH for 2 seconds to 2 minutes, depending on the setting of the 1M mini trim pot. The output will deliver up to about 300mA.
Here is the Train Detector module connected to Crossing Lights Module: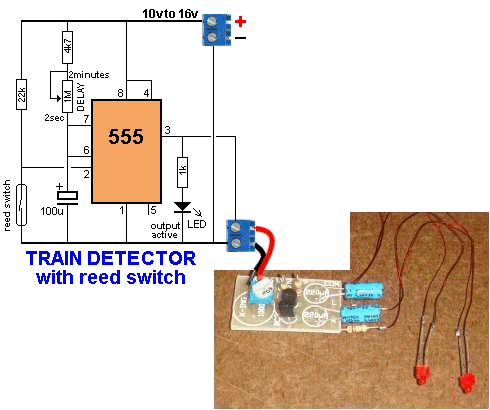
You can see the Train Detector Module** “powers” the module you want to operate. It supplies the voltage and current to the Module you are activating. The voltage will be about 2-3v less than the voltage you deliver to the ”+” and ”-” terminals and the current will be a maximum of 300mA due to the capability of the 555 IC.
THE SECOND TYPE
This is another simple TRAIN DETECTOR. It is available as a set of 6 Train Detectors on two separate Printed Circuit board.
Here is an image of our test-board with 5 different photo transistors, where we compare the sensitivity of each photo-transistor. We only supply the most sensitive photo-transistors in the kit.
These are not Infra-red transistors but “ordinary light” transistors that pick up the light in the room.

The 10k resistor is removed to increase sensitivity
The LED illuminates when the photo-transistor does not see light and it goes out when it is brought up to a light-source. This means the loco will turn on the LED when it passes over the sensor.
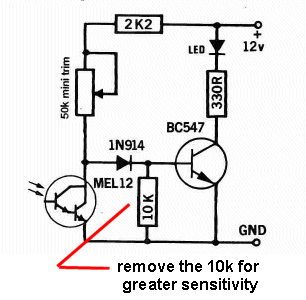
The PC board above shows 5 circuits. The new kit contain 6 modules (circuits) and comes with 2 PC boards containing 3 circuits on each board and costs $21.00 for the 2 boards and all the components.
It is called 6 TRAIN DETECTORS
Normally you mount the photo-transistor between the sleepers and the ambient light in the room will turn the LED off. When the train passes over the photo-transistor, the LED illuminates.
The circuit will not deliver much more than 12mA and maybe a little more if the 330R resistor is reduced to 220R.
It is mainly designed to illuminate the LED on the PC board.
THE THIRD TYPE
This module contains 6 separate circuits on the printed circuit board and uses a HEX Schmitt Trigger IC. It also has a delay feature with a timing that is fixed by the value of the 22u electrolytic and 100k resistor.
The complete kit costs $26.00
It is called HEX TRAIN DETECTOR
Each output is capable of delivering 10mA and the circuit is mainly designed to operate the 6 LEDs on the board.

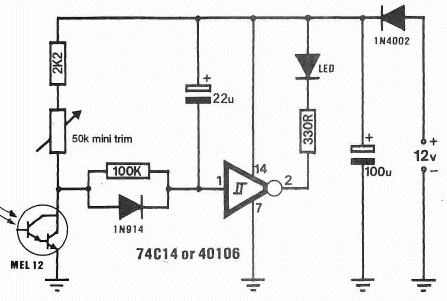
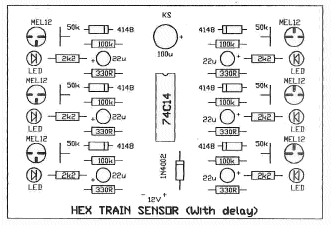
You can also get this module with 12 inputs and 12 outputs. The 12 LEDs are in a row and you can see them illuminate in-turn as your train executes the circuit.
It is called 12-BLOCK TRAIN DETECTOR. $30.00usd Plus $6.50usd shipping
This 12 Block Train Detector is pre-wired with detectors on 1 metre, 2 metre and 3 metre leads.
There are 12 indicator LEDs on the module. LEDs 1,2 have 3 metre leads. LEDs 3,4 have 2 metre leads LEDs 5,6,7,8 have 1 metre leads. LEDs 9,10 have 2 metre leads. LEDs 11,12 have 3 metre leads. This will allow a layout with a length of 6 metres to be covered.
Simply fit the detectors between the sleepers or through a 5.2mm hole from under your layout. The sensors are photo-resistors that reduce resistance when light is detected.
Each sensor is adjustable via the SENSITIVITY CONTROL - the 10k mini trim pot on the module.
Adjust the control until the corresponding LED turns OFF and then move your hand over the sensor and the LED will illuminate.
Place all the sensors in sequence and you will be able to watch your train move around the layout via the LEDs.
The module is completely wired and tested for $30.00usd plus $6.50usd shipping.
THE FOURTH TYPE - Reflective Detection
This module has two Infrared sensors that are placed between the sleepers and are fitted into two 3mm diameter holes in the base of your layout, so almost nothing is visible.
It is called TRAIN DETECTOR TD-01 under track detection
It is fully assembled and comes with two IR detectors on 1metre and/or 2 metre leads for $23.00 plus $6.50 postage.
There are 3 different detectors that can be fitted to this module:
- 2 separate LEDs to be fitted through 3mm holes
- IR module to be placed on the track between the rails
- IR module to be placed on one side of the track
All types cost the same ($23.00) but you need to specify which type you want.
Here is the circuit: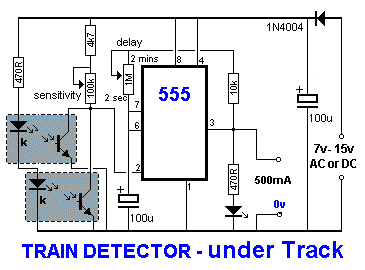
You will notice the transmitting LEDs are in series so you need to connect BOTH sets of sensors for the circuit to work.
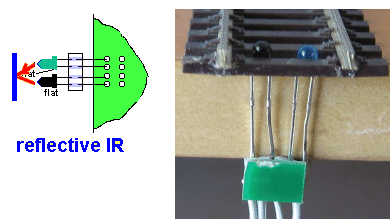
The circuit uses REFLECTIVE IR detection and this means the receiver does not detect infrared when “sitting around” (it escapes into the air). When the train passes over the LEDs shown above, the receiving LED detects the reflected infrared beam and the circuit turns ON for a period of time as determined by the 1Meg mini trim pot.
The output goes HIGH and is capable of delivering about 300mA to 500mA. The output voltage will be about 2v-3v lower than the supply voltage due to the voltage drop of the 555 IC.
This module also supports a reflective module containing two LEDs that can be placed between the rails:
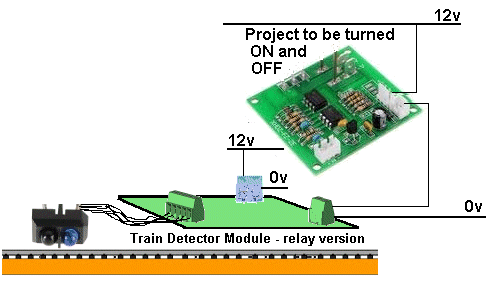
And the module supports a reflective module containing two LEDs that can be placed beside the track:

THE FIFTH TYPE - Broken Beam version
This module uses the same type of circuit as above but with different detectors.
It is called TRAIN DETECTOR TD-01 across track detection
It is fully assembled and comes with two IR detectors on 1metre and 2 metre leads for $23.00 plus $6.50 postage.
Here is the circuit:
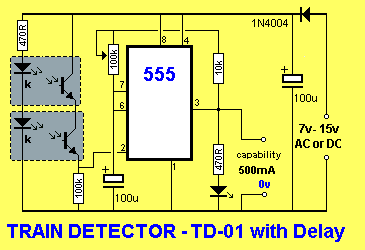
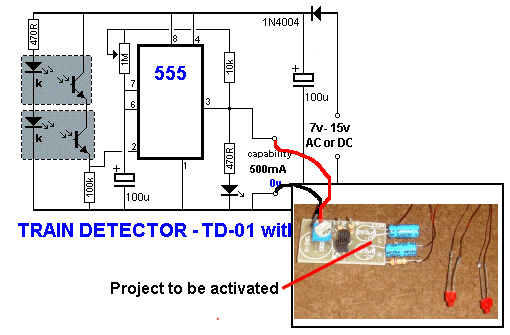


The detection is called BROKEN BEAM and the train interrupts the IR beam. The delay can be adjusted from 2 secs to 2 minutes via the 1Meg mini trim pot.
THE SIXTH TYPE - Isolated Output - Reflective Type
The output of the following two modules is completely isolated from the electronics on the board.
This allows you to operate a project that has its own power supply and may be connected to a different transformer.
When you have this type of arrangement, there can be leakage in each power supply that puts a high voltage between the output leads and what is called “earth.” The leakage current will be very small but the voltage can be sufficient to damage transistors and IC’s.
This happened 4 times with a customer until I asked for the module to be put on batteries and then use different power supplies. One of the supplies was “leaking.”
An isolated output allows you to power a project that may need a very high supply voltage or it may have supply leads where one is 0v and the other is say 12v, but when you test the 0v lead with one probe of the multimeter and place the other probe on the 0v terminal of another power, you get a reading of say 17volts. This is the “leakage voltage” we are talking about. The current will be nearly zero but a voltage higher than 15v will damage integrated circuits and microcontrollers.
That’s why we have an isolated module.
The first isolated module uses a 4N25 opto-isolator and can pass 50mA via its output terminals. This is idea for small loads such as LED lighting on a station or CROSSING LIGHTS.
It is called TRAIN DETECTOR IR using 4N25
It is fully assembled and comes with two IR detectors on 1metre and 2 metre leads for $24.00 plus $6.50 postage.
Here is the circuit:

The second isolated module uses a relay and can pass 1Amp via its output terminals. This is idea for larger loads such as sound modules, motors, and motorised point controllers.
It is called TRAIN DETECTOR IR using RELAY
It is fully assembled and comes with two IR detectors on 1metre and 2 metre leads for $25.00 plus $6.50 postage.
Here is the circuit:
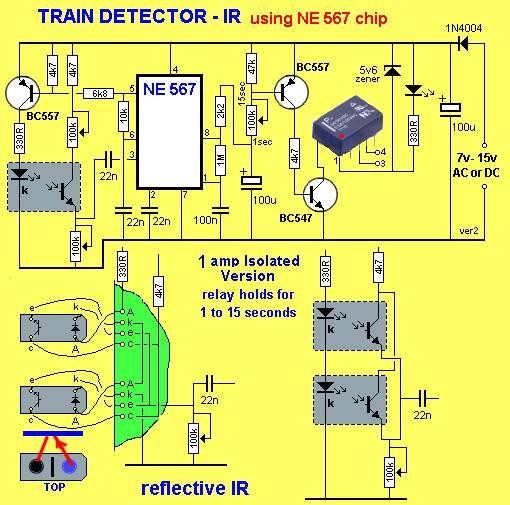
Both isolated modules connect to the IR module shown in the following image and they can be placed BESIDE THE TRACK, BETWEEN THE RAILS or THROUGH 2 x 3mm HOLES in the base of your layout. Both sets of sensors mush be connected as the IR LEDs are in series.

All modules use REFLECTIVE IR detection and will detect up to about 15cm.
BROKEN BEAM detection will detect up to 20cm and can be used for one set of tracks or across two tracks.
You need to ask for the extension lead for the BROKEN BEAM detector.
THE SEVENTH TYPE
5amp capability on the output pins.
This module is deigned to handle HIGH CURRENTS. More about this when the PC boards are received from the manufacturers.Here is the list of modules:
TRAIN DETECTOR with reed switch. Fully built and tested: $8.00 plus $6.50 postage.
6 TRAIN DETECTORS (kit) . . $21.00 (no delay)
6 Photo-transistors in kit
HEX TRAIN DETECTOR (kit) . . $26.00 (with delay)
6 Photo-transistors in kit
All the following are fully built and tested:
TRAIN DETECTOR TD-01 . . $23.00(with delay)
- with 2 sensors - between the rails
- with 2 sensors - beside the track
- with 2 sensors through 2x3mm holes
TRAIN DETECTOR IR using 4n25 . . 24.00 (isolated type) (no delay)
- with 2 sensors - between the rails
- with 2 sensors - beside the track
- with 2 sensors through 2x3mm holes
TRAIN DETECTOR IR using RELAY . . $25.00 (isolated type) (with delay)
- with 2 sensors - between the rails
- with 2 sensors - beside the track
- with 2 sensors via 2x3mm holes
You need to decide which set of sensors you will use and which module you need.
You can return any module for exchange as we realise this is a challenging decision.
email: Colin Mitchell with your requirements before buying.
LIGHTHOUSE LIGHT

Add this module to your layout for a very effective Lighthouse Beacon. Double-faced super-bright 1206 LEDs can be mounted in all types of models to give the effect of a rotating light. The result is very effective. Microcontroller circuit with 5v regulator. Input voltage can be 8v to 15v DC or 9v battery. The latest module has a mini slide-switch to select single flash or double-flash. (not shown in photo below)
![]()
Now with 1 flash or 2 flash selection via mini slide switch soldered to PCB.
CARRIAGE LIGHTING

The latest design has 2 inertia switches.

The LEDs illuminated
Add this module to a carriage for a very realistic lighting effect.
The super-bright LEDs can be mounted on the ceiling of the coach and the module placed on the floor.
When the train moves, the inertia switches (connected to the module) turn the lights ON.
The module has a delay features of more than 30 seconds to keep the lights illuminated when the train is stopped at a station and automatically turns off when you have stopped driving the train. No switch is needed as the module automatically turns off.
The fine wires to the LEDs allow you to place the LEDs at the exact positions on the ceiling of the carriage and the module is placed on the floor of the carriage with the inertia switches facing forward to activate the module.
No wiring or drilling is needed. The circuit takes less than 10mA when activated and zero when not activated.
2032 and 2016 cells are included. An extra 2016 cell is included. The battery will last about 4 hours and you will get a total of about 8 hours with the cells provided.
Double sided tape is included to fit the LEDs and module while you use acetone glue (such as clear nail polish) to set the LEDs in place and allow the glue to dry.
Each inertia switch has a floating steel ball and when the ball is driven to the end of the switch (the switch is connected to the module), the circuit turns ON. The top of the switch must be slightly higher than the other end so the ball remains in the OFF position when the carriage is at rest.
This module can be used on HO, OO and N-gauge providing the N-gauge carriage has space for the battery holder.
Cost $15.00 usd plus $6.50 usd postage
Theory, Test Gear & More Projects
MATRIX BOARDS
Talking Electronics has produced a lot of matrix board in all sorts of sizes and shapes so the board is ready and neat for the layout of components. These boards cost just $2.00 for the small boards, $2.50 for the medium size and $3.00 for the larger boards.
Simply email Colin with the number and size and they can be sent to you.
Click [Here](mailto:colin@elechelp.com?Subject=Buying Matrix Boards &Body=Please email the cost of the following Matrix boards by air mail to my country:**___****and send details of how I can pay for it. My name is:____) to order**

- SMALL BOARDS $2.00 each
- MEDIUM BOARDS $2.50 each
- LARGE BOARDS $3.00 each
Click [Here](mailto:colin@elechelp.com?Subject=Buying Matrix Boards &Body=Please email the cost of the following Matrix boards by air mail to my country:**___****and send details of how I can pay for it. My name is:____) to order**
THEORY - THE MULTIMETER
I test all my projects with a $5.00 multimeter !!
WHY???
Because an analogue multimeter puts a load on a circuit and the reading MUST be genuine.
Secondly, an analogue multimeter will show fluctuations in a circuit and show when a certain part of a circuit is not maintaining stability.
And thirdly, an analogue multimeter will respond to changes and pulses much faster than a digital meter.
Lastly, if I can design and test a circuit with a cheap meter, everyone else should be able to do the same when using a more-expensive meter.
Finally, an analogue meter lasts a lifetime. And if you damage it, the cost is only $5.00
And you get 500mA range, a digital meter gives 200mA.
Analogue Meters are on eBay
I have digital meter when I want to read voltages accurately.

If you buy two multimeters, you can test currents up to 1 amp by placing the multimeters in PARALLEL as shown in the following diagram:
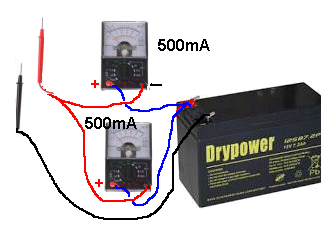
The red and black probes go to the positive and negative terminals of the project you are testing and you simply ADD the current readings (shown by the pointer on each meter) to get a final value (up to one amp).
I have converted one of the panel meters above to 0-5AMP using 8 x 1 ohm 0.25watt resistors in parallel on the 100mA range and the reading is 0 - 5 amp on the 50v scale.
Current flows through the multimeter from the positive probe to the negative probe and the arrow on top of the meter above shows this direction.
This is how we arrive at that statement:
When taking a measurement of CURRENT, the voltage on the positive probe will be very slightly higher than the voltage on the negative probe, because a very small voltage will be dropped across the CURRENT RESISTOR inside the meter. The meter is actually measuring the voltage across this resistor and you are reading the pointer where the scale says 0-500mA.
We know that current flows from positive to negative and when you trace the circuit above, you can see the meter is part of this circuit.
When measuring CURRENT, you use exactly the same reasoning as when you are measuring voltage.
Look at the circuit or project and work out which point will have the (slightly) higher voltage. The red probe goes to this point.
When measuring CURRENT, even the wires will have a slightly higher voltage at one end. This is the end for the red probe.
When measuring CURRENT, the circuit has to be CUT and the probes inserted into the CUT. You cannot measure the current taken by a component by placing the probes “across it.” You have to cut a wire or a track or desolder one of the wires.
If you cannot remember how to connect a multimeter when testing CURRENT, tilt it slightly so the positive terminal is higher than the negative terminal and lay the red probe on the bench, HIGHER than the black probe.
Now connect the red probe to the positive terminal of the battery and the black probe to the positive “input” of the project. Use another jumper to connect the negative of the battery to the negative (0v) of the project.
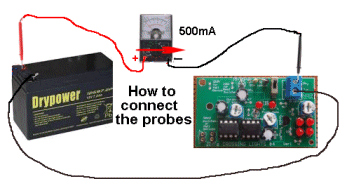
See how the current has to flow across the meter (from left to right) to make the pointer read “up-scale”. The probes are connected to the battery as shown in the diagram above.
But don’t be surprised if a project does not work perfectly when a multimeter is connected like this. The meter changes the “impedance of the supply” and the project may be relying on a “low impedance supply” - equal to a NEW - FRESH - battery.
The meter turns it into an OLD - WEAK - battery and not only will the project fail to work, but the current reading will be incorrect.
THEORY - SERVOS
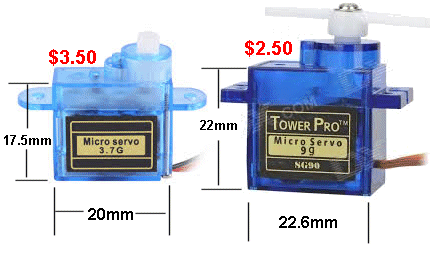
There are many different types of SERVOS on the market. Some are very cheap while others are very expensive. The main difference in cost is due to plastic gears Vs metal gears. We only need plastic gears.
We have simplified the requirement and come to the conclusion that there are two types suitable for controlling a point. The “normal” size is called “9g” and the “Micro” size is called “3.7g.” You can see by the dimensions above that the difference is only very slight.
But you have to be careful.
There are many different manufacturers with the same plastic body and the same appearance. Some will work in our applications and some will not. The program in the “electronics” (the PCB inside the case) is slightly different.
In some of our projects, we slow-down the rotation of the arm to make the movement “realistic.”
All the Micro SERVOS work in this “slow-down” application, but only 30% of the 9g models work successfully - some jitter when travelling slowly and there is no way to determine the faulty ones without testing each servo.
In addition, some of the 9g models can rotate 360° because there is no “stop” on the output shaft. This is not a problem in any way.
All it means is this: the shaft cannot get jammed against the “end-stop.” You cannot digitally rotate the shaft any more than about 180° to 270°, as the electronics is only designed to allow this much rotation. But if you position the shaft at the exact “dead-spot,” the servo will not know “which way to turn” and you have to activate it twice and it will swing around to the correct position. Under normal operating conditions, the servo will never land on the “dead-spot” and you will never have a problem.
In all other respects, the two servos are identical. The Micro version is slightly more expensive and ideal for controlling a point as it can easily be housed in a PlateLayers hut. (see image up further)
SERVO WITH “NO END STOPS”
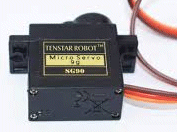
There is another SERVO on eBay called TENSTAR ROBOT 9g and it has no “end-stops.” This is a vast improvement as the servo will not get “jammed” at the end of its travel.
The servo has a “pot” as the feedback but it does not have any “stops” and thus the wiper passes the end of the curved track.
I tested this servo by trying to find the “dead spot” where the servo did not respond to a position that would normally be past either of the “end-stops.” The program in the servo detects when the wiper is not on the track and sends the arm to a starting position - proving this servo is the best one to buy.
“No stops” means the servo will not get jammed if it is forced (by an outside force). Sometimes, when these servos are used in a Robot-Fighting situation, they get forced to move (when in a collision) and this jams the gears. This servo does not have that fault.
This servo also operates slowly (when connected to some of our modules) and does not “jitter” when used in our projects.
THEOR - REED SWITCH DETECTION
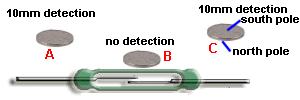
The reed switch only detects a magnet when the magnet is in positions A and C. This is because the magnetic flux produced by the magnet “hits” the left or right reed and magnetises it in a process called TEMPORARY MAGNETISM or INFLUENCED MAGNETISM and since the other reed is not magnetised, the two reeds “stick together.” When the magnet is in the centre of the reed, both reeds get magnetised by the North pole of the magnet and they do not make contact.
This means the reed switch MUST be placed “along the track” (parallel with the rails) so the magnet has the greatest opportunity to activate the reed. It does not matter if the north or south pole is near the reed switch - you need the magnet to sweep across the reed switch from one end to the other to make sure the reed switch activates.
THEORY - Bi-Coloured LEDs
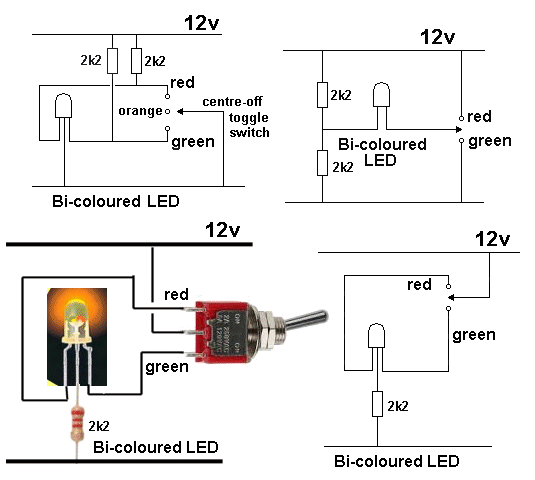
There are two types of Bi-coloured LEDs. One has 2 leads and the other 3 leads.
The two leaded type needs the voltage connected one way for the red LED to illuminate and the other way for the green LED to illuminate. If the leads are connected to AC, both LEDs will illuminate to get Orange.
The 3-leaded LED has a common pin (called the cathode) and the other leads will illuminate the red LED or the green LED. If both leads are connected at the same time, (to a positive voltage - - higher than 3v - - the result will be orange. You must have a current limiting resistor included (minimum 100R - and may be 470R or as high as 2k2 for 12v supply) connected to either the common lead or individual resistors to the other two leads.
These LEDs are NOT, what you call “12v LEDs” and cannot be connected directly to 12v (or any voltage above 2v without a resistor somewhere in the circuit. Start by putting a 2k2 in the wire from your supply and the LEDs will be dull but they will not be damaged.
You can use a toggle or slide switch to produce the colours and the diagrams above show how this is done.
You can make the 3-leaded bi-coloured LED flash by including a flashing LED:
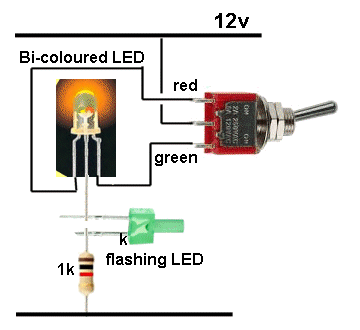
The dropper resistor is needed as the flashing LED is designed to operate on 3v to 6v and it has its own internal resistor and micro-controller chip. The bi-coloured LED drops another 2-3v and the resistor will drop the remaining voltage so that about 4mA flows. You can then reduce the 1k to 470R or 330R or 220R for a brighter effect.
Don’t forget the green LED must be a FLASHING LED - not an ordinary 2mm LED.
THEORY - Hall Device
The Hall Device must be connected the right way to the circuit.
Here is a close-up the Hall device with the output lead connected to the first lead. These two are connected to the white lead of the screened audio cable. The middle wire is the ground connection and it goes to the screening wires.
This is very unusual way to wire a Hall device, and is just another clever trick by Colin Mitchell to show how you can do just about anything with electronics.

Connecting the screened lead to the Hall device
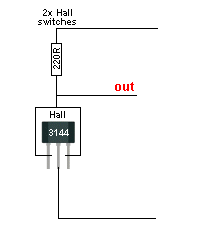
This is the circuit for the Hall Device
This is just one way to connect it to a circuit when you want to be able to connect a Hall Device or a reed switch to the same input terminals of a project.

Connecting the Hall wires to the module
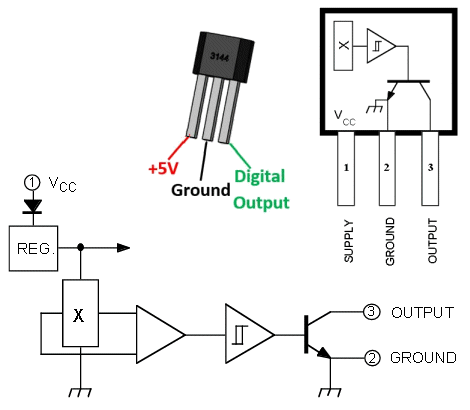
The internal circuit of the 3144 contains a number of “Building Blocks”
The Hall device is being used in an unusual way in this project, with the output connected to the “supply lead.”
The circuit above shows some of the “building blocks” inside the 3144 and one of the features is the amplifier block that detects a signal from the Hall block to turn ON the output transistor. Some of the other Hall devices turn-on-slowly as a magnet is brought closer to the detecting face. Make sure you do not use one with this feature, as we have not checked it and it may not turn on hard enough to start the module flashing. The main reason for it not working may be the low impedance of the input line (on the Flashing Lights Module) - due to the 220R load resistor.
TEST EQUIPMENT - LED TESTER
This project tests LEDs and tests for continuity and tests for other things as well.
It’s a very handy piece of test gear. Note: The two lithium cells are 6v for the supply.
See the full project HERE
[LED Tester Kit](mailto:colin@elechelp.com?Subject=Buying LED Tester kit $2.50 plus $4.00 postage&Body=Please%20e-mail%20the%20cost%20of LED Tester kit%20by%20air%20mail%20to%20my%20country:****___****%20%20and%20send%20details%20of%20how%20I%20can%20pay%20for%20it.%20My%20name%20is:____)
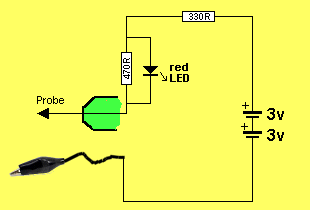
The LED Tester Circuit

TEST EQUIPMENT - CONTINUITY TESTER
This project tests for continuity and resistance and other things as well.
It’s a very handy piece of test gear. Note: The two lithium cells are 6v for the supply.
See the full project HERE
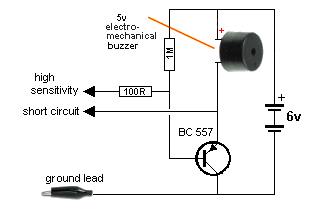
The Continuity Tester Circuit

The Continuity Tester comes as a kit for $3.50 plus $4.00 postage.
The circuit has no switch and it has two levels of sensitivity.
One probe makes the buzzer squeal when the resistance is very low. Anything above 300 ohms does not produce a sound.
This is called the SHORT CIRCUIT detector. It detects continuity of tracks and wiring.
The other probe allows resistances up to 40k to be detected and as the resistance increases, the sound from the buzzer decreases.
This lets you detect a resistance between two points.
[Continuity Tester Kit](mailto:colin@elechelp.com?Subject=Buying Continuity Tester kit $3.50 plus $4.00 postage&Body=Please%20e-mail%20the%20cost%20of Continuity Tester kit%20by%20air%20mail%20to%20my%20country:****___****%20%20and%20send%20details%20of%20how%20I%20can%20pay%20for%20it.%20My%20name%20is:____)
Our 3 pieces of Test Equipment are:
- [LED Tester](mailto:colin@elechelp.com?Subject=Buying LED Tester kit $2.50 plus $4.00 postage&Body=Please%20e-mail%20the%20cost%20of LED Tester kit%20by%20air%20mail%20to%20my%20country:**___****%20%20and%20send%20details%20of%20how%20I%20can%20pay%20for%20it.%20My%20name%20is:____)**
- [Continuity Tester](mailto:colin@elechelp.com?Subject=Buying Continuity Tester kit $3.50 plus $4.00 postage&Body=Please%20e-mail%20the%20cost%20of Continuity Tester kit%20by%20air%20mail%20to%20my%20country:**___****%20%20and%20send%20details%20of%20how%20I%20can%20pay%20for%20it.%20My%20name%20is:____)**
- [Track Tester](mailto:colin@elechelp.com?Subject=Buying Track Tester &Body=Please email the cost of Track Tester $10.00 USD or Mini Track Tester $5.00 USD plus $4.00 USD postage by air mail to my country:**___****and send details of how I can pay for it. My name is:____)**
PROJECT - TRACK PICK-OFF
Track Pick-offs are available from Talking Electronics for $2.00 plus postage.
This Printed Circuit board is fitted between the sleepers and has contacts to touch the rails so the voltage on the track can be monitored or delivered to a project.
If the current taken from the track is very small, it will not interfere with the operation of the train(s) on the layout and is called LEACHING.
A little bit of power is taken from the track and this saves running wires all the way back to your control panel.
Talking Electronics has designed 2 of these TRACK PICK-OFF boards:
Track Pick-Off MkI has two track joiners soldered to the board and this is fitted between two sections of your layout.
The images below show this board and how it it fitted to the track:
Twin lead or screened lead can be used for the Track Pick-off PC board
Here is the module connected to a project:

If it is not easy to connect the track joiners to your layout, we have:
Track Pick-Off MkII. It has two springy clips that touch the inner parts of the rails and make electrical contact.
The board comes with the two clips soldered in place and you need to remove the plastic from between two sleepers to allow the board to fit. Twist the board into position and give the spring clip a twist with a pair of pliers so it pushes against the rail.
TEST EQUIPMENT - TRACK TESTER
This project tests the voltage on your track.
It’s another very handy piece of test gear.
See the full project HERE
The Track Tester kit costs $10.00 AUD plus $4.50 AUD postage.
The Track Tester is also available ready-made for $16.50 USD (posted)
It alerts you to the presence of DCC via the piezo diaphragm and the voltage of your track at all parts of the layout.
Click [Here](mailto:colin@elechelp.com?Subject=Buying Track Tester &Body=Please email the cost of Track Tester by air mail to my country:**___****and send details of how I can pay for it. My name is:____) to buy a Track Tester.**


MINI TRACK TESTER


This is a smaller version of the other Track Tester is built and tested for immediate use. We have produced the Mini Track Tester so there is no excuse for you not having a Track Tester. It is invaluable for detecting and listening to faults.
It can be used on all gauges by touching the springy terminals onto the track and listening to noise on the track via the piezo and see the voltage of the track via the LEDs.
It will indicate the polarity of the track as well as the voltage, with 4 LEDs.
It is much faster and easier to use than a multimeter as you only need one hand and you can be adjusting the voltage with the other. You can find dirty rail-joiners by connecting the tester and wiggling the rails and listening to the piezo.
The piezo will buzz when DCC is present and the LEDs will indicate the positive rail and the presence of a voltage from 3v to more than 16v.
The MINI TRACK TESTER costs $5.50 USD plus $4.50 USD posted to any country in the world.
Click [Here](mailto:colin@elechelp.com?Subject=Buying Mini Track Tester $5.50 USD plus $4.50 USD post &Body=Please email the cost of Mini Track Tester by air mail to my country:****___****and send details of how I can pay for it. My name is:____) to buy Mini Track Tester.
TEST EQUIPMENT - OVER-CURRENT DETECTION
Requested by William Hicks:
This circuit detects when the tracks are overloaded by too many trains.
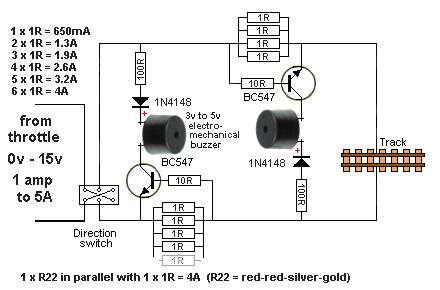
Note: Each 1R resistor needs to be 0.5watt 0R22 needs to be 5watt!!
The circuit will drop 1.4v when full detection-current is flowing.
Here is the simplest over-current circuit:
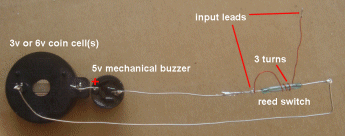
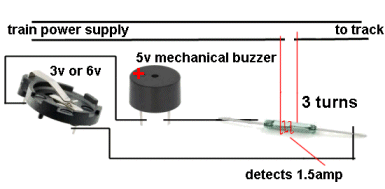
The reed switch closes when about 1.5 amps flows for 3 turns wrapped around the centre of the reed switch. 2 turns will detect about 2 amps.
Keep the reed switch at least 6cm from the mechanical buzzer as the magnet inside the buzzer will turn the circuit ON all-the-time.
The sensitivity of reed switches vary enormously and the ones we are using require 19 turns to detect 1 amp then tapped at 7 turns, 2 turns, 2 turns and the final winding is 8 turns. Nothing is linear with the turns and magnetic flux because the turns are at different locations across the reed and have differing effect.
You cannot get a simpler circuit and it only drops 22 millivolts when 2.5 amps flows.
It is ideal for detecting SHORT CIRCUITS. If something falls across the tracks, the buzzer will sound.

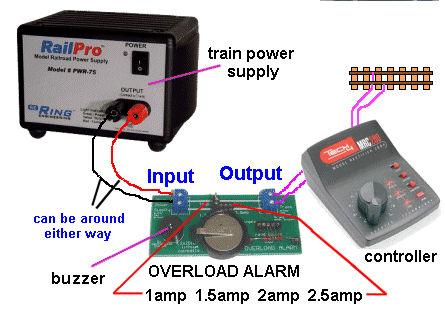
The Overload Alarm Module is fitted between the Train Power Supply and the Controller
[Kits are available](mailto:colin@elechelp.com?Subject=Buying Overload Alarm kit $8.00 plus $4.50 postage &Body=Please email the cost of Overload Alarm by%20air%20mail%20to%20my%20country:****___****%20%20and%20send%20details%20of%20how%20I%20can%20pay%20for%20it.%20My%20name%20is:____) for this project from
Talking Electronics for $8.00 plus $4.50 postage.
The reed switch and coil with tappings is already fitted to the board as this has to be calibrated with a 3-amp power supply and load.
FLASHING RAILROAD LIGHTS
This circuit flashes two red LEDs for a model railway crossing.
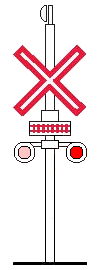
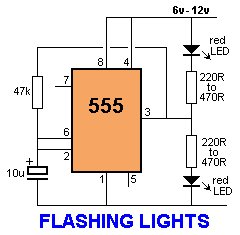
FLASHING LIGHTS FOR MODEL RAILWAY CROSSING
A flashing LED is used to create the timing for the flash-rate and the transistor provides the alternate flash for the second set of LEDs. The first circuit comes off the web, but Colin Mitchell doesn’t think it will work. See his circuit below.
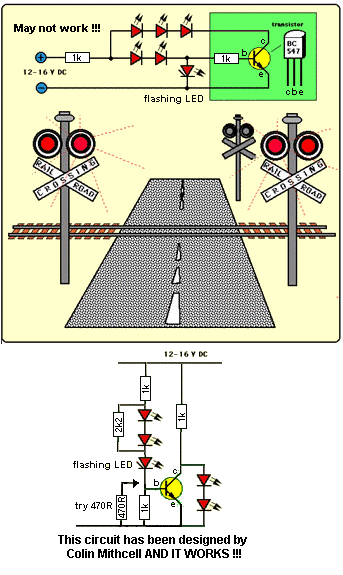
The top two 1k resistors are current-limiting resistors and can be increased if you want the LEDs to be dull.
The 2k2 makes sure the two LEDs are completely turned-off because the flashing LED draws a small current when it is off and this shows in the two LEDs. The lower 1k may need to be reduced to 470R to completely turn the transistor OFF. The other circuit does not have any of these features. The flashing LED has to be an ON-OFF flashing red OR green LED. Not a red-green flashing LED or a RED-GREEN-BLUE flashing LED. The flashing LED actually has an in-built resistor and will work on 2v to 5v. But we are using its feature of “taking a small current” when illuminated and then “taking almost zero current” when not illuminated, to “switch the transistor.”
You can get the CROSSING LIGHTS plastic mouldings from Talking Electronics. They will take 3mm LEDs.
Cost: $6.00 for 2 Crossing Lights with 4 LEDs and 2 metres of fine 0.25mm enamelled wire. .
You need to “push-out” the red lens and fit the 4 x 3mm red LEDs and carefully solder wires to the LEDs.
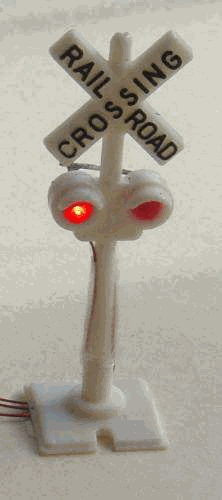
TRAFFIC LIGHTS
Here’s a clever circuit using two 555’s to produce a set of traffic lights for a model layout.
The animation shows the lighting sequence and this follows the Australian-standard. The red LED has an equal on-off period and when it is off, the first 555 delivers power to the second 555. This illuminates the Green LED and then the second 555 changes state to turn off the Green LED and turn on the Orange LED for a short period of time before the first 555 changes state to turn off the second 555 and turn on the red LED. A supply voltage of 9v to 12v is needed because the second 555 receives a supply of about 2v less than rail. This circuit also shows how to connect LEDs high and low to a 555 and also turn off the 555 by controlling the supply to pin 8. Connecting the LEDs high and low to pin 3 will not work and since pin 7 is in phase with pin 3, it can be used to advantage in this design.

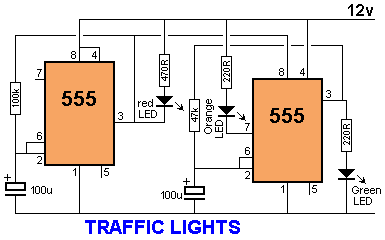
Here is a further description of how the circuit works:
Both 555’s are wired as oscillators in astable mode and will oscillate ALL THE TIME when they are turned ON. But the second 555 is not turned on all the time!
The first 555 turns on and the 100u is not charged. This makes output pin 3 HIGH and the red LED is not illuminated. However the output feeds the second 555 and it turns on.
Output pin 3 of the second 555 turns on the green LED and the second 100u charges to 2/3 rail voltage and causes the 555 to change states. The green LED goes off and the orange LED turns on.
The second 100u starts to discharge, but the first 100u is charging via a 100k and after the orange LED has been on for a short period of time, the first 555 changes state and pin 3 goes LOW.
This turns on the red LED and turns off the second 555.
The first 100u starts to discharge via the 100k and eventually it changes state to start the cycle again.
The secret of the timing is the long cycle-time of the first 555 due to the 100k and the short cycle due to the 47k on the second 555.
4 WAY TRAFFIC LIGHTS
This circuit produces traffic lights for a “4-way” intersection. The seemingly complex wiring to illuminate the lights is shown to be very simple. This circuit is used in the next article.
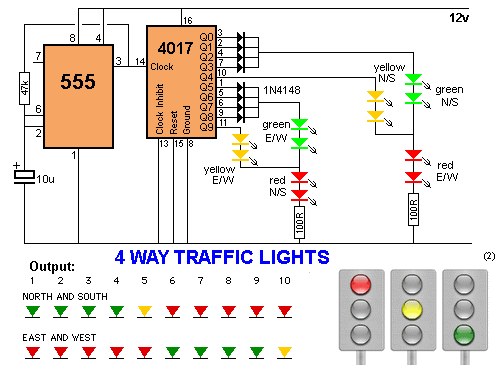
4-Way Traffic Lights
Kits are available for this project from Talking Electronics for $20.00 for the parts and PCB plus $5.00 for each overhead light (4 needed) plus $6.50 postage.
The project is also available fully assembled and tested for $25.00 plus postage.
This project adds realism to your layout with functioning traffic lights at an intersection.
You can use column signals or overhead signals.
The PC board shows the condition of the lights and you only need to extend leads from the board to the signals, to complete the project.
The supply MUST be 12v as the voltage of the LEDs adds up to about 10v and any voltage below 12v will not allow some of the LEDS to illuminate AT ALL - and you will think the project is faulty.


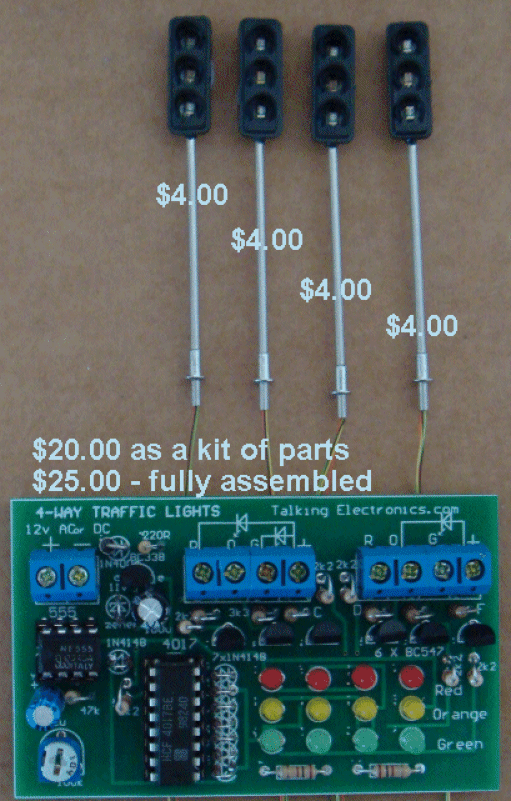

This image shows how to connect the very fine wires from the end of the post to the screw terminals. The kit contains fine screened lead and two of these leads are used for each overhead signal to the terminals. Two overhead signals are joined in parallel to the first set of four screw terminals and two overhead signals are connected to the second set of four screw terminals.

This wiring diagram shows how the LEDs are connected in the over-head light. All the anodes are connected to the black wire and the cathodes emerge as Green, Orange and Red. The 4-screw terminal block is looking at the where the wires enter the terminals and this is clearly shown in the photograph above.
Crossing Lights and Sound - UK
This circuit produces Crossing Lights and Sound (a wailing sound) for the 3-light crossings in the UK and has an amber light in the middle to indicate the Lights are about to activate. It comes with piezo sounder, two reed switches on 90cm leads and two super-magnets.
The module also comes with components to make your own crossing lights ($2.50 usd extra) and you will need a hobby saw, sand paper, glue, paint and soldering iron to complete the signal.
More details HERE
Cost:$25.00usd plus $6.50usd shipping.
[Modules are available](mailto:colin@elechelp.com?Subject=Buying Crossing Lights with reed switches &Body=Please email the cost of Crossing Lights with reed switches $15.00 plus $4.50 shipping by airmail to my country:**__**** My name is:____)**

Jim’s Crossing Lights MkIV
This module operates Crossing Lights and includes “ding-ding-ding” from a mini speaker. It comes with 2 reed switches that activate the module via a very thin super magnet (provided) on the train.
More details [HERE](#Jim’s Crossing Lights)
Cost:$25.00usd plus $6.50usd shipping.
[Modules are available](mailto:colin@elechelp.com?Subject=Buying Jim’s Crossing Lights MkIV &Body=Please email the cost of Jim’s Crossing Lights MkIV $25.00usd plus $6.50usd shipping by airmail to my country:**__**** My name is:____)**
See below for more details.
The next module has Crossing Lights and Sound and also Boom Gates. It is activated by IR beam across the tracks. Cost of the modules and Crossing Lights and Boom Gates and two servos that activate the Boom Gates: $90.00 plus $9.50 Postage
[Modules are available](mailto:colin@elechelp.com?Subject=Buying Crossing Lights with reed switches &Body=Please email the cost of Crossing Lights with reed switches $15.00 plus $4.50 shipping by airmail to my country:**__**** My name is:____)** for this project
Jim’s Crossing Lights MkIV
[Kits are available](mailto:colin@elechelp.com?Subject=Buying Jim’s Crossing Lights MkIV $18.00 plus $4.50 postage &Body=Please e-mail the cost of Jim’s Crossing Lights Module by air mail to my country:**___**** and send details of how I can pay for it. My name is:____)** from
Talking Electronics for $18.00 plus $4.50 postage.
See the FULL PROJECT HERE with more details of the Hall Device
The kit is the latest module for type-A lights and type-B lights
Fully built and tested modules come with 2 reed switches (1200mm leads) and 2 super magnets for $25.00 usd plus $6.50 usd postage
This project operates crossing lights automatically when the train enters the crossing and turns them off automatically. The flash-rate can be adjusted as well as the brightness of the lights and the overall length of time for the flashing. No other module on the web offers these features.
The latest module is version #5 and has a change-over switch for Common Anode lights and Common Cathode lights. This is called Type-A and type-B lights
Two LEDs on the module indicate when the lights are flashing and the module comes with 4 extra LEDs for those who have bought crossing signals without the LEDs installed.
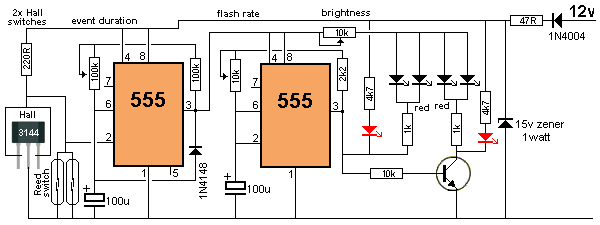
Jim’s Crossing Lights MkIV circuit
The circuit has a number of very clever features. .
It is Jim’s Crossing Lights MkIV
It uses two 555 ICs to provide all the functions. The signal diode on the first 100u discharges the 100u quickly when the circuit turns off so the timing can restart again with full duration.
The flash-rate can be adjusted because everyone says “the flash-rate is not right.”
The “duration of the event” can be adjusted to suit your layout.
The brightness of the LEDs can be adjusted to suit the type you are using.
The circuit will take 12v DC as the ideal voltage. Do not go below 10v DC as the voltage drops across the various components gives the second 555 less than 5v because the power diode drops 0.7v, the 47R drops about 1.5v and the first 555 outputs a voltage and current via pins 3 to the second 555 for all the rest of the circuit. There is about another 1.5v drop in doing this.
The circuit will work perfectly up to 15v DC and when you supply a DC voltage higher than 15v, the 15v zener comes into action and any voltage above 15v, will be dropped across the 47R resistor. If you supply 16v, the voltage drop across the resistor will be 1v and the current that will flow through the 47R will be I\=V/R = 1/47 = 20mA. This current will also flow through the 15v zener and is called the REGULATION CURRENT or wasted current and the wattage dissipated by these two components will not be noticed at the moment. But if the supply voltage is raised to 20v, the “wasted current” will be 100mA and the wattage dissipated by the 15v zener will be 15 x 0.1 = 1.5watts. The zener is 1watt and it will burn out at 1.5watts, so the limitation of input voltage is 18v.
The zener in this circuit is NOT called a zener regulator but a ZENER LIMITER. It prevents voltages higher than 15v because the 555 IC’s are limited to 18v operation.
The circuit is designed to take either two reed switches OR two Hall effect devices (switches).
The Hall switches are connected in a very clever way. They are connected so that they sit with a load resistor of 220R and due to the small current they require, the voltage at the “pick-off” point is about 9v for a 12v supply.
When any of the input devices detects magnetic flux, the circuit switches ON and the output lead effectively goes LOW. The voltage goes to 0v for the reed switch, but the Hall device is different. This “pulls” the “pick-off” point lower and as it gets lower, the voltage to the Hall device drops too. As the voltage across the device reduces, its capability to keep the output low is reduced and thus the output does not drop to 0v, but stops at about 2-3v. At this voltage the device is still working and pulling the output as low as possible, (with the current that is available at this low voltage).
You can combine one reed and one Hall device as the 220R will cover the requirement of either/both devices.
The voltage at the “pick-off” point is detected by Pin2 of the 555. This pin only detects a LOW and when the voltage drops to 33% (or less) of the voltage on pin 8 of the chip, it starts to “time the event.”
The timing of the event is done by charging a 100u via a resistor(s) and when Pin6 detects 66% of the voltage on the Pin8, the output Pin 3 goes HIGH and the project turns OFF. The only component taking current when the project is not flashing, is the first 555 and this takes up to 10mA.
To reduce the brightness of high-brightness red LEDs, it takes up to 10k via a mini trim pot. This will allow all different types of LEDs to be used.

Everything is identified on the PC board

The module is available fully-built and only needs to be connected to 12v DC. Connect the reed switches or Hall devices to the input terminals and switched ON.
Bring the magnet up to the reed switch or Hall device and work out the distance at which it is detected.
The magnet must be around the correct way for the Hall device as it detects just the North or South pole, according to the way the Hall device is placed.
The detection range is about 5mm for the tiny super-magnets we supply in the kit
This will help you place the reed switch or Hall device in the centre of the track and glue the magnet under the loco, and have the gap small enough to make sure the circuit responds every time.
CROSSING LIGHTS
There are many different types of crossing lights and most of them have three wires.
The black and red wires are shown in the diagram below.
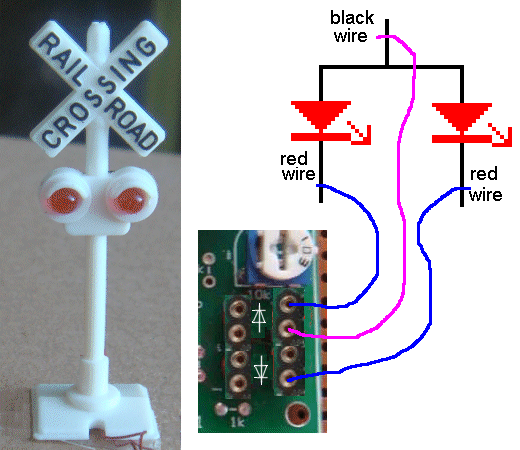
The Crossing Light above is available from Talking Electronics for $5.00
You will need 2 of these. (HO scale)

This crossing Light is on eBay
PARTS LIST - Jim’s Crossing Lights
$18.00
plus $4.50 postage
[Kits are available](mailto:colin@elechelp.com?Subject=Buying Jims Crossing Lights MkIV $18.00 plus $4.50 postage&Body=Please e-mail the cost of Jim’s Crossing Lights MkIV by air mail to my country:**___**** and send details of how I can pay for it. My name is:____)**
1 - 47R all 0.25watt
1 - 220R
2 - 1k
1 - 2k2
2 - 4k7
1 - 10k
1 - 100k
2 - 10k mini trim pots
1 - 100k mini trim pot
3 - 100u electrolytic
1 - 1N4148 diode
1 - 1N4004 diode
1 - 15v 1watt zener diode
6 - 3mm red LED
2 - 555 ICs
2 - 8 pin IC socket
1 - BC547 transistor
2m - 2-core cable for input devices
2 - mini reed switches or
2 — Hall effect devices
2 - 10mm x 1mm super-magnets
1 - 2-way terminal block
2 - 2 pin sockets - round pins
2 - 4 pin sockets - round pins (called machine pins)
1 - mini slide switch
1 - 20cm very fine solder
1 - Jim’s Crossing Lights MkIV PCB
You will need 2 x Crossing Lights as shown in the images above
TWO VERSIONS
TWO versions of this project are now available because some 2-aspect lights have a black wire that goes to the anode of each LED via a resistor and some are wired with the black lead to the cathode of the two LEDs.
The difference between the two PC boards can be clearly seen by the white frame around the output pins.
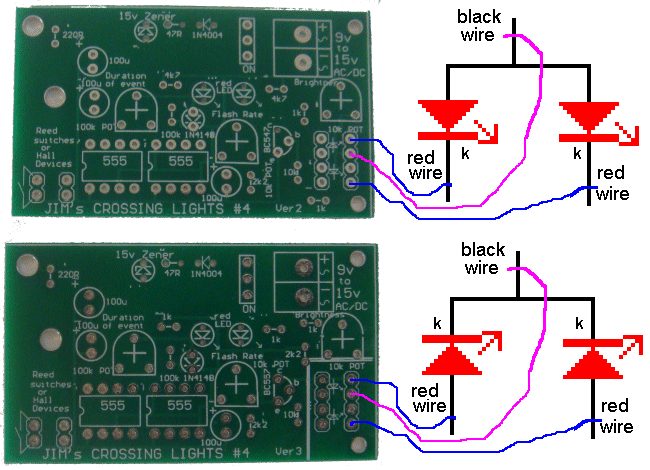
The wrong type of Crossing Light will NOT work with the wrong module.
You can test each Crossing Light with a 6v battery and 1k resistor or use the LED Tester project.
With the ver2 PC board, the LEDs must illuminate when the positive of the 6v battery is connected to the black wire and the red wire is connected to the 0v of the battery. You will need a 1k resistor to prevent the LEDs burning out, just in case the Crossing Light does not have an internal resistor.
But when the Crossing Lights are fitted to either module, the PC board has current limiting resistors under the board and a 10k pot to reduce the brightness to any level.
LATEST VERSION … .
A new version of JIM’S CROSSING LIGHTS (called ver5) has been produced for customers who cannot work out which type of lights they have installed. It has a change-over switch and works with both types - very clever !!!

The image above shows the fully built and tested module. It comes with 2 reed switches on 1200mm leads and 2 super magnets for $25.00 usd plus $6.50 usd postage. Order a module: [Jim’s Crossing Lights for TypeA&B lights](mailto:colin@elechelp.com?Subject=Buying Jim’s Crossing Lights Module (for TypeA_B lights) - fully built $25.00 usd plus $6.50 usd postage &Body=Please e-mail the cost of Jim’s Crossing Lights Module (for TypeA_B lights) - fully built $25.00 usd plus $6.50 usd postage by air mail to my country:****___**** and send details of how I can pay for it. My name is:____)
Connecting the Lights:
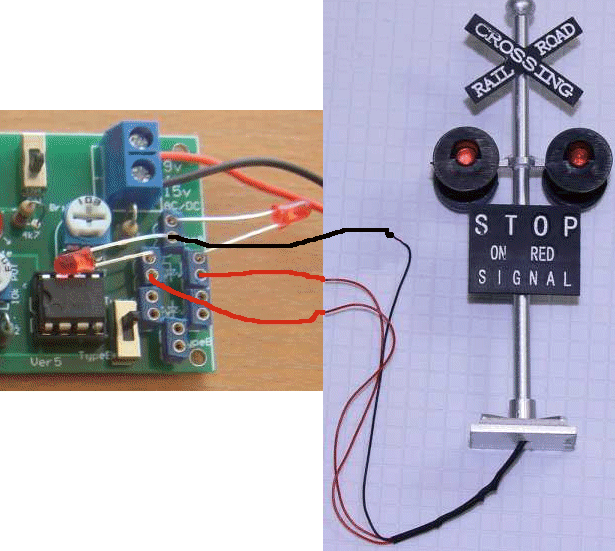
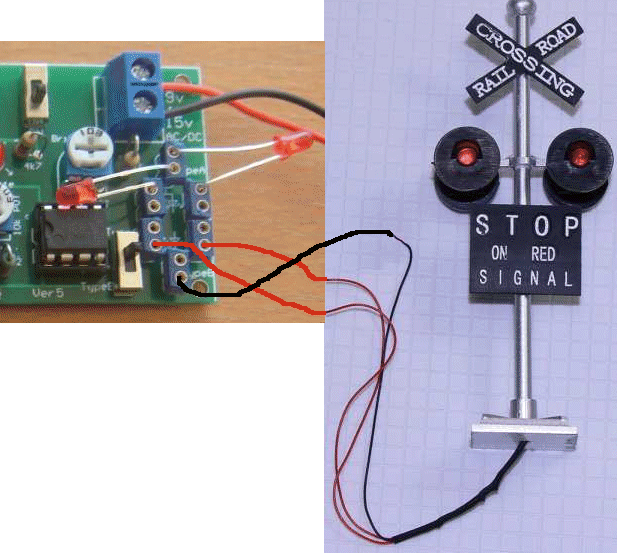
Flick the switch and the Lights will work.
CROSSING LIGHTS and SOUND - UK
This circuit produces crossing lights and sound for the 3-light crossings in the UK.
The orange light comes on to indicate the lights will be operating and then the red lights flash and a High-Low siren sound is produced.
The module comes built-and-tested for $25.00 usd and includes piezo sounder, two reed switches on 900mm leads and two super-magnets.
You can also get the components to make your own sign for $2.50 extra and includes the base-board and 3 LEDs and wire and 2mm copper/brass pole that you solder to the base-board. Very similar to the pic below but you get the 3-light version.
Order a module: [Crossing Lights and Sound - UK](mailto:colin@elechelp.com?Subject=Buying Crossing Lights and Sound- UK - fully built $25.00 usd plus $6.50 usd postage &Body=Please e-mail the cost of Crossing Lights and Sound - UK - fully built $25.00 usd plus $6.50 usd postage by air mail to my country:**___**** and send details of how I can pay for it. My name is:____)**
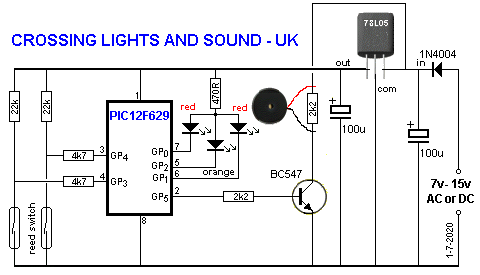


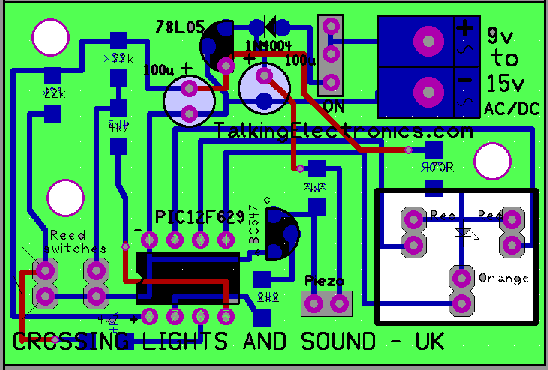
Jim’s LEDs also called LED DISTRIBUTION BOARD
[Jim’s LEDs is available](mailto:colin@elechelp.com?Subject=Buying Jim’s LED’s Distribution Module $18.00 plus $4.50 postage &Body=Please e-mail the cost of Jim’s LEDs Distribution Module by air mail to my country:****___**** and send details of how I can pay for it. My name is:____) from
Talking Electronics for $18.00 plus $4.50 postage.
This is another module requested by Jim Hamilton who supplies Z scale signs, houses and lighting to hundreds of modellers. His website is: Scaleworkshop, South Australia, Mob 0412111152

The module is a DISTRIBUTION BOARD capable of illuminating 30 LEDs across your layout.
There are 4 separate brightness controls. Two controls have shafts that can be easily adjusted with your fingers and two controls are via mini trim pots.
The Distribution Board comes fully built and has sample LEDs to show the brightness of each LED.
6 flying leads can be fitted into the JST 2mm sockets and 12 sets of LEDs can be fitted into the screw terminals.
The end of the module has 12 sets of female machine pins and you can insert 0.5mm wire into them and illuminate a further 12 LEDS.
The input voltage can be 9v AC or DC up to more than 20v as the 7805 regulator delivers 5v to all the LEDs. As you add more LEDs, the regulator might get warm and you can add a heatsink if you cannot hold it in your fingers.
These modules are very popular as they solve the problem of illuminating stations, roads and scenes with the appropriate level of brightness. You can use any colour LEDs as each section is individually protected with a current-limiting resistor.
You can add two red and or green LEDs in series to any output but two blue or white LEDs in series will not work because the 5v supply is not high enough.
6 SIGNALS
[6 SIGNALS](mailto:colin@elechelp.com?Subject=Buying Jim’s LED’s Distribution Module $18.00 plus $4.50 postage &Body=Please e-mail the cost of Jim’s LEDs Distribution Module by air mail to my country:****___**** and send details of how I can pay for it. My name is:____) [is available](mailto:colin@elechelp.com?Subject=6 Signals Module $18.00 plus $4.00 for the switches plus $4.50 postage &Body=Please e-mail the cost of 6 Signals Module by air mail to my country:****___**** and send details of how I can pay for it. My name is:____) from
Talking Electronics for $19.00 plus $4.50 postage.
Plus $4.00 for the two reed switches
This project adds interest to your layout by providing SIGNALLING
The timing for this project starts when the loco passes over one of the reed switches and the train strops at the first signal.
On the 6 SIGNALS module you need to program the time for the first signal via pot #1 through to the sixth signal via pot #6.
On the PC board you will find the timing for each pot - from a few seconds - to about 15 seconds.
The first signal remains red for say 6 seconds and then you can progress to the next signal.
The second signal will remain red for your second programming time and then you can advance to the third signal.
The first 3 signals will be activated by the reed switch at the bottom of the diagram (see diagram below) near the chip.
And the next set of 3 signals will be activated by the other reed switch.
The second reed switch will start the timing when the train passes over the switch and this will allow you to obey signals 4, 5 and 6.

The signals on the left are the authors prototypes to test the module and are not part of the items for sale.
You will need to buy signals shown in the images below to suit your layout.
There are many different types of signals on eBay.
The LEDs in the signals bought on the web have the two anode leads connected together with a resistor soldered to this join. The other end of the resistor is soldered to a black wire. The anode of the red LED is soldered to a red wire and the anode of the green LED is soldered to a green wire. These wires are very fine and the module is supplied with machine pins that fit into a 3-pin socket supplied on 1 metre leads ($1.50 extra). Remove the resistor and solder the machine pins to the 3 fine wires.
You can now fit the signal to your layout and place it over a 3mm hole for the 3 wires. Push the machine pins into a 3-pin plug under your layout and the signal will illuminate.


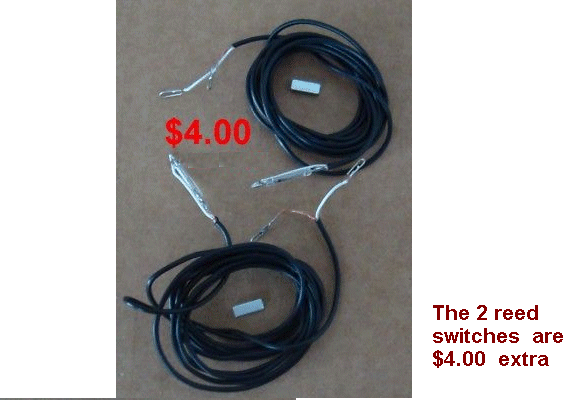
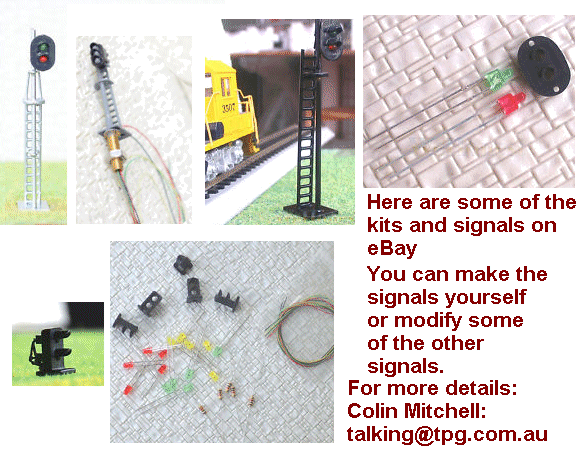
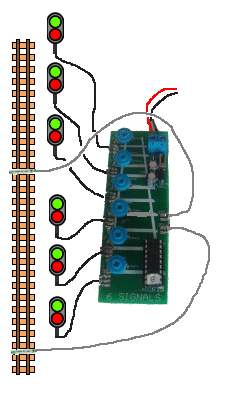
The layout shows the two reed switches and the 6 signals. The loco travels from the bottom of the diagram to the top.
The timing of the lights is designed to make you stop at each control-point and this adds a bit of activity to each part of your layout.
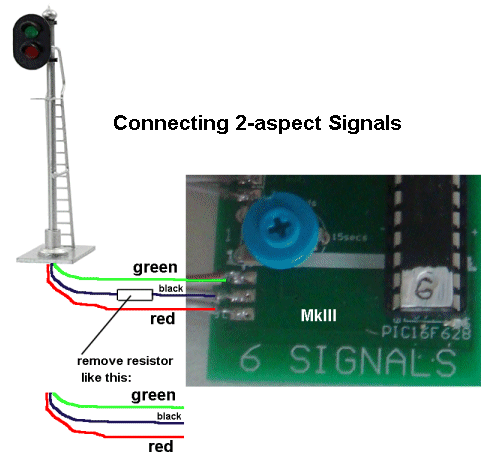
Here is the link on aliexpress for the signals. Cost $30.00 for 5 signals. Make sure you get the 6.41mm signal for HO layout as some signals are larger and are suitable for 00 layouts.
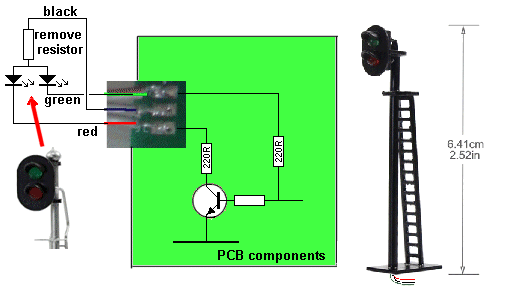
The MkIII Module is designed to connect 2-aspect signals.
2-aspect signals have three wires. The black wire has a resistor. This resistor is removed as the PCB has 220R resistors to limit the current to the LEDs in the signals.
The diagrams above shows how to connect the 2-aspect signals to the module.
You will need the LED Tester to test the LEDs and make sure they are connected correctly.

See the full project HERE
[LED Tester Kit](mailto:colin@elechelp.com?Subject=Buying LED Tester kit $2.50 plus $4.00 postage&Body=Please%20e-mail%20the%20cost%20of LED Tester kit%20by%20air%20mail%20to%20my%20country:****___****%20%20and%20send%20details%20of%20how%20I%20can%20pay%20for%20it.%20My%20name%20is:____)
TO - FRO MKII (WITH OPTOCOUPLERS)
To-Fro Module (built) $35.00USD plus post $6.50USD
To buy: [To-Fro Module](mailto:colin@elechelp.com?Subject=Buying To-FRO Module for $35.00USD plus $6.50USD postage &Body=Please e-mail the cost of To-FRO Module by air mail to my country:****___**** and send details of how I can pay for it. My name is:____)
This module uses an opto-coupler to turn ON each transistor. It is an AUTOMATIC REVERSER and will accept AC or DC input from 12v to 15v DC or up to 12v AC (this becomes 17v DC via the module).
It also has a THROTTLE CONTROL to produce very slow travel via PWM with increments from just about zero to nearly full speed. The PWM ensures the loco will start at a very low setting.
SIMPLE SET-UP
You only need an isolated section of track. Simply connect the two alligator clips to the rails around either way.
Fit the
Set the speed to the lowest value and the time to the shortest number of seconds. Increase both values to suit the length of track you are using. This will allow the train to constantly shuttle from one end to the other.
Ideally you can use a small track-maintenance vehicle for this.
Turn the module ON and the train will move slowly towards the reed switch in short bursts until the reed switch is reached. The loco will stop and move in the other direction and then detect the speed and time you have set on the two pots.
The speed of the train will depend on the setting of the SPEED pot and it will continue to move for the number of seconds as determined by the TIME setting.
The train will then stop at the other end of the track and reverse at the same speed and for the same number of seconds back to the starting position.
It will then “inch” towards the reed switch and start the cycle again.
It will take a few adjustments to get the speed and time adjusted correctly for the length of track you are using.
SET-UP
You only need an isolated section of track. Simply connect the two alligator clips to the rails around either way. If the loco starts in the wrong direction, reverse the clips.
Fit the magnet under the loco at a position that will activate the reed switch.
Set the speed to the lowest value (and then increase it a small amount) and the time to the shortest number of seconds (and then increase the time to get higher than zero time). Eventually you will increase both values to suit the length of track you are using. This will allow the train to constantly shuttle from one end to the other.
Ideally you can use a small track-maintenance vehicle for this. Make sure the track is clean as a light maintenance vehicle will not make very good contact with the rails if any oxidation is present.
Turn the module ON and the train will move slowly towards the reed switch (maybe backwards) until the reed switch is reached. The loco will stop and move in the opposite direction and then the electronics in the module will detect the speed and time you have set on the two pots.
The speed of the train will depend on the setting of the SPEED pot and it will continue to move for the number of seconds as determined by the TIME setting.
The train will then stop at the other end of the track and wait 3 seconds before it reverses at the same speed and then at a slower speed until it reaches the reed switch.
It will take a few adjustments to get the speed and time correct for the length of track you are using. And then it will repeat the action, again and again.
The reed switch is designed to provide REGISTRATION. In other words it sets the train for the same number of seconds and the same distance on each cycle.
If this does not occur, the “inching” towards the reed switch re-starts the cycle and removes any discrepancies in the distance travelled.
The module comes with an extra microcontroller so that you can operate a low-current shuttle loco or a higher current loco with a tender.


The reed switch is now included with the module.
The TIME pot and the SPEED is set (and adjusted) so
the train reaches the end of the track - then stops - then returns to the starting position.
This will take a while to set-up.

The reed switch is fitted along the length of the track because the centre of the reed switch is not sensitive.
Allow 15cm of track past the reed switch to prevent the train running out of track.
The module comes fully built and tested for $35.00 as we build them 10 at a time and test them with a 300mA motor and 12v DC supply to make sure everything works. You can buy a kit for $25.00 and if you want a kit, you will need to email Colin Mitchell: colin@elechelp.com for all the details.
End of Track
End of Track Connector $2.50USD plus post $4.00USD
To buy: [End of Track Connector](mailto:colin@elechelp.com?Subject=Buying End of Track Connector $2.50 USD plus $4.00 USD postage &Body=Please e-mail the cost of End of Track Connector by air mail to my country:****___**** and send details of how I can pay for it. My name is:____)
This connector delivers power to the rails and also isolates the end of a track.
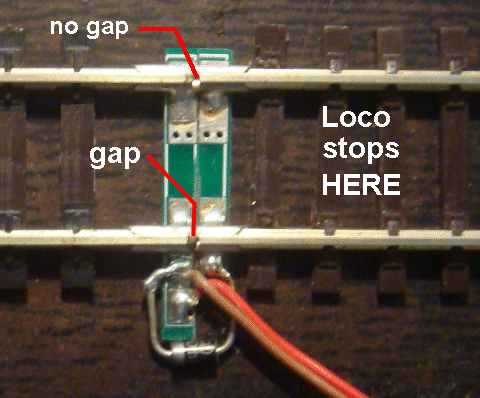
Suppose you have the end of a track in a tunnel or at a distance that is impossible to see.
Rather than have a buffer (it can derail a loco) it is better to have an End of Track diode that stops the loco and when the track voltage is reversed, the train will emerge.
The End of Track Connector comes with power leads and track joiners with a gap on the lower rail.

You can fit two End of Track Connectors if you want to operate a shuttle such as a trolley car.
PROJECT - AIRCRAFT NAVIGATION BEACON
![]()
![]()

The double-sided board has two chips and very small surface-mount components.
Two 0805 LEDs are soldered to 30cm leads
This project is available from Talking Electronics for $5.00 plus $4.00 post.
[Buy A Module](mailto:colin@elechelp.com?subject=Buying Aircraft Navigation Beacon&Body=Please e-mail the cost of buying Aircraft Navigation Beacon by air mail to my country:**___**** and send details of how I can pay for it. My name is:____)** It uses surface mount parts on a double-sided board 15mm x 15mm. Two very bright LEDs are mounted on the tips of the wings of your model aeroplane and the LEDs flash twice then delay 2 seconds before the next double flash.
You can also add the module to the front of a loco, as shown in the following animation:
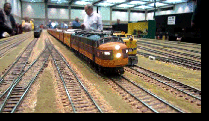
PROJECT - KITT SCANNER / POLICE LIGHTS
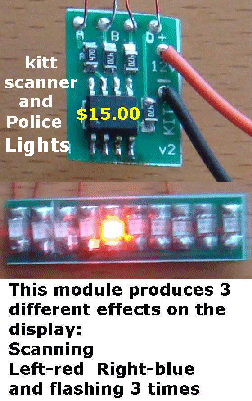

This display is just 25mm x 7mm.
The microcontroller is programmed to scan the display 5 times back and forth then 5 loops of red 3-times then blue 3-times. Then 5 loops of scanning then 30 loops of red-blue. Connect 9v DC to 12v DC to the battery snap and the display will impress you.
Ideal for adding to the vehicles on your layout.
[Buy A Module](mailto:colin@elechelp.com?subject=Buying Kitt Scanner / Police Lights Module&Body=Please e-mail the cost of buying Kitt Scanner / Police Lights Module by air mail to my country:**___**** and send details of how I can pay for it. My name is:____)**
TURNTABLE CONTROLLER - STEPPER MOTOR
You can now add a turntable to your layout for about $130 and motorize it for less than $3.00 for the motor and $35.00 for the electronics (incl shipping).
Our electronics module is cheaper, simpler and better than anything on the market and it will give you lots of extra things to do when enjoying your layout.
The TURNTABLE we have chosen is the PECO OO/HO model #LK-55 while the #NB-55 is for N-gauge.

You can get the Peco PL-55 turntable motor for $110 or our module and motor for less than $45.
Our module uses a stepper motor with microcontroller operation.
Our module will work with many different types of turntables and you only have to buy the correct coupling if your turntable does not have a 5mm female insert on the shaft.

You need to buy the 28BYJ-48 DC 5V Reduction Step Gear Stepper Motor from AliExpress for about $3.00 including shipping from a supplier such as:
https://www.aliexpress.com/item/32862471393.html
You do not need the electronics module as supplied by some other sellers - just the motor.
It has to be the 5v version and have a red wire at the end of the socket. This will connect directly to our module.
When you have purchased the turntable and received the stepper motor from China, you can get the module from us. The turntable has a hole to take a 4mm diameter pin and we supply this pin and a 4mm to 5mm coupling for the stepper motor.

You will need screws to hold the stepper motor as shown in the picture opposite.

This is the PECO turntable.
There are 5 different names and sizes on the web for this type of turntable and you need to be sure of the size before ordering. (The size is not always shown in the advertisement).
The turntable comes as a set of parts and requires gluing and assembling (about 2 hours).

TURNTABLE CONTROLLER MODULE
This is the module to drive a STEPPER MOTOR for a TURNTABLE or any other device that needs slow activation.
Connect the module to a 7v to 12v DC supply and connect the plug on the stepper motor to the 1 metre supplied with the module.
Use the FORWARD and REVERSE buttons to align the turntable with each of the the in-comming tracks.
When you push either button the turntable will ‘INCH” slowly to allow you to align the tracks perfectly.
The turntable will revolve 360° so that locos can be turned around and sent to the opposite end of the train.
The module costs $25.00usd plus $6.50usd shipping.
[Buy A Module](mailto:colin@elechelp.com?subject=Buying Turntable Controller module for $25.00 plus $6.50 usd shipping&Body=Please e-mail the cost of buying Turntable Controller Module by air mail to my country:**___**** and send details of how I can pay for it. My name is:____)**

This is the 8 steps for each revolution. We don’t need this amount of accuracy but it is interesting to see how the poles are accessed to get 8 steps of movement for each revolution.
USING DIFFERENT STEPPER MOTORS
This module will operate different stepper motors slowly in the forward/reverse direction.
You can use 4 outputs (lines - wires - phases) or 5 outputs.
But you must but the correct microcontroller for the stepper motor.
You need to send a picture of the stepper motor so we can fir the correct microcontroller.
Here is some information to help you decide which stepper motor to buy.

Miniature stepper motors like the ones above are quite useless. They have very little torque and even a screw with nut will stop turning as soon as a few grams of load is applied.
Don’t waste your time buying and experimenting with anything like this. They come from camera equipment that requires almost no torque.

The stepper motors above include a reduction-gearbox (either 3 stages of planetary reduction or a gearbox and this increases the toque by the number displayed next to the device. In other words, it is 33 times more powerful. When you get to 95, you cannot stop the shaft with your fingers and the device is very useful. The screw models are called linear actuators.
The first 3 examples have an output shaft that rotates and has a small gear called a pinion-gear. You can connect this to a larger gear to produce rotation.
Or you can use the other styles to obtain linear travel.
All these stepper motors have 4-wires (4 coils) and can be connected to the module above. The linear models need to be programmed with the required number of steps to allow the nut to travel the length of the screw and not get jammed at the end. The rotational devices rotate slowly when the forward or reverse button is pressed.
Stepper motors have a limit to the RPM and are not designed for higher than about 600RPM. They are really designed for accuracy - when you need to know the exact displacement of an output. The turntable application is one example. You need to alight the tracks to allow the loco to exit the turntable.
THEORY
Don’t worry about the terms UNIPOLAR and BIPOLAR. In simple terms, the Unipolar stepper motor has a common wire that connects to 5v and each coil can be turned on via a transistor. This means each coil can only produce either a North pole of South pole, depending on the way the coil is wound. Each coil is turned on in turn to produce rotation - in 4 steps. If two coils are turned on we get a half-step and we need 8 steps for a complete rotation.

With a bi-polar stepper motor, the voltage to the coils can be reversed and by turning on one coil, then both coils (as show in the second diagram), the rotor has only one way to move. And we need 8 steps to compete one full rotation.
If we don’t need the full torque of the motor, we can include a “dead-spot” in the timing for each step and the motor will take less current.

You need to buy the stepper motor first and then order the module and microcontroller for your application.
PROJECT - MODEL RAILWAY TIME
Here is a circuit that will convert any clock mechanism into Model Railway Time.
For those who enjoy model railways, the ultimate is to have a fast clock to match the scale of the layout. This circuit will appear to “make time fly” by turning the seconds hand once every 6 seconds. The timing can be adjusted by changing the 47k. The electronics in the clock is disconnected from the coil and the circuit drives the coil directly. The circuit takes a lot more current than the original clock (1,000 times more) but this is one way to do the job without a sophisticated chip.
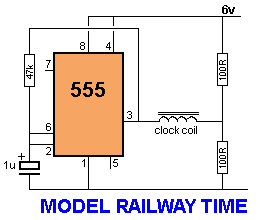

THEORY - REVERSING A MOTOR - 4
(see 1, 2, 3 in 200 Transistor Circuits) In this example the power is applied via the start switch and the train moves to the away limit switch and stops. The 555 creates a delay of 1 minute and the train moves to the home limit and stops. Turn the power on-off to restart the action.

THEORY - POINT MOTOR DRIVER
One of the first things (you will want) when expanding a model railway is a second loop or siding.
This needs a set of points and if they are distant from the operator, they will have to be electrically operated. There are a number of controllers on the market to change the points and some of them take a very high current. (You can get a low-current Point Motor).
The high current is needed because the actuating mechanism is very inefficient, but it must be applied for a very short period of time to prevent the point motor getting too hot.
Sometimes a normal switch is used to change the points and if the operator forgets use it correctly, the Point Motor will “burn-out” after a few seconds.
To prevent this from happening we have designed the following circuit. It operates the Point Motor for 5mS to 10mS (a very short time) and prevents any damage.
You can use a Peco switch (PL23 - about $10.00!!) or an ordinary toggle switch (change-over switch - SPDT - single-pole double-throw).
You can connect to either side of the Point Motor and both contacts of the other side go to 14v to 22v rail.

Point Motor mounted under the track.
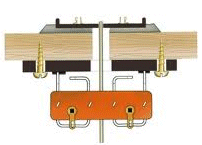
The Point-Motor shaft moves left-right to change the points.

Wiring a Point Motor
The white wire is the “common” because it goes to the start of the two windings.
The red wire move the point to the left and the brown wire moves the point to the right.

Point Motor connected to track
Here is a video showing a point motor connected to a set of points, from the Rail Video Channel:
http://www.youtube.com/watch?v=aW67CFSWGzU&feature=related
THEORY - MAKE YOUR OWN POINT MOTOR using a SERVO
Point Motors can be expensive. You can save over 75% by making your own.
Point Motors (or switches) are also known as Turnouts or Points.
A point Motor can be made from an RC Servo (Radio Control Servo).

Servo and Horns

Connecting the push-rod
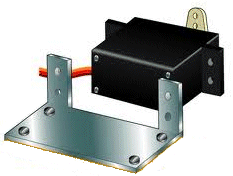
Mounting the Servo on a bracket
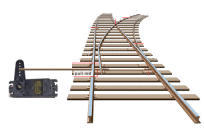
Fitting the Servo to the track
All servos come with a variety of attachments for the output shaft. These are called “Servo Horns” or “Servo Arms” and are “single leg horn, (or servo arm), double servo horn, circular horn (wheel) and others.
They convert circular motion into straight-line motion with the aid of a push-rod.
That’s exactly what we want, to move the track-rails. Any of the horns can be used for this project as you only need a very short travel. The push-red needs to be spring-steel and you can unwind a small spring to get this item.
Servos have 3 leads. Positive, Negative and Signal. The Signal wire is connected to a PC board containing a chip that detects pulses to activate the motor.
Normally the arm on the output of the servo rotates up to 270 degrees. But this is too much for our application and so we need a module to reduce the angular rotation to less than 70 degrees.

That’s what the Point Controller using 555 IC project does.See the full project HERE.
The kit comes with different arms and lengths of different 0.5mm diameter wire so you can connect the output of the servo to the activating lever on the point.
The wire should have a certain amount of “springyness” so the point is kept in either position and that’s why different types of wires are provided.
PROJECT- Arc Welder Simulator
This project adds reality to a work-site. It produces realistic flickering from an arc-welder.
The full project can be viewed HERE. A full kit is available from Talking Electronics for $21.20 plus $4.50postage.
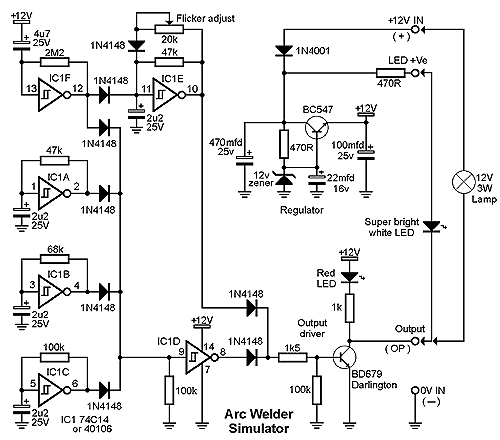

PROJECT - 27MHz link for about $10.00
These two modules are available from Talking Electronics for about $10.00 plus post.
They produce 2-channel transmission and can be used for all sorts of communication on your layout.
You may want to control something at the far-end and running cables may be practically impossible.
Or you may want to control something that moves around the layout.
This is an ideal way to solve the problem.
The range is about 10 metres.
The modules come with whip antennas.
See more of this project: [HERE](/articles/27mhz-transmitters#2CHANNEL LINK)


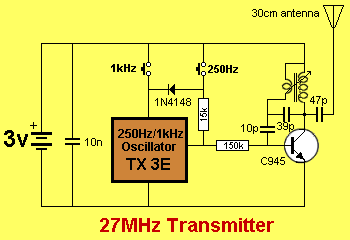


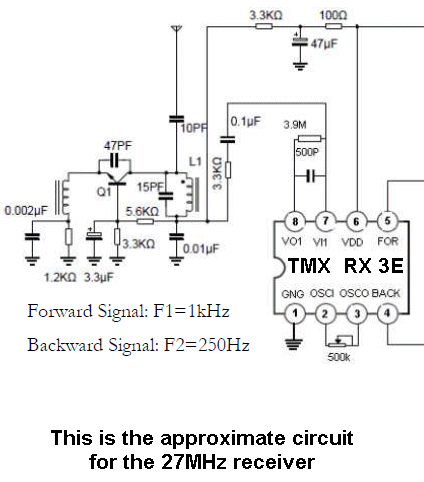

Note: Only one motor is connected to the chip.

The two outputs can be used to reverse a motor or each output can be used to turn on a device.
When there is no transmission (reception) both outputs have zero volts.
For Forward, one output goes high and the other is low.
The voltage lost across the output FETs is only a few millivolts (about 3 to 5mV).
The output FETs can handle about 200mA to 300mA.
Each output can be used to turn on a separate motor:

You don’t have to buy these modules. You can use the transmitter/receiver from a toy car that no-one wants any-more. (some of them are 4 channel).
You can operate sound modules, lights, gates, points and anything up to 6v and 200mA.
Every module is different with different circuitry and chips. This article is just to give an approximate idea of how to use the modules.
COME BACK REGULARLY
More projects are being added and up-dated all the time.
The first resistor in row 1 (brown-black-silver and the last band will be gold) is one-tenth of an ohm
If 3rd band is gold, Divide by 10
If 3rd band is silver, Divide by 100 (thus 10 becomes 0.10ohms or 0.22ohms etc)
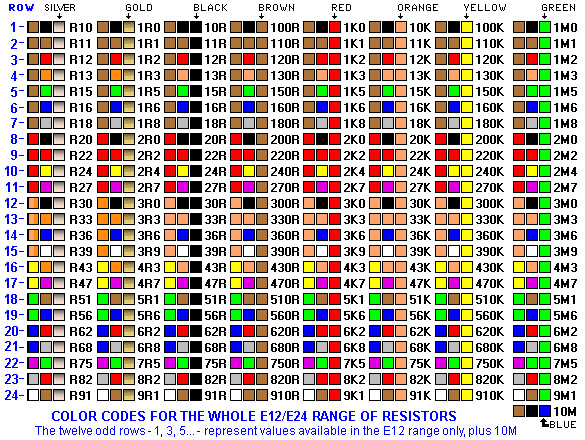
SURFACE MOUNT RESISTORS
In the following table I have included some of the common values and some very uncommon values to show how careful you have to be when reading the value of resistance. Some surface-mount resistors have letters and you have to look up a chart.
A clever trick is to measure the value with a digital meter to get some idea of the resistance and most of the time a reading such as 9680 ohms will be a 10k resistor with the surrounding components making the value slightly lower than 10k. Sometimes, reversing the leads will give a different value.
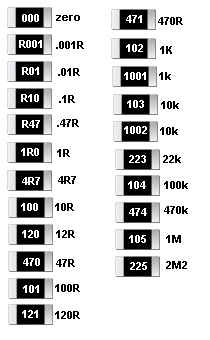
This is only a starting point. Eventually you may have to remove the resistor to get the true value, but try and avoid this at all costs. Resistors rarely give any problems and you should look at capacitors first, then transistors and diodes.
The biggest problem will be reading the resistor and think it has changed value.
Don’t forget, a substitute value may have been used.
Before removing it, you can solder the same value across it to effectively get a reduced value and see if it alters the operation of the circuit.
“0” or “000” on a resistor indicates it is a LINK. It is zero ohms.
“R1” or “R01” or “R001” indicates the resistor is a CURRENT SENSING resistor (because it is such a low value). A high current through the resistor will produce a voltage across it and this voltage is detected and passed to the rest of the circuit.
The biggest mistake is thinking “100” is one hundred ohms. It is ten ohms.
SURFACE MOUNT CAPACITORS
Surface mount capacitors are unmarked and their size does not indicate the capacitance. The only way to determine the value is via a capacitance meter. These are available on eBay for less than $20.00 and a capacitance meter can include inductance readings as well as resistance.
Alternatively you can replace the capacitor with a leaded value and see if the circuit works the same.
You can copy and use anything for your own personal use.
Direct copying to other websites is not allowed as these projects are updated and too many websites have copied my eBooks and not given any credit to me. But you can see they are my projects, because no-one, except me, has them as a kit or fully assembled.

Quick Links
Legal Stuff
Social Media