

Table Of Contents
Experiments
Page5
REMINDER: These are the items you need for these experiments:
- the 5x7 Display Project (fully built),
- a 6v battery,
- an interface cable (the components come with the kit)
- a computer.
- The first 6 experiments are on: ”Experiments Page1.” (Turning a LED on, Blinking, Scanning up/down, Reaction Game - Hit the middle LED)
- Experiments 7, 8, 9 are on: ”Experiments Page2.” (shifting columns of LEDs left/right back/forth)
- Experiments 10, 11 are on: ”Experiments Page3.” (Start/Stop action via switch, Elevator display)
- Experiment 12 is on: ”Experiments Page4.” (TE Moving Sign)
EXPERIMENT-13 Single Digit UP-COUNTER
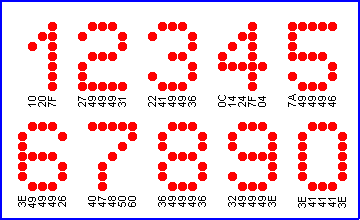
The 5x7 Display can display numbers and letters as well as graphics. It can also be a one digit, two digit or three digit counter. The next 4 experiments will show the types of counters that can be produced by the 5x7 Display Module. In this experiment we will produce a single digit UP COUNTER using button A to increment the display. The layout of the digits is shown in the diagram below:
Each digit needs 5 locations in a table as they will be scanned on the Screen. The display will start at zero an increment each time the switch is pressed.
Most of the routines for this program have already been presented. It’s only a matter of combining them with some slight modifications.
The Program will have 5 Ghost locations and the routine for transferring data from these locations to the screen can be found in Experiment-12 under “Scan.” This routine takes data from files 11h, to 15h and moves it to output port B (file 06). A delay is called and the 4017 is clocked to output to the next column. After 5 columns, the 4017 is reset and the process starts again. In the Delay/clock sub-routine, the display is turned off while the 4017 advances to the next position, to prevent “mirroring” on the screen. This is a very dim image on the screen containing information from the previous column. It’s also called “Ghosting” or “Blurring.”
The sub-routine to take information from the table to the Ghost locations has already been presented but not 5 bytes at a time.
We are going to introduce a new approach to doing this called INDIRECT ADDRESSING. This method is ideal when data in consecutive locations has to be transferred to files that are also numerically next to each other.
It involves the use of the Indirect Register (or file) called INDF. This file is used in conjunction with another file called the FSR. This is ”File Select Register” and the sub-routine start by telling the FSR the value of the first location where you want to place the information. (It can also be given the address of the file where you want information to be collected).
When you access INDF and request its contents to be placed in another file, the value of its contents will be the value of the file looked at by FSR.
This means that FSR can be incremented and by looking at a single file (called INDF) you can get a string of values. This can save a lot of programming. It only becomes economical if 5 or more values need to be transferred.
Finally you need to incorporate a sub-routine that looks at the input button (push-switch A) and makes sure it is fully debounced.
Start by creating the table, Table1: Number “1” has “00” as first and fifth bytes in the table so the number sits in the centre of the screen.
To produce a down-counter, simply reverse the order of the digits in the table.
By now you will see some of the advantages of learning to program. You can produce items that can be tailor-made to specific requirements and added to a PC board already in production. The display can use any colour or size LED and they can be doubled-up to produce larger “pixels.”
Some of the running-sign manufacturers are very clever. They use a block of 4 high-bright LEDs to represent each pixel and the signs are only 7-lines high. At first glance you would not notice the “blocky” effect of the writing as the words are clearly seen. It only when you look closely and see how few LEDs are required to produce the sign, that the “smart thinking” has come to the fore.
The advantage of producing everything yourself is it slows down someone else copying your designs. No-one can go out and buy a module to duplicate what you have done. And you have the advantage of simplifying your range of components. But basically it comes down to cost. You can actually produce a microcontroller product cheaper than a discreet product. A four-digit counter chip we used in a project some time ago has increased in price so much that it costs twice as much as a PIC micro!
Don’t be put off by the simplicity of these experiment. They use up less than 1/10th of the memory and demonstrate less than 1/100 the capability of the micro. They are only intended as the first stepping-stone to programming.
What a dream! To be able to produce a counter by simply writing a few lines of code! See the range of 4 counter experiments and you will able to see how they can be adapted to suit your own needs. Start with the 0-9 UP Counter:
Experiment-13 for “5x7 Display” Project
;PIC16F84 and only F84 chip
; 0-9 Up Counter
 Start  ORG 0x00
   BSF 03,5   ;Go to page1 for setting-up the ports
     MOVLW 0Ch   ;Put 0C into W
    MOVWF 05h   ; to make RA2 & RA3 input
     MOVLW 00h   ;Put 00 into W
   MOVWF 06h   ;to make all RB lines output
     BCF 03,5   ;Go to Page0 for programming
    GOTO Main

 Table1 ADDWF 02h,1   ;Add W to Program Counter
    RETLW 3Eh  ;0
    RETLW 41h
   RETLW 41h
   RETLW 41h
     RETLW 3Eh
     RETLW 00h  ;1
    RETLW 10h
   RETLW 20h
     RETLW 7Fh
     RETLW 00h
   RETLW 27h  ;2
     RETLW 49h
     RETLW 49h
   RETLW 49h
   RETLW 31h
   RETLW 22h  ;3
   RETLW 41h
     RETLW 49h
  RETLW 49h
     RETLW 36h
     RETLW 0Ch  ;4
    RETLW 14h
    RETLW 24h
     RETLW 7Fh
     RETLW 04h
     RETLW 7Ah  ;5
     RETLW 49h
    RETLW 49h
    RETLW 49h
    RETLW 46h
     RETLW 3Eh  ;6
     RETLW 49h
     RETLW 49h
     RETLW 49h
    RETLW 26h
     RETLW 40h  ;7
     RETLW 47h
     RETLW 48h
    RETLW 50h
    RETLW 60h
     RETLW 36h      ;8
    RETLW 49h
    RETLW 49h
     RETLW 49h
     RETLW 36h
     RETLW 32h      ;9
     RETLW 49h
   RETLW 49h
     RETLW 49h
     RETLW 3Eh
     RETLW 00h


  ;Ghost routine transfers data from the  Ghost files to the Video Screen
     ; and scans the Video Screen ONCE

 Ghost  BSF 05,1 ;Reset 4017
    NOP
    BCF 05,1
     MOVF 11h,0   ;Move the data from the
     MOVWF 06h   ; Ghost files to
     CALL DelA    ; the output port
     MOVF 12h,0   ; and call a Delay so the
     MOVWF 06h   ; LED can be illuminated
      CALL DelA
   MOVF 13h,0
   MOVWF 06h
   CALL DelA
   MOVF 14h,0
    MOVWF 06h
    CALL DelA
     MOVF 15h,0
     MOVWF 06h
   CALL DelA
   RETURN

 DelA  DECFSZ 1Bh,1
      GOTO DelA
      MOVLW 00h
   MOVWF 06
 Clk   BCF 05,0  ;Clock the 4017 to the
    NOP    ; next output
    BSF 05,0
   RETURN


  ;"FillGh"  Fill moves 5 bytes of data from Table1 to
   ; to Ghost area via Indirect Addressing

 FillGh  MOVLW 05
    MOVWF 18h    ;5 cycles of Loading
   MOVLW 11h
       MOVWF 04     ;Move start of Ghost locations to FSR
 FillGh2  MOVF 17h,0    ;Move table pointer to W
    CALL Table1
    MOVWF 00   ;Move W to INDF (move into what FSR looks at)
    INCF 04h,1   ;Increment the FSR to look at next file
    INCF 17h,1
    DECFSZ 18h,1
    GOTO FillGh2
  RETURN


  ;MAIN ROUTINE

 Main   MOVLW 00
    MOVWF 17h  ;Load Table1 pointer with 00
    CALL FillGh   ;Put "0" on Screen
 Main1  BCF 1E,5
 Main2  CALL Ghost   ;Display whatever is in Ghost files
    BTFSC 05h,2    ;Test for buttonA
    GOTO Main3  ;Pushed
    GOTO Main1  ;Not pushed

 Main3  BTFSC 1E,5
    GOTO Main2
    MOVF 17h,0   ;Has pointer reached end of table?
      XORLW 32h   ;End of Table is 32h bytes.
      BTFSS 03,2   ;Test the zero flag
       GOTO Main4
      MOVLW 00
      MOVWF 17h Main4  CALL FillGh   ;No. Put next number on screen
     BSF 1E,5    ;Set the button flag
     GOTO Main2

   END
The block of numbers below is the HEX file for Experiment-13. Copy and paste it into a text program such as TEXTPAD or NOTEPAD and call it: Expt-13.hex
:1000000083160C3085000030860083126228820738
:100010003E344134413441343E34003410342034D1
:100020007F3400342734493449344934313422345C
:1000300041344934493436340C34143424347F3454
:1000400004347A3449344934493446343E344934EA
:1000500049344934263440344734483450346034C9
:1000600036344934493449343634323449344934E5
:1000700049343E3400348514000085101108860090
:100080004E20120886004E20130886004E201408C9
:1000900086004E20150886004E2008009B0B4E2837
:1000A0000030860005100000051408000530980097
:1000B00011308400170807208000840A970A980BE3
:1000C0005A2808000030970056209E123B20051D3C
:1000D0006A2865289E1A66281708323A031D722876
:0A00E0000030970056209E16662897
:00000001FF
EXPERIMENT-14 Two Digit UP-COUNTER
This experiment adds more features to the counter series. Since we can only display one digit at a time, we have a choice as to how two digits can be displayed.
- Digits can be squashed up and alternated on the screen,
- Digits can be scrolled onto the screen.
- Standard-size digits can be flashed on the screen.
As you may have guessed, we will take the most difficult path - digits squashed-up and alternated on the screen. All digits can be reduced in width by one column with the 10’s digit on the left-hand side and the units on the right-hand side. This adds to a viewability of the display.
The table has been created from the digits in the diagram above and generally the middle column has be removed.
This experiment also adds a new concept to programming. There is one point you have to remember. You have to know how the program runs to be able to understand each routine.
Even a person producing a program must compile a description of how the programs to help in case the program need refinements at a later date.
Every program is structured differently and you need to know how it has been put together.
In our case, the approach is new. It’s simpler than before but the program is longer because there are more things that have to be done.
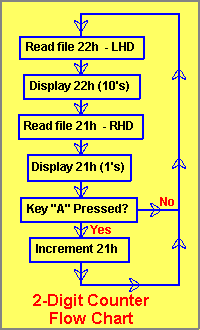
The program begins by putting 00 on the screen. The instructions for this are the first 3 in Main. The program then constantly loops Main doing the following 4 things:
- It puts the first digit on the screen - the 10’s digit, and loops around this routine to create a delay so the digit can be seen.
- It blanks the screen by calling a delay
- It turns on the right-hand digit (the “1’s”) and loops to show digit.
- It blanks the screen for a longer period of time to indicate end of the number.
The routine then repeats.
During each of the loops the program looks to see if button A is pressed. If it is pressed, the program checks to see if it is the first pass. The program then sets the button flag (bit5 in file 1E) and calls the “00 to 99” counter routine.
This routine increments the units digit and also the pointer that looks at Table1. The program then check to see if the file is 10. Ten is equal to 0A and by testing bits 1 and 3, it is able to determine if ten has been reached. If it has, the program zero’s the file and zero’s the pointer for table1 and increments the 10’s file. The 10’s file is also tested to see when it reaches ten, so that the maximum readout is 99 and then the numbers start again at 00.
A couple of additional features called “housekeeping” have to be included in the program. One is the pointer for the Table. Each digit has to have its own pointer and this points to the first byte of the digit. After the first pass of the program this pointer will be incremented and so the pointer has to be passed to another temporary file that can be incremented during each pass without affecting the main pointer.
The other housekeeping feature is switch debounce (also called switch repeat). To prevent a switch repeating or bouncing, the program must set a button flag after the first time the switch is detected. This is because the program will come around to the same instructions in a fraction of a second! After the instruction, the program will have instructions for the switch to carry out. The next time the micro detects the switch, it will come to an instruction to test the flag. This instruction must appear BEFORE the SET instruction and it will steer the micro away from carrying out the switch instructions.
When the button is released, the micro will will carry out and instruction to CLEAR the switch flag. It sounds simple but the three instructions must be placed in the right places in a program for them to work.
The remaining two sub-routines LHD and RHD, put the digits on the screen. Each routine performs one pass of the screen
For the left-hand digit, the first 4 columns are taken from Table1 and the 5th column is blank. The data for each column is obtained from the “CALL Table1” instruction. This instruction requires the “jump” value to be placed in W before executing the CALL Table1 instruction. At the end of the instruction, W contains the Table value and this can be moved to the output port. If a Delay routine is called, the column will be seen on the screen. This is how the 5 columns are displayed and the program returns to Main.
The same happens with the right-hand digit, but this time the 1st column is blank.
Note that the table pointer must be incremented 4 times to look at the next digit.
It’s fairly simple programming but some of the routines are very clever.
The flow-Chart below shows the operation of the Main routine:
Experiment-14 for “5x7 Display” Project
;PIC16F84 and only F84 chip
; 0-99 Up Counter
 Start    ORG 0x00
          BSF 03,5    ;Go to page1 for setting-up the ports
          MOVLW 0Ch   ;Put 0C into W
          MOVWF 05h   ; to make RA2 & RA3 input
          MOVLW 00h   ;Put 00 into W
          MOVWF 06h   ;to make all RB lines output
          BCF 03,5    ;Go to Page0 for programming
          GOTO Main

 Table1   ADDWF 02h,1 ;Add W to Program Counter
          RETLW 3Eh   ;0
          RETLW 41h
          RETLW 41h
          RETLW 3Eh
          RETLW 00h   ;1
          RETLW 20h
          RETLW 7Fh
          RETLW 00h
          RETLW 27h   ;2
          RETLW 49h
          RETLW 49h
          RETLW 31h
          RETLW 22h   ;3
          RETLW 49h
          RETLW 49h
          RETLW 36h
          RETLW 1Ch   ;4
          RETLW 24h
          RETLW 7Fh
          RETLW 04h
          RETLW 7Ah   ;5
          RETLW 49h
          RETLW 49h
          RETLW 46h
          RETLW 3Eh   ;6
          RETLW 49h
          RETLW 49h
          RETLW 26h
          RETLW 40h   ;7
          RETLW 47h
          RETLW 48h
          RETLW 70h
          RETLW 36h   ;8
          RETLW 49h
          RETLW 49h
          RETLW 36h
          RETLW 32h   ;9
          RETLW 49h
          RETLW 49h
          RETLW 3Eh
          RETLW 00h

    ;"LHD" Moves 4 bytes of data from Table1 plus a BLANK
    ; to output to produce Left-hand digit
    ; It scans the Video Screen ONCE

 LHD      BSF  05,1 ;Reset 4017
          NOP
          BCF 05,1
          MOVF 17h,0  ;Copy 17h to W
          MOVWF 23h   ;17h copied to 23h for temp incrementing
          MOVLW 04
          MOVWF 18h   ;4 cycles of Loading in count file 18h
 LHD2     MOVF 23h,0  ;Copy 23h to W
          CALL Table1
          MOVWF 06h
          CALL Del
          INCF 23h,1
          DECFSZ 18h,1
          GOTO LHD2
          MOVLW 00    ;Last column is blank as numbers are      squashed.
          MOVWF 15h
          CALL Del
          RETURN


RHD       BSF 05,1    ;Reset 4017
          NOP
          BCF 05,1
          MOVLW 00    ;First column is blank as numbers are       squashed.
          MOVWF 06h
          CALL Del
          MOVF 19h,0   ;Copy 19h to W
          MOVWF 24h    ;19h copied to 24h for temp incrementing
          MOVLW 04
          MOVWF 18h    ;4 cycles of Loading in count file 18h
RHD2      MOVF 24h,0   ;Copy 23h to W
          CALL Table1
          MOVWF 06h
          CALL Del
          INCF 24h,1
          DECFSZ 18h,1
          GOTO RHD2
          RETURN

Del       DECFSZ 1Bh,1
          GOTO Del
          MOVLW 00h
          MOVWF 06
Clk       BCF 05,0      ;Clock the 4017 to the
          NOP           ; next output
          BSF 05,0
          RETURN

Delay     MOVLW 04
          MOVWF 1B
Delay1    DECFSZ 1Ah,1  ;Delay for main program for scanning
          GOTO Delay1
          DECFSZ 1B,1
          GOTO Delay1
          RETURN

     ;00 to 99 COUNTER

OOto99    INCF 22h,1
          INCF 19h,1
          INCF 19h,1
          INCF 19h,1
          INCF 19h,1
          BTFSS 22h,1     ;Bits 1 & 3 make up the number 10!
          RETURN
          BTFSS 22h,3
          RETURN          ;File 22h is not 10!
          MOVLW 00
          MOVWF 22h       ;Zero the digits file
          MOVWF 19h       ;Zero the pointer for RHD
          INCF 21h,1
          INCF 17h,1
          INCF 17h,1
          INCF 17h,1
          INCF 17h,1
          BTFSS 21h,1
          RETURN
          BTFSS 21h,3
          RETURN          ;File 21h is not 10!
          MOVLW 00
          MOVWF 21h       ;Zero file 21h
          MOVWF 17h       ;Zero the pointer for LHD
          RETURN

SwA       BTFSC 05h,2   ;Test for buttonA
          GOTO SwA1     ;Pushed
          GOTO SwA2     ;NOT pushed
SwA1      BTFSC 1E,5    ;First time for press A?
          RETURN
          BSF 1E,5      ;Set the button flag
          CALL OOto99   ;Increment count
          RETURN
SwA2      BCF 1E,5
          RETURN

   ;MAIN ROUTINE

Main      MOVLW 00
          MOVWF 21h     ;21h is units file. Start=0
          MOVWF 22h     ;22h is 10's file. Start=0
          MOVWF 17h     ;1's pointer in table1
          MOVWF 19h     ;10's pointer in table1
Main1     MOVLW 60h     ;Delay to show LHD
          MOVWF 1Ch
Main2     CALL LHD
          CALL SwA
          DECFSZ 1Ch,1
          GOTO Main2
          MOVLW 10h     ;Delay after first digit is displayed
          MOVWF 1Ch
Main3     CALL Delay
          CALL SwA
          DECFSZ 1Ch,1
          GOTO Main3
          MOVLW 60h     ;Delay to show RHD
          MOVWF 1Ch
Main4     CALL RHD
          CALL SwA
          DECFSZ 1Ch,1
          GOTO Main4
          MOVLW 0A0h    ;Delay after RHD
          MOVWF 1Ch
Main5     CALL Delay
          CALL SwA
          DECFSZ 1Ch,1
          GOTO Main5
          GOTO Main1    ;Repeat routine

    END

How the numbers appear on the screen
The block of numbers below is the HEX file for Experiment-14. Copy and paste it into a text program such as TEXTPAD or NOTEPAD and call it: Expt-14.hex
:1000000083160C3085000030860083128728820713
:100010003E34413441343E34003420347F340034A3
:10002000273449344934313422344934493436345C
:100030001C3424347F3404347A344934493446340B
:100040003E344934493426344034473448347034DB
:1000500036344934493436343234493449343E3400
:1000600000348514000085101708A30004309800A0
:100070002308072086005520A30A980B3828003053
:10008000950055200800851400008510003086007A
:1000900055201908A4000430980024080720860081
:1000A0005520A40A980B4D2808009B0B55280030BA
:1000B0008600051000000514080004309B009A0B10
:1000C0005F289B0B5F280800A20A990A990A990ADF
:1000D000990AA21C0800A21D08000030A200990085
:1000E000A10A970A970A970A970AA11C0800A11D5E
:1000F00008000030A10097000800051D8028852811
:100100009E1A08009E16642008009E120800003007
:10011000A100A2009700990060309C0031207D2052
:100120009C0B8E2810309C005D207D209C0B942819
:1001300060309C0043207D209C0B9A28A0309C00BE
:0A0140005D207D209C0BA0288C2878
:00000001FF
Go to the next page of experiments: 5x7 EXPERIMENTS: Page-6

Quick Links
Legal Stuff
Social Media