

Table Of Contents
[Kits are available](mailto:colin@elechelp.com?Subject=Buying 26v kit $12.00 plus $4.50 postage &Body=Please e-mail the cost of 26v kit by air mail to my country:****___**** and send details of how I can pay for it. My name is:____) for this project from Talking Electronics for $12.00 plus $4.50 postage.
This is a very simple project to produce 26 volts for a Capacitor Discharge Unit (CDU).
Finding a Power Supply that produces about 25 to 26 volts is not easy.
A Capacitor Discharge Unit (CDU) needs about 25v to get the most out of the capacitors used in the CDU. These capacitors are generally 1,000u or 2,200u or 4,700u and rated at 25v.
A capacitor is not like a rechargeable battery.
A rechargeable battery will deliver a current for a long time because the voltage of the battery remains constant for a long period of time. In other words, a 12v6 battery or 3.7v cell remains at this voltage for at least 20% of its energy and then starts to reduce slowly.
A capacitor (electrolytic) is different. As soon as you take energy from a capacitor (in the form of current), the voltage starts to drop and thus the current decreases, because the voltage is reducing. In fact only about 10% of the energy will be released at the initial voltage and it continues to fall very quickly and thus the current drops too. That’s why you need to charge them to their full potential to get a worthwhile result.
Thus you need to have a 26v power supply to charge them.
This circuit provides the 26v and is connected to the track. It takes a small amount of current during the charging process. This current is very low and it does not affect the operation of the train.
As soon as the track voltage reaches 6v, the circuit drives a flyback oscillator to create 26v pulses that charge the electrolytic.
As the track voltage increases, the current taken from the track increases slightly.
It can take between 8 and 15 seconds to fully charge the electrolytic, so give the circuit time to do its job before changing the point again.
As soon as the electro reaches 26v, the circuit turns off and the electro is not overcharged.
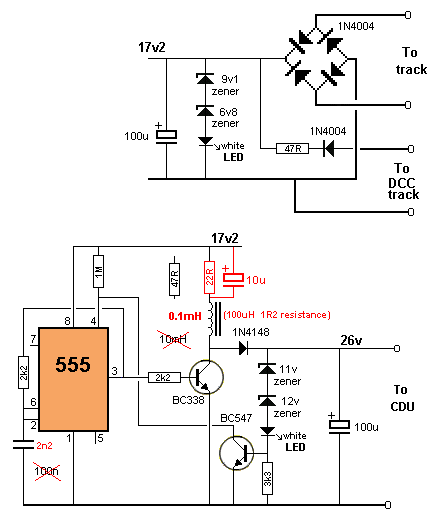
The 26v circuit has 4 modifications to increase the output about 5v.
The 47R is replaced by a 22R with a 10u across it.
The 100n is now 2n2 and the 10mH inductor has been replaced by a 100uH inductor.
This is shown in red on the circuit above.
The CIRCUIT
The circuit is very simple. It consists of a 555 oscillator and the output of the chip drives a BC338. Connected to the transistor is a 100 microHenry coil (choke - inductor) and because the transistor turns off very quickly, the inductor produces a very high spike.
This is called a flyback pulse.
The resistance of the inductor is very small but the frequency of the oscillator has been increased so that the ON-TIME is very short and during this time the inductor only has the opportunity to produce magnetic flux.
During the build-up of the magnetic flux, the inductor produces a back voltage that fights against the incoming voltage and the resulting incoming voltage is very small. This causes a relatively small current to flow and that’s why the current taken by the circuit is less than 150mA and gradually drops to 100mA when the 26v has been reached. This current is a result of the currents taken by the 3 LEDs and the project and because they are operating in a 26v circuit via zener diodes, and current taken by them will be reflected back to the incoming by voltage by a factor of about 2.5 times. If the LED takes 10mA, the flyback circuit will need to deliver 25mA. This accounts for 25mA and the remainder is taken by the IC and losses in the oscillator stage.
The spike produced by the 100uH would be about 40v or more volts if the 1N4148 diode was not present. The spike goes through the diode and charges the 100u. Each spike adds a little more energy and the voltage gradually increases. As soon as it rises above 11v plus 12v (23v) the voltage starts to appear on the top of the white LED. The voltage has to rise another 3.4v and the LED starts to glow. As the voltage rises further, a voltage is developed across the 3k3 (and the LED glows brighter) and when it rises to 0.55v, the BC547 transistor starts to turn ON. When it rises to 0.6v or 0.65v, the transistor gets turned ON more and the voltage on pin 4 of the 555 starts to reduce. When it drops to less than 0.5v, the 555 turns OFF and the voltage on the 100u does not rise further.
This project will be connected to a Capacitor Discharge Unit containing a 1,000u or 2,200u electrolytic.
The charging pulses from the inductor will be passed to this electrolytic as well as the 100u and when the voltage rises to about 26v, the 555 will turn OFF.
The input voltage for the project can come from a DC track or AC track or from DCC. Any voltages or spikes will pass through the bridge rectifier and charge the 100u. Any voltage above about 5v will activate the 555 and the circuit will start to work.
If the white LED comes ON at any time, it will indicate the input voltage has reached a maximum as the 555 has a maximum allowable voltage of 18v.
If the white LED illuminates brightly, the input voltage is too high. The LED should never come ON.
CONSTRUCTION
All the components are identified on the board and all our projects can be constructed without any other references.
Refer to the photos to see how the parts are placed and make sure everything is pushed close to the board before soldering.
The LEDs should be about 3mm off the board to make them visible.

The 47R on the left has now been replaced by 22R and 10u across it.
This modification increases the output voltage by 5v.
ASSEMBLY
The first thing to do is solder the two track jointers to the Track Pick-off PC Board. To do this:
Fit the joiners to the track and then add solder.
Then solder twin lead or screened lead to the two pads at the end of the PC board as shown in the photo below:

Twin lead or screened lead can been used for the Track Pick-off PC board
The 26v PC board is connected to the Track Pick-off board and a Capacitor Discharge Unit. The photo below shows an example of a CDU from Talking Electronics:

CDU connected to 26v Module and Track Pick-off PCB
The LED on the CDU can be removed as the top LED on the 26v module indicates when the 26v has been reached.
If you want to keep the LED on the CDU, it will have to be replaced by a blue LED and 10k resistor to “leach” very little current.
When the 26v module is used with CDU and Reed Switches and LOOP Module, the whole project will be self contained and will “leach” its operating voltage (and current) from the track.
Email talking electronics for the link to the CDU and Reed Switches and LOOP Module as it has just been finished.
26 VOLTS - PARTS LIST
Cost: $12.00 plus $4.50 postage
[Kits are available](mailto:colin@elechelp.com?Subject=Buying 26v kit $12.00&Body=Please e-mail the cost of 26v kit by air mail to my country:****___**** and send details of how I can pay for it. My name is:____)
1 - 22R
1 - 47R
2 - 2k2 resistors
1 - 3k3 resistor
1 - 1M resistor
1 - 2n2 capacitor
1 - 10u electrolytic
2 - 100u electrolytics
5 - 1N4004 diodes
1 - 1N4148 diode
1 - 6v8 400mW zener diode
1 - 9v1 400mW zener diode
1 - 11v 400mW zener diode
1 - 12v 400mW zener diode
1 - BC547 transistor
1 - BC338 transistor
2 - 3mm super-bright white LEDs
1 - 8 pin IC socket
1 - 555 IC
1 - 100uH inductor
3 - 2-screw terminals
20cm very fine solder
1 - 26v PC board
2 - track joiners
1 - 1m twin lead
1 - Track Pick-off PC board

Quick Links
Legal Stuff
Social Media