

Table Of Contents
2-Digit Display
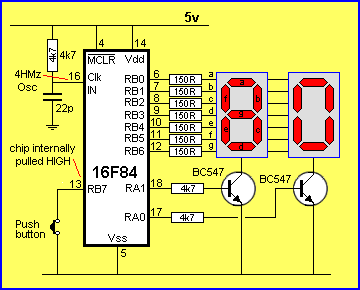
The next circuit has a number of problems. It is possibly the worst “2-Digit Display” project I have seen.
The main fault with the design is the “on time” for each segment. To explain this, we will need to cover some background theory.
When two displays are connected to a microcontroller, only one display can be illuminated at the a time.
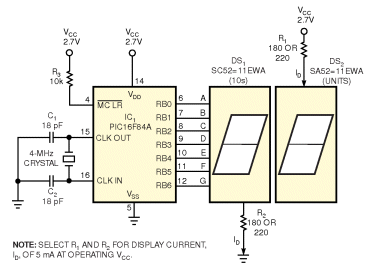
Ultralow-cost, two-digit counter features few components
Two seven-segment displays and one microprocessor count from zero to 99. Noureddine Benabadji, University of Sciences and Technology, Oran, Algeria; Edited by Brad Thompson and Fran Granville — EDN, 8/17/2006
The ultralow-cost, two-digit- counter circuit in Figure 1 represents an attempt to reduce the number of components using a mostly software approach and a low-cost microcontroller, the PIC16F84A. The circuit lacks the current-limiting resistors that normally connect to a seven-segment LED display’s pins because a software routine lights only one of the display’s segments at a time, first in the 10s display and then in the units display. Doing so keeps the circuit’s maximum current consumption at a nearly constant level, even if you add a third LED display to implement a three-digit counter. The circuit also lacks digit-selection switching transistors that classic multiplexed circuits’ switching transistors typically use, and the circuit includes one common-cathode and one common-anode display. The reason for this approach is that each of the microprocessor’s I/O Port A and Port B lines can assume one of three states: high, low, and floating - that is, high impedance. Programming a line as an input places it in a high-impedance state, which turns the display off.
In addition, the program drives only one segment at a time and executes the following sequence: To drive the 10s display, program the line RB0 output and drive it high to light the corresponding segment of the common-cathode display and then program RB0 as an input. Repeat this procedure for lines RB1 through RB6. To drive the units display, repeat the process while applying a low output from RB0 to drive the common-anode display. Figure 2 shows the circuit’s timing diagram. The prototype display uses Kingbright’s SC52-11EWA (DS1) and SA52-11EWA (DS2) high-efficiency, seven-segment displays that emit 2000 to 5600 µcd at a forward current of 10 mA. At a forward current of approximately 5 mA, the displays remain readable.
Early motion pictures displayed at an 18-Hz rate, which produces marginal flicker. The software executes at a rate of 180 Hz, or 10 times the minimum flicker rate. Each of the display’s seven segments must illuminate for an interval of 1/(180x7) sec, or approximately 0.8 msec. To simplify the timing routine (section Delay3 of Listing 1), the software uses a refresh interval of 1 msec.
Although this approach provides adequate segment-drive current, the display’s internal LEDs carry a 3V maximum reverse-voltage rating. Driving any I/O line high applies forward bias to one segment of the common-cathode digit but applies reverse bias to the corresponding segment of the common-anode display. The 16F84A requires a minimum of 2V for operation, and thus the circuit must operate in a 2 to 3V power-supply range. The assembler source code in Listing 1 counts from 0 to 99 sec and serves as an unoptimized proof-of-concept software test bed for the display.
A Joule Thief Circuit
The next circuit has a major fault. It revolves around diode D1. Can you see the problem?
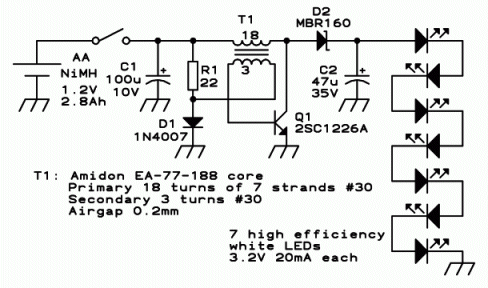
Diode D1 is drawing 23mA via the 22R for part of the cycle for no good purpose. It is intended to prevent “lock-up” when the circuit is turned on, but this can be achieved with a capacitor.
By substituting a 10n capacitor for the diode, this current is not consumed and the efficiency is increased.
The capacitor will prevent “turn-on” voltage (produced by the feedback winding), entering the 22R and being “lost.” All the turn on voltage (current) will enter the transistor and turn it on harder.
The 22R is a very low value and when the circuit is changed to drive the LEDs with AC, the current needed will be less than half. This will require a complete re-design, so I will not go into the circuit any further.
With 16,000mcd white LEDs costing only a few cents (less than 10cents from the manufacturer), a small LED torch needs only 2 or 3 LEDs, so this type of circuit can be changed to suit.
By referring to our article on LED Torches you can see how to produce a more-efficient circuit by supplying AC to the LEDs.
Here’s a photo mistake. Can you spot the mistake?

The boy is soldering a “Solderless Breadboard!”
Measuring Current
The next mistake is the sort of help I like to give:
A customer was measuring the current through a LED as shown in diagram “A.”
He should measure the current via diagram “B.” We will explain WHY.
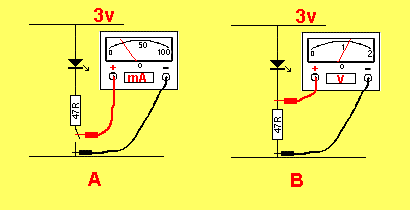
The LED and resistor create a low-impedance circuit. This is due to the fact that 47 ohms is a low value. If we measure the current through the 47R with a meter switched to mA, the multimeter will have a small resistance inside it that will add to the 47R. If this resistance is about 4 ohms, it adds about 10% to the 47R and thus the current through the circuit will be less. If the meter reads 25mA, when the resistor is re-connected, the current through the LED will be slightly more than 25mA.
In other words, the reading on the multi-meter in “A” is less than the true value.
This is not important if you have one LED, but if you are creating a strip of 350 LEDs, an increase of 2mA, will change the overall wattage of the strip considerably.
The way to measure the current though the resistor is to take a mV reading and use Ohms Law to provide the answer. If the reading is 1.175v, by Ohms Law, the current is 1.175/47 = 25mA.
Measuring A Diode
Here’s a mistake from an ebook on the web. Corrections are in red.
Meter check of a diode
Being able to determine the polarity (cathode versus anode) and basic functionality of a diode is a very important skill for the electronics hobbyist or technician to have. Since we know that a diode is essentially nothing more than a one-way valve for electricity, it makes sense we should be able to verify its one-way nature using a DC (battery-powered) ohmmeter. Connected one way across the diode, the meter should show a very low resistance. Connected the other way across the diode, it should show a very high resistance (“OL” on some digital meter models, meaning “Open Load”):

A digital multimeter will NOT measure zero ohms across a diode. It will produce a value very similar to the diodes voltage drop in millivolts. This value will not be a true indication of the voltage across the diode when it is conducting full current.

Of course, in order to determine which end of the diode is the cathode and which is the anode, you must know with certainty which test lead of the meter is positive (+) and which is negative (-) when set to the “resistance” function. With most digital multimeters, the red lead becomes positive and the black lead negative when set to measure resistance. However, this is not guaranteed for all meters. Many analogue multimeters, for example, actually make their black leads positive (+) and their red leads negative (-) when switched to the “resistance” function, because it is easier to manufacture it that way!
LED Current
Another circuit from Electronics For You, an Indian electronics magazine.
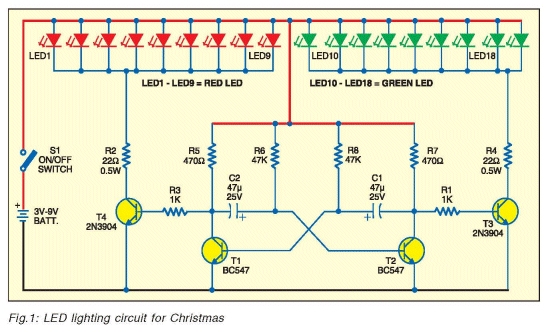
Suppose we use a 9v battery or 9v supply. The current through the 22 ohm resistor will be about 310mA, if we assume a red LED drops 1.7v and transistor T4 drops about 0.35v between collector and emitter.
This 310mA will be divided between 9 LEDs = 34mA for each LED. This current is very high and totally unnecessary to illuminate a LED.
But more important, a LED has a characteristic voltage that is dropped across it when it is placed in a circuit.
Each LED has a slightly different characteristic voltage and this causes a set of LEDs in parallel to take a slightly different current for each LED. You will find some LEDs will glow bright while others will hardly glow, even though a very high current is available.
This type of arrangement is totally unsuitable.
If 9v is available, 3 LEDs should be placed in series with a dropper resistor and the other 6 LEDs placed in groups of three with individual dropper resistors.
The moral to the story is this: Before designing and releasing anything, build the circuit and make tests. Get others to check the design and test the circuit to destruction!
Thermal Conduction
Here’s a problem that stumped the experts.
Refer to the photo. The problem exits with the two 330R 1 watt resistors in series from a set of 100n capacitors forming a capacitor power supply on 240v mains.
One of the resistors is getting very very hot, while the other is getting hot. The two resistors are identified in the photo. Exactly the same current flows through each resistor and it is a mystery why one resistor is getting hotter than the other.
One suggestion was due to spikes, but this was ruled out. The problem was heat-sinking due to lack of track-work. The tracks and lands were not sufficient for the heat being generated in each resistor. This slight problem cost the company a fortune. The cost of the design was $8,000. The cost of manufacture of 2,000 modules was $7,000. The cost of fitting them into freezer doors was $3,000. And now the cost of removal and replacement will cost more than $100 per item as the doors are now at locations around the world! The modules cannot simply be extracted as they are built into the frame of the doors. It requires a serviceman to remove the door, pull the frame apart and refit a modulator. A simple thing like this can send a company “to the wall.”

The Inductor
The next discussion comes from a reader. The photo shows the board from a battery tester. It shows “good” on a green LED or “replace” on a red LED for either a 1.5v cell or 9v battery.
The item in question is the yellow coil. It has three wires and the readings are:
Pins 1 and 2: 1.6 ohms 108uH
Pins 1 and 3: 0.6 ohms 18uH
Pins 2 and 3: 1.2 ohms 48uH
The reader asks if he can replace the coil with two separate coils.

The answer is NO.
The “coil” is a transformer and it steps up the voltage from the 1.5v cell to drive the LEDs.
The circuit uses a 1.5v supply (a single cell) to generate 5v and this is regulated by a 5v zener diode.
See our 5v regulated Solar Power Supply.
The transformer can be made by winding say 15 turns on a ferrite core and 40 turns over this, for the secondary. The connections will have to be correct for the circuit to work and this can be determined by referring to the project above.
Circuit Mistakes
Next we have a common mistake from many designers. They turn off a device by “shorting-it-out.”
In the circuit below, the output LED is around the wrong way, but more important is its placement. When the output of the chip is low, the LED does not illuminate. Approx 10mA (via the 1k2 resistor) passes to ground via the chip. If the project is supplied by a battery, this current is wasted.
When the output of the chip (a comparator with open collector) is HIGH, the current from the 1k2 is passed to the LED. Fortunately, this chip is a comparator with open collector. But if you try this idea with a high current chip such as an op-amp, things will be different and the LED will be destroyed.

Quick Links
Legal Stuff
Social Media