

Table Of Contents
For normal (through-hole) transistors, go to our Transistor Data page.
Here are some links to data-bases on the web:
- Philips SM transistor markings
- Transistor Database
- SMD Markings - very large database
- Philips SM transistor markings
- http://www.ua1zh.murmanskham.ru/ - Russian
- http://www.ua1zh.murmanskham.ru/smd/ SMD - Russian
- http://www.s-manuals.com/smd/
- http://english.electronica-pt.com/smd-databook
- http://www.chip.tomsk.ru/chip/chipdoc.nsf?OpenDatabase
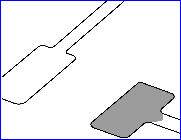
Here are the most common pinouts for transistors:
![]()
DESIGNING WITH SM
It all depends on the type of circuit you are going to design, but if you want the final result to look really professional and up-to-date, I recommend using SURFACE MOUNT technology.
You don’t have to make the whole project SM. You can combine SM with through-hole components, as some items are not available (or not suitable) in SM form. You may want to use chips that can be inserted and removed (such as microcontroller chips) or air spaced coils (for high frequency oscillators) or a potentiometer with a knob.
Even a combination of components looks very neat and if you buy your components from Talking Electronics, you can produce very low-cost prototypes.
When it comes to production costs, SM becomes the cheaper alternative when very large quantities are ordered.
In the meantime, you can start with TE surface-mount prototyping boards and develop your skills in this area.
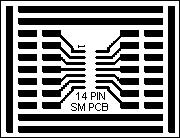
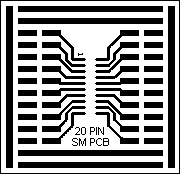
The following SM prototyping boards are available and these are mainly designed for SM IC’s. See below for PC board prices. You simply cannot design a circuit around a chip that only comes in surface-mount, without a designer board. The pin spacing does not fit any other prototyping boards and you cannot solder to the pins without placing the chip on a board.
Some chips come in both surface-mount and standard pin spacing. You have to be careful, sometimes the surface-mount variety behaves differently. We found this to be the case with the CD 40106 Schmitt trigger IC. There are 5 boards in the set: 8 pin, 14 pin, 16 pin, 20 pin & 28 pin
- only 4 boards are shown: (the boards are considerably smaller than
shown here - the pin spacing is 20 pins per inch for DIL TYPES! The normal
spacing is 10 pins per inch.)

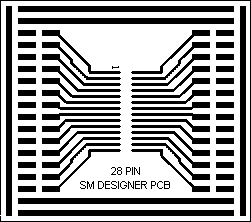

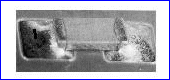
Our latest Designer Board accepts SM transistors and diodes as well as resistors and capacitors.
A transistor and diode connected to the Designer Board Surface Mount Outlines
Standard components can be placed around the SM chip and all the parts are placed on the track-side of the board. This saves turning the board over during development.
The layout is called “birds nest” or “rats nest” and although it doesn’t look tidy, it’s the only way to experiment as each item can be fitted, removed and tested without turning the board over and losing your concentration.
Once you get the circuit working you can tidy up the layout and reduce the size of the board.
When it comes to SM, the board is considerably smaller than a conventional design and it is cheaper to produce as it does not require drilling. The 28 pin board can take an 8 pin and 14 or 16 pin.
When loading the boards by hand, SM assembly time is about the same as conventional assembly and most of our assemblers prefer SM as they can line-up 20 to 50 boards and fit one component at a time with tweezers, without having to turn the boards over.
Once you master the 3-Step process of soldering SM, you will want to design everything in this medium.
SOLDERING SURFACE MOUNT DEVICES
Surface mount devices are much smaller than normal through-hole components and are mainly designed for automatic placement (by robots) onto specially designed PC boards.
These PC boards allow for very quick soldering via a method called re-flow, in which the solder on the board is sufficient to make the solder connection on each of the pins of the surface mount device.
The devices are placed on the board and held in position with glue and when the board is exposed to high temperature air, the solder on each of the lands is melted and forms a bond with the leads of the component.
Another method of soldering surface-mount devices uses a shallow bath of molten solder. The parts are glued in place and the board is turned over and placed above the solder and a wave is created that just touches the board and at the same time deposits a small amount of solder on each of the lands.
Surface-mount components are designed to withstand a 10 second immersion during the soldering process.
The point of this explanation is to let you know that the temperature of the solder bath is strictly controlled and the solder-time is kept to a minimum.
The average hobbyist will not be able to solder at this low temperature and thus the solder-time must be kept as short as possible.
To solder SM, you need three items.
- A very fine-tipped soldering iron with adjustable temperature.
- A set of fine tweezers.
- Fine solder - and I mean really fine solder!
You may also need a magnifying glass (magnifying lamp) to help with placement, soldering and inspection.
IDENTIFYING SM RESISTORS
Most of the 5% SM resistors conform to a 3-digit code. But some suppliers are using the 4 digit code (see 4-digit code below)
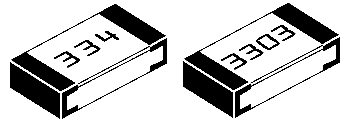
A 3-digit and 4-digit 330k SM resistor
The first two digits represent the two digits in the answer. The third digit represents the number of zero’s you must place after the two digits. The answer will be OHMS. For example: 334 is written 33 0 000. This is written 330,000 ohms. The comma can be replaced by the letter “k”. The final answer is: 330k.
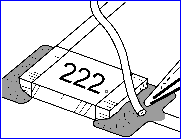
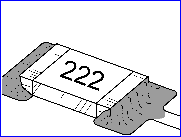
222 = 22 00 = 2,200 = 2k2
473 = 47 000 = 47,000 = 47k
474 = 47 0000 = 470,000 = 470k
105 = 10 00000 = 1,000,000 = 1M = one million ohms
There is one trick you have to remember. Resistances less than 100 ohms are written: 100, 220, 470. These are 10 and NO zero’s = 10 ohms = 10R
or 22 and no zero’s = 22R or 47 and no zero’s = 47R.
Sometimes the resistor is marked: 10, 22 and 47 to prevent a mistake. (This is also done on ceramic capacitors - not SM caps)
THE COMPLETE RANGE OF SM RESISTOR MARKINGS
Click to see the complete range of SM resistor markings for 3-digit code:
Click to see the complete range of SM resistor markings for 4-digit code:
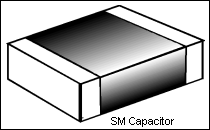
SM CAPACITORS
Most SM capacitors are not identified in any way and the SIZE OF THE COMPONENTS DOES NOT indicate the capacitance as each capacitor has a different number of layers. A 22n can be smaller than 1n due to the layers and the voltage rating. There is also a number of different sizes for SM capacitors.
The only way to “read” the value is via a capacitance meter. Always keep chip capacitors in their “carrier” until required.
Some manufacturers have a 3 digit code such as a letter to indicate the origin of the component, a letter to represent the two digits in the capacitance (A=10, B=12 C=15 D=18 etc) and the third digit is the multiplier. The answer is given in pF (puff).
SM TANTALUMS AND ELECTROLYTICS
SM tantalums are marked in n.
n means nanofarad. (One thousand nanofarad = 1 microfarad.)
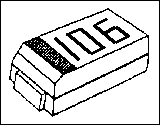
A 10u tantalum. The black line indicates the positive end.
A simple way to to remember nanofarad is via the following:
0.001u = 1n
Therefore: 0.01u = 10n and 0.1u = 100n (this is needed when you are dealing with standard ceramic capacitors)
105 = 1u = 1 microfarad
106 = 10u
107 = 100u
Here is the list of tantalum values: Tantalums come in 16v, 35v and 63v
105 = 1u
225 = 2u2
475 = 4u7
106 = 10u
226 = 22u
476 = 47u
107 = 100u
227 = 220u
Electrolytics are marked in the conventional way:
1/16 = 1u 16 volt working
22/25 = 22u 25 volt working
100/6 = 100u 6 volt working
SOLDERING SURFACE MOUNT COMPONENTS:
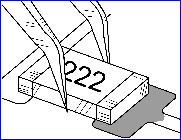
1: Tin the land on the PC board with a hot soldering iron and leave a thin layer of solder covering the land. Make sure you do not leave any “lumps” as this will prevent the component sitting neatly on the board. This especially applies to “IC’s” as one leg on a bump will prevent the other legs touching the board.
2: The diagram opposite shows the pads smoothly covered with FRESH solder. Fresh solder will have a small amount of flux on the surface and this is very important as it will clean the under-side of the lead of the surface-mount component and you will be able to solder the underside too.
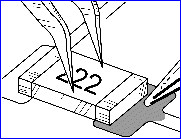
3: Place the component on the board with fine tweezers and align it with the pads. If you don’t have fine tweezers, a dot of blu-tack on a opened-out paper clip will allow you to lift the component from the work bench to the position on the board.

4: Place the tweezers on the top of the component and hold it in place.
Alternatively use the other end of the paper-clip to hold the component in place. Don’t allow the blu-tack to get hot or it will poison the tip of the iron.
5: Solder the first connection by touching the iron on the land and the resistor. Use the small amount of solder on the land to make a temporary connection.
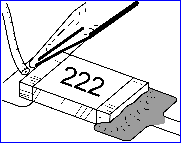
6: After the first connection has cooled down, solder the other end of the component. Do not push the component or try to move it as this will break the metallic “cap” on the end of the component, from the ceramic substrate. Or it can produce a “dry” or “intermittent” fault.
7: Resolder the end of the resistor which was partially soldered. Remove the iron and allow the joint to cool. If it takes more than a second, you know the soldering iron is too hot!
Don’t try soldering semi-conductors with an iron this hot as they will be damaged!
8: The surface mount resistor, capacitor or electrolytic is now soldered to the Printed Circuit Board.
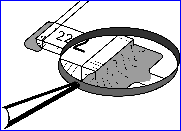
9: Examine all joints carefully with a magnifying glass to make sure the solder has made a good connection.
You can see if it is a good connection, by the shiny surface and the lack of “spikes” or “dags” or solder.
Soldering a transistor is more difficult as it is smaller than a resistor and much more temperature sensitive. You must be very quick and wait for the transistor to cool down between each lead connection.

Fault-1: This component does not have enough solder. The dob of glue in the centre of the component is the only thing holding it onto the PC board.
Fault-2: This component is correctly soldered. It looks messy but the shiny solder and the curve of the solder indicates the component is soldered correctly.

Fault-3: This component has too much solder. Adding too much solder like this could result in damaging a transistor or diode, as they are very heat-sensitive.
This diagram shows an ideal amount of solder holding the component in position.
SPEED
Speed is the essence when soldering surface-mount components especially semiconductors. All SM components will withstand immersion in hot solder for 10 seconds but this is because the solder is kept at the lowest temperature possible. Most soldering irons are much hotter than this and so your soldering time must be kept as short as possible.
After a small amount of practice, you will find SM assembly the smartest way to go and many Talking Electronics projects are partially or fully surface mount.
Three Projects using surface mount components are:
- Phone Ring - a demonstration SM project
- Voyager - FM Bug
- Infinity Bug - listen to room conversation after the phone has been “placed on the hook.”
TESTING SM TRANSISTORS
Surface-Mount transistors are tested in exactly the same way as conventional transistors - except their small size makes them physically more difficult to test.
Here are some additional notes for surface mount types:
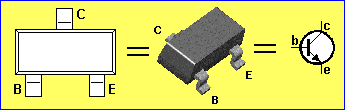
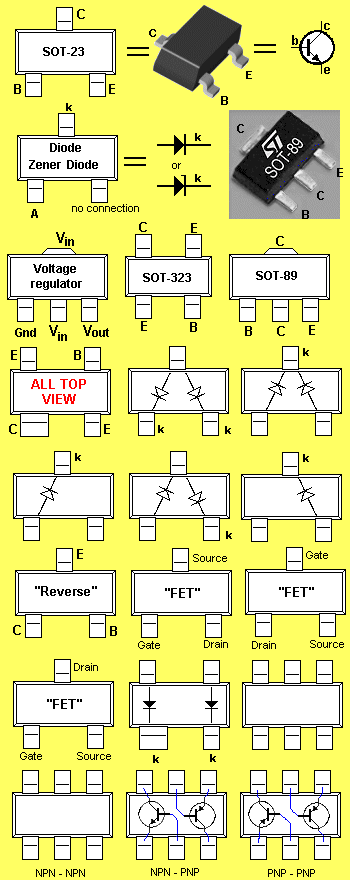
All surface mount transistor cases (styles) are the same - as shown below - and have the same pin-out. The only difference is the size. This makes working with them easy. The pin-out corresponds exactly to the NPN circuit-symbol. Each lead is in the same relative position.
More on testing surface mount transistors can be found in our Basic Electronics Course, Page 68.
Although Surface Mount Transistors are not strictly “Chips,” they look like “chips” and since these have the word “chip” in their definition, I have decided to include them in this Data Book.
The list is very big and only a short-form of the most common types have been listed here. The full version can be found on the internet: HERE.
You will need to be connected to the web to download the pages.
Identifying Surface Mount Transistors is very difficult as their size is extremely small and the letters and numbers are very difficult to read. The same letters and numbers can be used for different types, depending on the manufacturer and the size of the device - so it’s very complex.
SURFACE MOUNT COMPONENTS
Talking Electronics has packs of components available for the hobbyist and repairman. The following packs are available:
SURFACE MOUNT RESISTOR PACK
consists of 1 off each standard value
10 ohms to 1M & 2M2 (60 resistors)
A$14.20 US$12.00 including pack and post
SURFACE MOUNT CAPACITOR PACK
consists of:
2 - 10p 5 - 47p 5 - 100p 5 - 470p 5 - 1n 5 - 10n 5 - 22n 5 - 100n
5 - 1u 16v electrolytic 5 - 10u 16v electrolytic
5 - 10u 25v electrolytic 5 - 47u 16v electrolytic
(60 components)
A$23.80 US$21.00 including pack and post
SURFACE MOUNT DIODE PACK
consists of:
5 - 1N 4148 (marked as “A6”)
A$10.00 US$8.00 including pack and post
SURFACE MOUNT TRANSISTOR PACK
consists of:
5 - BC 848 (marked as “1K”)
A$10.00 US$8.00 including pack and post
SURFACE MOUNT PC BOARDS:
A pack of 5 different surface mount PC boards for prototyping. These are specially designed to take surface-mount IC’s and the surrounding components are conventional devices.
A$9.15 US$7.70 including pack and post
SURFACE MOUNT SOLDERING KIT:
This kit is designed to teach surface-mount soldering skills. It is a do-nothing soldering kit containing: 5 resistors, 5 capacitors,
5 electrolytics, an 8 pin IC, 14 pin IC, a length of fine (0.71mm) solder
and a 28 pin SM PC board or 8 and: 14, 16 or 20 pin PC board.
A$14.50 US$12.00 including pack and post
- * = SOT 23
- # = SOT 323
- + = SOT 89
- EM3: L=1.6mm W=1.6mm
- UMT: L=2mm W=2.1mm
- SC70: L=2mm W=2.1mm
- SMT: L=2.9mm W=2.9mm
- SOT-23: L=2.9mm W=2.9mm
- SOT-89: L=1.6mm W=1.6mm
- SOT-323: L=2mm W=2.1mm
‘R’ indicates reverse leads
| Marking Code: | Type Number: |
|---|---|
| 1 | 2SC3722K |
| 1A | BC846A |
| 1A | MMBT3904 (Fair) |
| 1B | BC846B |
| 1BR | BC846AR |
| 1D | BC846 |
| 1D | MMBTA42 (Fair) |
| 1E | BC847A |
| 1ER | BC847AR |
| 1F | BC847B |
| 1FR | BC847BR |
| 1G | BC847C |
| 1GR | BC847CR |
| 1H | BC847 |
| 1J | BC848A |
| 1JR | BC848AR |
| 1K | BC848B |
| 1KR | BC848BR |
| 1L | BC848C |
| 1LR | BC848CR |
| 1M | BC848 |
| 1P | MMBT222A (Fair) |
| 1S | MMBT2369A (Fair) |
| 1V | BF820 |
| 1W | BF821 |
| 1X | BF822 |
| 1Y | BF823 |
| 2A | MMBT3906 (Fair) |
| 2B | BC849B |
| 2BR | BC849BR |
| 2C | BC849C |
| 2CR | BC849CR |
| 2D | MMBTA92 (FAIR) |
| 2F | BC850B |
| 2F | MMBT2907A (Fair) |
| 2FR | BC850BR |
| 2G | BC850C |
| 2GR | BC850CR |
| 02 | BST82 |
| 0A | DTC125TK (SMT) |
| 03 | DTC143TKA |
| 04 | DTC114TKA |
| 05 | DTC124TKA |
| 06 | DTC144TKA |
| 09 | DTC115TKA |
| 12 | DTA123EKA |
| 13 | DTA143EKA |
| 14 | DTA114EKA |
| 15 | DTA124EKA |
| 16 | DTA114EKA |
| 19 | DTA115EKA |
| 1B | IRLML2803 |
| 1C | IRLML6302 |
| 1C | 2SC4082 (UMT) |
| 1D | IRLML5103 |
| 1D | 2SC4083 (UMT) |
| 1E | 2SC4084 (UMT) |
| 1L | 2SC4103 (UMT) |
| 1M | 2SC4128 (UMT) |
| 1T | 2SC4773 (UMT) |
| 22 | DTC123EKA |
| 23 | DTC143EKA |
| 24 | DTC114EKA |
| 25 | DTC124EKA |
| 26 | DTC144EKA |
| 29 | DTC115EKA |
| 2X | MMBT4401 (Fair) |
| 303 | FDV303N |
| 310 | FDV301N |
| 304 | FDV304P |
| 302 | FDV302P |
| 331 | NDS331N |
| 332 | NDS332P |
| 33 | DTA143XKA |
| 335 | NDS335N |
| 336 | NDS336P |
| 337 | FDN337N |
| 338 | FDN338P |
| 351 | NDS351N |
| 352 | NDS352P |
| 355 | NDS355N |
| 356 | NDS356P |
| 357 | FDN357N |
| 358 | FDN358P |
| 35 | DTA124XKA |
| 3A | BC856A |
| 3AR | BC856AR |
| 3B | BC856B |
| 3BR | BC856BR |
| 3D | BC856 |
| 3E | BC857A |
| 3E | FMMTA42 (ZETex) |
| 3ER | BC857AR |
| 3F | BC857B |
| 3FR | BC857BR |
| 3G | BC857C |
| 3GR | BC857CR |
| 3J | BC858A |
| 3JR | BC858AR |
| 3K | BC858B |
| 3KR | BC858BR |
| 3L | BC858C |
| 3LR | BC858CR |
| 3R | MMBT5771 (Fair) |
| 3S | MMBT5551 (Fair) |
| 43 | DTC143XKA |
| 45 | DTC124XKA |
| 4A | BC859A |
| 4AR | BC859AR |
| 4B | BC859B |
| 4BR | BC859BR |
| 4C | BC859C |
| 4CR | BC859CR |
| 4E | BC860A |
| 4ER | BC860AR |
| 4F | BC860B |
| 4FR | BC860BR |
| 4G | BC860C |
| 4GR | BC860CR |
| 41A | FMMT491A (ZET) |
| 44 | BAS40-04 (SIE) |
| 458 | FMMT458 (ZET) |
| 489 | FMMT489 (ZET) |
| 491 | FMMT491 (ZET) |
| 493 | FMMT493 (ZET) |
| 52 | DTA123YKA |
| 53 | DTA143YKA |
| 54 | DTA114YKA |
| 5A | BC807-16 |
| 5AR | BC807-16R |
| 5B | BC807-25 |
| 5BR | BC807-25R |
| 5C | BC807-40 |
| 5CR | BC807-40R |
| 5D | MMBD914 (Fair) |
| 5E | BC808-16 |
| 5ER | BC808-16R |
| 5F | BC808-25 |
| 5FR | BC808-25R |
| 5G | BC808-40 |
| 5GR | BC808-40R |
| 5H | MMBD4148 (Fair) |
| 558 | FMMT558 (ZET) |
| 589 | FMMT589 (ZET) |
| 591 | FMMT591 (ZET) |
| 593 | FMMT593 (ZET) |
| 605 | NDS0605 |
| 610 | NDS0610 |
| 62 | DTC123YKA |
| 63 | DTC143YKA |
| 64 | DTC114YKA |
| 69 | DTC115TE (EM3) |
| 6A | BC817-16 |
| 6AR | BC817-16R |
| 6B | BC817-25 |
| 6BR | BC817-25R |
| 6C | BC817-40 |
| 6CR | BC817-40R |
| 6E | BC818-16 |
| 6ER | BC818-16R |
| 6F | BC818-25 |
| 6FR | BC818-25R |
| 6G | BC818-40 |
| 6GR | BC818-40R |
| 605 | NDS0605 |
| 610 | NDS0610 |
| 617 | FMMT617 (ZET) |
| 618 | FMMT618 (ZET) |
| 619 | FMMT619 (ZET) |
| 702 | 2N7002 |
| 702 | 2N7002LT1 |
| 717 | FMMT717 (ZET) |
| 718 | FMMT718 (ZET) |
| 720 | FMMT720 (ZET) |
| 72 | 2N7002 |
| 74 | BAS70-04 (SIE) |
| 74 | DTA114WKA |
| 76 | DTA144WKA |
| 84 | DTC114WKA |
| 86 | DTC144WKA |
| 9A | DTA125TK |
| 91 | DTA113TKA |
| 93 | DTA143TKA |
| 94 | DTA114TKA |
| 95 | DTA124TKA |
| 96 | DTA144TKA |
| 99 | DTA115TKA |
| 111 | DTA113ZUA (UMT) |
| 113 | DTA143ZUA (UMT) |
| 121 | DTC113ZUA (UMT) |
| 123 | DTC143ZUA (UMT) |
| 132 | DTA123JUA (UMT) |
| 142 | DTC123JUA (UMT) |
| 156 | DTA144VUA (UMT) |
| 166 | DTC144VUA (UMT) |
| 179 | DAT115UU (UMT) |
| 183 | DTC115UU (UMT) |
| A | 2SC4618 (EM3) |
| A | 2SC4098 (UMT) |
| A | 2SC2413K (SMT) |
| A1 | SS355 (ROHM) |
| A0 | HSMS-2800 (HP) |
| A1 | BAW56 |
| A11 | MMBD1501A (Fair) |
| A13 | MMBD1503A (Fair) |
| A14 | MMBD1504A (Fair) |
| A15 | MMBD1505A (Fair) |
| A2 | BAT18 |
| A2 | HSMS-2802 (HP) |
| A3 | BAT17 |
| A4 | BAV70 |
| A5 | BRY61 |
| A6 | BRY62 |
| A7 | BAS16 |
| A8 | BAS28 |
| A51 | BAV99 |
| A61 | BASl9 |
| A81 | BAS20 |
| A82 | BAS21 |
| A91 | BAS17 |
| A | 2SC2413K |
| AB* | BCW60B |
| AB+ | BCX51-6 |
| AC | 2SC3837K |
| AC | 2SC4725 (EM3) |
| AC | 2SC3837K (SMT) |
| AC* | BCW60C |
| AC+ | BCX51-10 |
| AD | 2SC3838K |
| AD | 2SC4726 (EM3) |
| AD | 2SC3838K (SMT) |
| AD* | BCW60D |
| AD+ | BCX51-16 |
| AE | 2SC3839K |
| AE | BCX52 |
| AF | BCX52-6 |
| AF | 2SD1781K |
| AG | BCX70G |
| AH* | BCX70H |
| AH+ | BCX53 |
| AH | 2SB1197K |
| AJ | 2SD1782K |
| AJ* | BCX70J |
| AJ+ | BCX53-6 |
| AJ | BCX70JLT1 (Mot) |
| AK | 2SB1198K |
| AK* | BCX70K |
| AK+ | BCX53-10 |
| AL | BCX53-16 |
| AL | 2SC3802K |
| AM | BCX52-16 |
| AM | 2SC4018K |
| AN | 2SC4061K |
| AP | 2SC4074K |
| AQ | 2SB0151K |
| AR1 | BSR40 |
| AR2 | BSR41 |
| AR3 | BSR42 |
| AR4 | BSR43 |
| AS1 | BST50 |
| AS2 | BST51 |
| AS3 | BST52 |
| AT1 | BST39 |
| AT2 | BST40 |
| AT | 2SC4326K |
| B | 2SC2412K |
| B | 2SC4617 (EM3) |
| B | 2SC4081 (UMT) |
| B0 | HSMS-2810 (HP) |
| B0 | BC847 |
| B2 | BSV52 |
| B2 | HSMS-2812 (HP) |
| B4 | BSV52R |
| B4 | HSMS-2814 (HP) |
| B5 | BSR12 |
| B5 | HSMS-2815 (HP) |
| B8 | BSR12R |
| BA | DAN217K (ROHM) |
| BA* | BCW61A |
| BA+ | BCX54 |
| BB* | BCW61B |
| BB+ | BCX54-6 |
| BB | 2SD2114K |
| BC* | BCW61C |
| BC+ | BCX54-10 |
| BD* | BCW61D |
| BD+ | BCX54-16 |
| BD | 2SA1821 (EM3) |
| BD | 2SA1808 (UMT) |
| BD | 2SA1733K |
| BE | BCX55 |
| BF | 2SC4723 (UMT) |
| BF | BCX55-6 |
| BF | 2SC4642K |
| BG* | BCX71G |
| BG+ | BCX55-10 |
| BH* | BCX71H |
| BH+ | BCX56 |
| BH | 2SC4699K |
| BH | 2SC4700 (UMT) |
| BJ* | BCX71J |
| BJ+ | BCX56-6 |
| BJ | 2SD2226K |
| BJ | 2SD2351 (UMT) |
| BK* | BCX71K |
| BK+ | BCX56-10 |
| BL | BCX56-16 |
| BL | 2SC4771K or 2 |
| BM | 2SC4713K |
| BM | BCX55-16 |
| BM | 2SC4774 (UMT) |
| BR1 | BSR30 |
| BR2 | BSR31 |
| BR3 | BSR32 |
| BR4 | BSR33 |
| BS1 | BST60 |
| BS2 | BST61 |
| BS3 | BST62 |
| BT1 | BST15 |
| BT2 | BST16 |
| C | 2SC2411K |
| C | 2SC4097 (UMT) |
| C1 | BCW29 |
| C2 | BCW30 |
| C2 | HSMS-2822 (HP) |
| C4 | BCW29R |
| C5 | BCW30R |
| C7 | BCF29 |
| C77 | BCF29R |
| C8 | BCF30 |
| C9 | BCF30R |
| C91 | BCV62 |
| CA | BCX68 |
| CA | 2SA1885 (EM3) |
| CA | 2SA1886 (UMT) |
| CAC | BC868 |
| CB | 2SC4997 (EM3) |
| CB | 2SC4998 (UMT) |
| CE | BCX69 |
| CEC | BC869 |
| D | 1SS376 (ROHM) |
| D) | 2SA1037AKLS |
| D0 | HSMP-3800 (HP) |
| D1 | BCW31 |
| D2 | BCW32 |
| D20 | HSMP-3802 (HP) |
| D3 | BCW33 |
| D3E | RB411D (ROHM) |
| D4 | BCW31R |
| D4 | HSMP-3804 (HP) |
| D5 | BCW32R |
| D6 | BCW33R |
| D7 | BCF32 |
| D8 | BCF33 |
| D58 | FLLD258 (ZET) |
| D63 | FLLD263 (ZET) |
| D76 | BAR18 (ST) |
| D77 | BCF32R |
| D81 | BCF33R |
| D91 | BCV61 |
| D94 | BAR42 (ST) |
| D95 | BAR43 (ST) |
| D96 | BAS70-04 (ST) |
| DA | BF622 |
| DA5 | BAR43S (ST) |
| DB | BF623 |
| DB1 | BAR43A (ST) |
| DB2 | BAR43C (ST) |
| DC | BF620 |
| DF | BF621 |
| DH | BCW68GLT1 (Mot) |
| E | 1SS380 (ROHM) |
| E1 | BFS17 |
| E2* | BFS17A |
| E2# | BF547W |
| E4 | BFS17R |
| E4 | HSMP-3814 (HP) |
| E6 | BFG17A |
| E11 | DTA113ZKA |
| E13 | DTA143ZKA |
| E15 | BF747 |
| E16 | BF547 |
| E21 | DTC113ZKA |
| E23 | DTC143ZKA |
| E32 | DTA123JKA |
| E42 | DTC123JKA |
| E56 | DTA144VKA |
| E66 | DTC144VKA |
| E79 | DTA115UK |
| E89 | DTC115UK |
| E92 | DTB123TK |
| E93 | DTB142TK |
| E94 | DTB114TK |
| E97 | DTB163TK |
| EC | BCW65C (Fair) |
| ED | BCV28 |
| EE | BCV48 |
| EF | BCV29 |
| EF | BCW66GLT1(Mot) |
| EG | BCV49 |
| F | 2SA1037AK |
| F | 2SA1774 (EM3) |
| F | 2SA1576A (UMT) |
| F0 | HSMP-3820 (HP) |
| F1 | BFS18 |
| F2 | BFS19 |
| F2 | HSMP-3822 (HP) |
| F02 | DTD123TK |
| F03 | DTB143TK |
| F3 | BF840 |
| F04 | DTD114TK |
| F4 | BFS18R |
| F4 | HSMP-3824 (HP) |
| F5 | BFS19R |
| F07 | DTD163TK |
| F8 | BF824 |
| F11 | DTB113EK |
| F12 | DTB123EK |
| F13 | DTB143EK |
| F14 | DTB114EK |
| F21 | DTD113EK |
| F22 | DTD123EK |
| F23 | DTD143EK |
| F24 | DTD114EK |
| F31 | BF841 |
| F52 | DTB123YK |
| F62 | DTD123YK |
| FA | BFQ17 |
| FB | BFQ19 |
| FD | BCV26 |
| FF* | BCV27 |
| FF+ | BFO18A |
| FR | BC857 |
| G | 2SA1455K |
| G0 | HSMP-3890 (HP) |
| G1 | BFS20 |
| G1K | BC848B (ROHM) |
| G1L | BC848C (ROHM) |
| G2 | BF550 |
| G2 | HSMP-3892 (HP) |
| G3 | BF536 |
| G3C | DTB122JK |
| G3F | BC857B (ROHM) |
| G3K | BC858B (ROHM) |
| G4 | BFS20R |
| G4C | DTD122JK |
| G5 | BF550R |
| G6 | BF569 |
| G7 | BF579 |
| G8 | BF660 |
| G08 | DTD133HK |
| G9 | BF767 |
| G11 | DTB113ZK |
| G21 | DTD113ZK |
| G81 | BF660R |
| G98 | DTB133HK |
| GF1 | BC847B (ROHM) |
| GT1 | BCX17 (ROHM) |
| GU1 | BCX19 (ROHM) |
| H | 2SA1036K |
| H1 | BCW69 |
| H | 2SA1577 (UMT) |
| H02 | DTC323TK |
| H2 | BCW70 |
| H3 | BCW89 |
| H03 | DTC343TK |
| H31 | BCW89R |
| H4 | DTC314TK |
| H04 | BCW69R |
| H5 | BCW70R |
| H7 | BCF70 |
| H07 | DTC363TK |
| H27 | DTC363EK |
| H71 | BCF70R |
| I | 2SC3722K (SMT) |
| J | 2SC2059K |
| J | 2SC4649 (EM3) |
| J | 2SC4099 (UMT) |
| JP | BAS19 (FAIR) |
| JS | BAS21 (SIE) |
| JV | BAS116 (SIE) |
| JY) | BAV119 (SIE) |
| K1 | BCW71 |
| K2 | BCW72 |
| K3 | BCW81 |
| K3B | DTA1D3RKA |
| K4B | DTC1D3RKA |
| K4 | BCW71R |
| K5 | BCW72R |
| K7 | BCV71 |
| K8 | BCV72 |
| K9 | BCF81 |
| K14 | DTA114GKA |
| K15 | DTA124GKA |
| K16 | DTA144GKA |
| K19 | DTA115GKA |
| K24 | DTC114GKA |
| K25 | DTC124GKA |
| K26 | DTC144GKA |
| K29 | DTC115GKA |
| K31 | BCW81R |
| K71 | BCV71R |
| K81 | BCV72R |
| K91 | BCF81R |
| KM | BST80 |
| KN | BST84 |
| KO | BST66 |
| L | 2SC2412KLN |
| L4 | BAT54 |
| L14 | DTB114GK |
| L20 | BAS29 |
| L21 | BAS31 |
| L22 | BAS35 |
| L24 | DTD114GK |
| L30 | BAV23 |
| L41 | BAT74 |
| L42 | BAT54A (ZET) |
| L43 | BAT54C |
| L44 | BAT54S |
| L51 | BAS56 |
| LM | BST120 |
| LN | BST122 |
| M* | BCW60A |
| M+ | BCX51 |
| M | 2SD1757K |
| M | 2SD1757K (SMT) |
| M1 | BFR30 |
| M2 | BFR32 |
| M3 | BFT46 |
| M4 | BSR56 |
| M5 | BSR57 |
| M6 | BSR58 |
| M31 | BSD20 |
| M32 | BSD22 |
| M62 | PBMF4391 |
| M63 | PBMF4392 |
| M64 | PBMF4393 |
| M65 | BF545A |
| M66 | BF545B |
| M67 | BF545C |
| M74 | BSS83 |
| M8 | BSN20 |
| M84 | BF556A |
| M85* | BF556B |
| M86 | BF556C |
| M87 | BF99OA |
| M89 | BF989 |
| M90 | BF990 |
| M91 | BF991 |
| M92 | BF992 |
| M94 | BF994 |
| M96 | BF996 |
| M97 | BFR101A |
| M98 | BFR101B |
| MC | ZVN3306F |
| MF | ZVN3310F |
| ML | ZVP3306F |
| MR | ZVP3310F |
| MY | VN10LF |
| MZ | ZVN4106F |
| N0 | TN0200T |
| N1 | TN0201T |
| N1* | BFR53 |
| N2 | BFS520 |
| N28 | BFR520 |
| N29 | BFR540 |
| N3 | BFG520W |
| N30 | BFR505 |
| N33 | BFG505 |
| N36 | BFG520 |
| N37 | BFG540 |
| N38 | BFG590 |
| N39 | BFG505/X |
| N4* | BFR53R |
| N4# | BFS540 |
| N4 | BFG520W/X |
| N6# | BFS25A |
| N70 | BFG10 |
| N71 | BFG10/X |
| N72 | BFGll |
| N73 | BFGll/X |
| NC | BF840 |
| ND | BF841 |
| OA | DTC125TK |
| P0 | TP0101T |
| P1* | BFR92 |
| P2# | BFR92AW |
| P3 | TP0202T |
| P4 | BFR92R |
| P5 | BFR92AR |
| P8A | FLLD261 (ZET) |
| R | 2SA1514K |
| R | 2SA1579 (UMT) |
| R1 | BFR93 |
| R2 | BFR93A |
| R4 | BFR93R |
| R5 | BFR93AR |
| S | BB515 (SIE) |
| S | 2SC3082K |
| S | 2SC4619 (EM3) |
| S | 2SC4100 (UMT) |
| S1 | BBY31 |
| S2 | BBY40 |
| S6 | BF510 |
| S7 | BF511 |
| S8 | BF512 |
| S9 | BF513 |
| SA | BSS123LT1 |
| SAs | BSS123 |
| SDs | BSS284 |
| SP | BSS84 |
| SRs | BSS131 |
| SS | BSS138 |
| sSG | SN7002 |
| T | BB811 (SIE) |
| T | 2SC3906K |
| T | 2SC4102 (UMT) |
| T0 | TP0610T |
| T1 | BCX17 |
| T2 | BCX18 |
| T3 | BSS63 |
| T4 | BCX17R |
| T5 | BCX18R |
| T6 | BSS63R |
| T7 | BSR15 |
| T8 | BSR16 |
| T9 | BSR18 |
| T71 | BSR15R |
| T81 | BSR16R |
| T91 | BSR18R |
| T92 | BSR18A |
| T93 | BSR18AR |
| U | 2SB852K |
| U1 | BCXl9 |
| U2 | BCX20 |
| U3 | BSS64 |
| U4 | BCX19R |
| U5 | BCX20R |
| U6 | BSS64R |
| U7 | BSR13 |
| U8 | BSR14 |
| U81 | BSR17 |
| U9 | BSR14R |
| U91 | BSR17R |
| U92 | BSR17A |
| U93 | BSR17AR |
| UB | 2SB852K (ROHM) |
| V2 | BFQ67 |
| V3 | BFG67 |
| V4 | BFT25R |
| W | 2SD1383K |
| W1 | BFT92 |
| W4 | BFT92R |
| X1 | BFT93 |
| X4 | BFT93R |
| Y | 2SD1484K |
| Y | 2SD1949 (UMT) |
| ZA | RU101 |

Quick Links
Legal Stuff
Social Media