

<!-- // TODO FIXME: No first page/index file -->
CONSTRUCTION
CONSTRUCTION
All the components fit on the single-sided board and the project is connected via a 4-pin US telephone plug to the serial port of a computer. It gets all its voltages from this port as well as the programming signals.
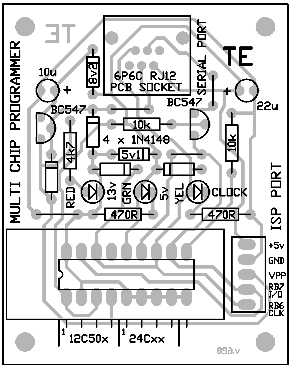
The diagram below shows the layout of the board. The three jumper links should be fitted first and then the diodes. Make sure you can identify the 4 signal diodes and the 5v1 and 8v2 zeners. The band or “line” on the diodes is the cathode end and this is shown by a line on the overlay. The only other components requiring careful fitting are the LEDs and transistors. Don’t fit them too close or leave them too high off the board. A gap of about 3mm to 5mm looks the most professional. Solder them quickly to prevent heat running up the leads and damaging the semiconductor junction. The electrolytics are identified on the body of the component with a black stripe while the positive lead is identified on the board.
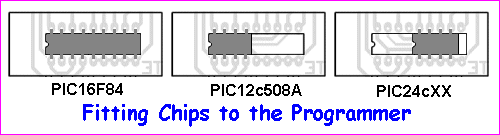
No ZIF (zero insertion force) socket is provided in the kit because they are very expensive and not necessary if you put the chip you are programming in an additional socket. This will make the PIC chip easy to fit and remove from any socket and keep costs down.
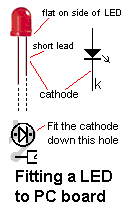
The cut-out on the end of the socket identifies pin 1 and the diagram below shows how to fit different types of 8-pin chips to the programmer.
The last components are the resistors and socket and the board is ready.
The next thing is the assembly of the serial cable.
THE SERIAL CABLE
The Multi-Chip Programmer is connected to a computer via a serial cable. The components to make this cable are included in the kit.
You have to be careful when soldering the 4 wires to the pins of the 9-pin D-plug to make sure they are soldered to the correct places. It’s very easy to make a mistake. A 4-pin US plug (telephone plug) is supplied clamped to the cable and it clicks into the socket on the PC board. Attach it to the board and bare the free end to see how the 4-core cable has been connected. From this information, you should determine how the leads will be connected to the 9-pin plug. Select the appropriate diagram from the layout below and wire the conductors to the plug, including the 2k2 resistor. This should be done neatly as it has to fit inside the backshell. Screw the 9-pin D-plug together and you are ready to program a chip.
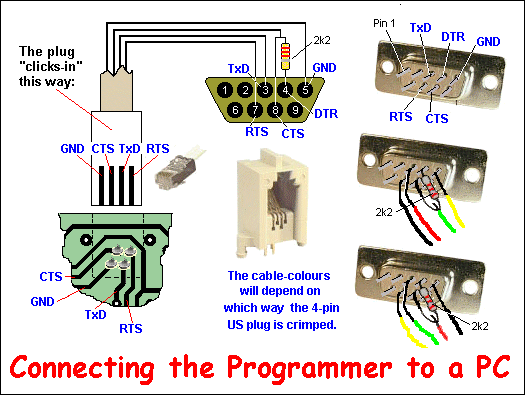
9 PIN D-SUB MALE at the Computer.
| Pin | Name | I/O | Description |
|---|---|---|---|
| 1 | CD | I | Carrier Detect |
| 2 | RxD | I | Receive Data |
| 3 | TxD | O | Transmit Data |
| 4 | DTR | O | Data Terminal Ready |
| 5 | GND | - | System Ground |
| 6 | DSR | I | Data Set Ready |
| 7 | RTS | O | Request to Send |
| 8 | CTS | I | Clear to Send |
| 9 | RI | I | Ring Indicator |

Modification: Use 470R in the back-shell of the serial cable.
The circuit contains three indicator LEDs:
The 5v Power LED shows when 5v is present on the circuit.
The 13v Programming LED. At the commencement of the “burning” process, the chip will be put in “Programming Mode” by applying 13v to pin 4.
The Clock LED. During the “burning process” the “Clock LED” will illuminate to show data entering the chip.
Multi-Chip Programmer PARTS LIST
(incl: all parts, PCB, cable, and postage)
- 2 - 470R 1/4 watt resistors
- 1 - 4k7 1/4 watt resistor
- 1 - 10k ” ”
- 1 - 10u 16v electrolytic
- 1 - 22u 16v electrolytic
- 1 - 3mm Red LED
- 1 - 3mm Green LED
- 1 - 3mm Yellow LED
- 4 - 1N 4148 signal diodes
- 1 - 5v1 zener 400mW
- 1 - 8v2 zener 400mW
- 2 - BC 547 transistors or similar
- 1 - 18pin IC socket
- 1 - 30cm fine tinned copper wire
- 1 - 30cm very fine solder
- 1 - 4-pin US telephone socket (low profile)(RJ12 6P4C PCB socket)
- 1 - Multi-Chip Programmer PC board
Serial Cable:
- 1 - 2k2 resistor or 470R
- 1 - 4-pin US plug on 6ft 4-core cable ( RJ12 6P4C crimp plug)
- 1 - 9 pin D-type socket
- 1 - 9 pin backshell
Go to P3: Using the Multi-Chip Programmer

Quick Links
Legal Stuff
Social Media