Table Of Contents
The AMP METER
THE AMMETER
The ammeter is placed in SERIES with one lead of a circuit. It must be placed around the correct way so the needle moves up-scale.
An ammeter is really a microamp-meter (it’s called a movement - generally a 0-30 micro-amp movement) with a SHUNT (a thick piece of wire) across the two terminals.
To cover the range of current used in electronic circuits, there are basically 3 types of amp-meters (or 3 ranges):
- 0 - 1 amp (0 - 1A)
- 0 - 1milliampb (0 - 1mA)
- 0 - 1 microamp (0 - 1uA)
In each range you can get many different scales, such as:
- 0 - 1A, 0 - 10A, and higher
- 0 - 10mA, 0 - 100mA, 0-250mA, 0-500mA
- 0 - 1uA, 0 - 100uA, 0 - 500uA
(0 - 1uA uses a 1uA movement)
Connecting an AMMETER
An ammeter is never connected across a battery or the supply rails of a project as this will create a SHORT-CIRCUIT and a large current will flow to either burn-out the meter or bend the pointer.
However, you need to know which way to connect a meter so that it reads up-scale.
This is how you do it:
Remember this simple fact: Current flows through the meter from the +ve lead to the -ve lead and this means the leads must be placed so that the positive lead sees the higher voltage.
Do not place an ammeter ACROSS a component. This will generally cause damage and in most cases it will not tell you anything.
You can check to see how much current is flowing through a circuit by flicking one lead of the ammeter onto the circuit and watching the needle. If it moves up-scale very quickly, you know excess current is flowing and a higher range should be chosen. If the needle moves fairly slowly up-scale, the chosen range may be correct.
Always start with a high range (0-1Amp for example) and if the needle moves a very small amount up the scale, another range can be chosen.
DON’T FORGET: Placing an ammeter on a circuit is a very dangerous thing because it is similar to playing with a jumper lead and represents a lead with a very small resistance. It is very easy to slip off a component and create a short-circuit. You have to be very careful.
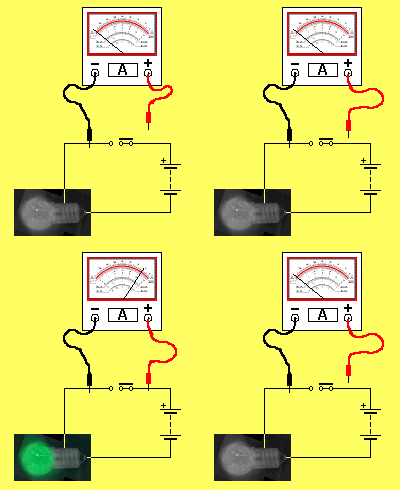
Ammeters have to be connected across a “gap” or “cut” in a circuit and the easiest way to get a gap is across the on/off switch.
The animation below shows how to connect an ammeter:

Quick Links
Legal Stuff
Social Media


