Table Of Contents

A handy 2-Input alarm using the PIC Lick-1 module
This project is not available as a complete kit.
The PIC LICk-1 module is available from Talking Electronics. You will need to buy the other components from your local electronics store.
Our 5-Input Alarm will be available soon as a complete kit
- P1
- Page 2
Files you will need:
This article describes a 2-Input alarm developed on the PIC LICK-1 Module using a Microchip PIC16F628-04. The program uses the internal 4MHz oscillator and if any other frequency is used, the timer values will need to be changed.

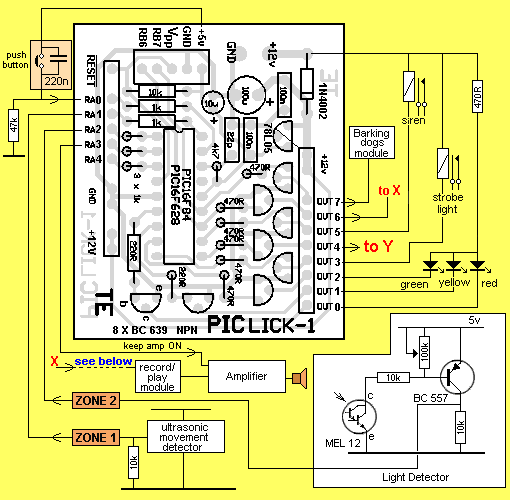
2-INPUT ALARM CIRCUIT

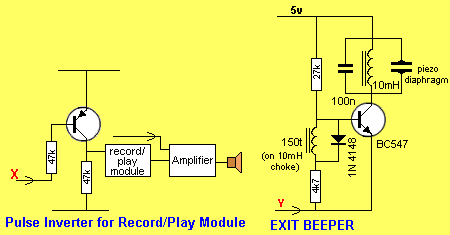
Exit Beeper

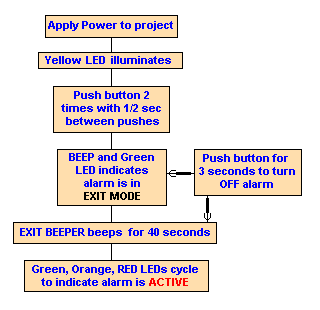
Alarm Flow Chart 1

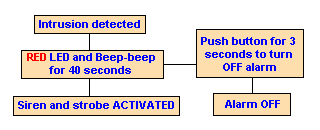
Alarm Flow Chart 2
A two zone alarm means the system has two separate detection circuits and can identify which circuit was triggered. The circuit uses lines RA1 and RA2 as zone 1 and zone 2. The operator can only enable or disable Zone 2. This allows situations such as disabling a large zone such as the garage, while an ultrasonic detector covering a smaller zone, such as toolboxes or equipment, remains enabled.
A more practical application would be in a small store with a workroom at the back. The owner needs to know when someone enters the store and specifically when someone goes behind the counter/cash register.
Two stage means the alarm recognizes when it has been triggered more than once and reacts differently. “Warning/subdued” devices are triggered the first time the alarm is set-off and then “Intruder/loud” devices are triggered every time thereafter. After being triggered once, the 2-Input Alarm moves to the yellow-alert stage and uses the softer alarm outputs. Thereafter, when triggered, it moves to the red-alert stage and uses the louder alarm outputs. Currently both zones trigger the yellow-alert and then the red-alert stages. The basic ‘circuit’ is the PIC LICK-1 module. RA0, RA1, and RA2 are used as input ports. RB0 thru RB7 and RA3 are used as output ports.
CONTROL
The 2-Input Alarm is controlled by a single push-button that takes RA0 HIGH when pushed. This can be a doorbell “press-button” or a small switch mounted on the PC board.. A single ‘push’ does nothing, thwarting people from easily disabling the alarm. The push-button must be pressed two times with about 1/2 second between pushes.
The push-button has three commands:
Enable/Reset the System
Push the switch twice with 1/2 second between pushes.
This enables the alarm and the indicator LEDs change from yellow to green.
If the 2-Input Alarm is already in ‘enabled’ mode, any pushes are counted toward triple pushes, which reverses the enabled state of Zone 2 (see below).
Disable the system
To “Disable” the alarm, you must push and hold the switch for more than 2.1 seconds. That’s why we suggest 3 seconds. If the alarm is already ‘disabled,’ nothing happens.
When power is applied to the circuit it comes on in ‘disabled’ mode and the yellow LED illuminates.
If you enter a zone covered by the alarm, the entry/exit piezo produces a “beep-beep” and you have about 30 - 40 seconds to disarm the system before the alarm is triggered.
Reverse (enable/disable) the state of zone 2.
This is done by triple-pushing the button while the alarm is in enabled (green LED) mode. Triple pushing in any other mode is interpreted as a double click (Enable/Reset) with an additional extraneous click. The alarm powers-up with zone 1 and 2 enabled.
The Enable/Reset and Disable command have no effect on the status of zone 2. The only way to change the state of zone 2 is to power-off the system (yellow LED) and start from the beginning, or to use this command.
Display
The Alarm Status is displayed on three LEDs.
They are like traffic lights, with Red - Yellow - Green.
Yellow - Disarmed (okay to walk about freely).
Blinking sequence 1 (Red, Yellow, Green) - Armed, Enabled, and using only Zone 1.
Blinking sequence 2 (Green, Yellow, Red) - Armed, Enabled, and using both Zones
Green - Armed and alarm has been triggered once.
Red - Armed and alarm has been triggered 2 or more times.
PIC-LICK1 Ports
Inputs:
- RA0 - Command input (from a momentary switch)
- RA1 - Input from zone 1 detectors
- RA2 - Input from zone 2 detectors
Outputs
- RB0 - Controls Green LED
- RB1 - Controls Yellow LED
- RB2 - Controls Red LED
- RB3 - Controls Strobe light - used every time alarm is triggered
- RB4 - Controls Horn/Buzzer - used only when triggered and entering or in red alert
- RB5 - Controls Siren - used only when triggered and entering yellow alert
- RB6 - Controls speech/Warning module - used when triggered and entering yellow alert.
- RB7 - Controls barking dogs module - used every time alarm is triggered
- RA3 - Controls power for amplifier/speakers (used by “Barking Dogs” and verbal warning)
The Strobe light is turned on when the alarm is triggered and is the last device to be turned off before the system re-arms itself. The Horn is extremely loud (120 decibels) and is used only in the second stage. It is cycled ON for several seconds and then OFF for about two seconds. It is cycled so the “barking dogs” module (also used in the second stage), can be heard.
This cycle repeat for about 30 seconds.
The Siren is only used the first time the alarm is triggered. Thereafter, the Horn/Buzzer is used. The pitch of the siren is made to rise and fall by depressing and releasing a momentary switch on the Siren’s PCB. Solder a lead from the load-side of the momentary switch to the relay, thereby controlling the wailing of the siren by setting RB5 high and low. The software varies the times the relay is on and off, creating a very realistic effect.
The Record/Playback module was bought from RadioShack for about $10. It runs flawlessly at 12 volts. The module has a momentary switch on the PCB to trigger the playback. Connect a lead to output 6 of the PIC Lick-1 module. The 2-Input Alarm triggers the playback by pulsing this lead. The message is a verbal warning to “leave the premises …” and is used only the first time the alarm is triggered, with the siren, strobe and barking dogs.
RB7 Details
This is a Velleman’s electronic watchdog kit and does an excellent job of sounding like barking dogs. The module has a momentary switch on the PCB to trigger the barking dogs. Solder a wire from the positive side of the momentary switch to RB6 on the PIC LICK-1 board. The alarm triggers the playback by pulsing this lead LOW. The dogs bark every time the alarm is triggered.
RA3 Details
I used an old Kenwood KAC-524 car amplifier (60 Watts x 2) and some car speakers for the verbal warning and barking dogs. The nice thing about car amplifiers is that they have a built-in power control connection that is normally connected to the ignition switch and can easily be controlled by the 2-Input Alarm. The circuit powers the amplifier only when it is needed and turns it off after use.
The 2-Input Alarm has a delay between the time when an intruder is detected and the alarm is triggered. This is called the entry-delay and the beeper on the alarm produces a beep-beep to give the user time to disable the circuit.
RA0 Details
This is the only way to give commands to the 2-Input Alarm (enable/reset, disable).
A doorbell or any other push-switch can be used. A capacitor across it helps to produce a clean pulse.
RA1 Details
This is an Ultrasonic Movement Detector (such as Tech Amercia kit 990-0203). It will detect movement up to 20 feet away.
RA2 Details
This is a light-detector - ideal for a cupboard, drawer or toolbox. Pick a drawer that is not in regular use so the alarm can be active all the time.
Parts List
- 1 - PIC Lick-1 module
Other components can be bought from your local electronics store.
Kits for PIC Lick-1 can be obtained from Talking Electronics: http://www.talkingelectronics.com
- P1
- Page 2
Tags
Quick Links
Legal Stuff
Social Media


