

Table Of Contents
UNDER CONSTRUCTION
Files you will need:
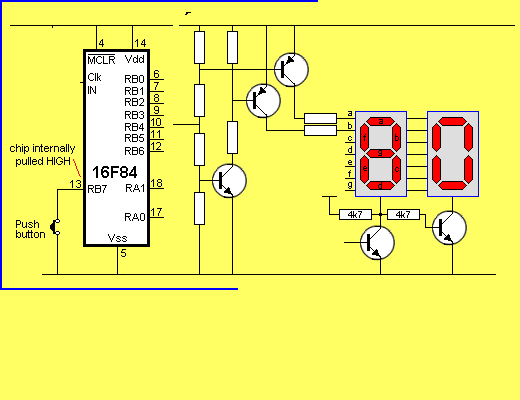
This article describes a 2-Digit Counter using a Microchip PIC12F629.
It shows what can be done with an 8-pin chip having just 5 output lines and one input line.
The chip drives two7-segment displays and this would normally require 7 lines to drive the segments plus another one or two lines to select the displays.
We have shown how a single line can be used to drive two different segments by using the tri-state of an output.
Each output of the chip has three states: HIGH, LOW and FLOATING (high impedance). The high impedance state occurs when the line is in the input state and any line can be changed from output to input at any time during the running of the program.
The circuit is more complex than shown in the diagram. The interface circuit between the chip and the displays is duplicated two more times for the other 4 lines to the displays. This means we have used 9 transistors to drive 6 lines, whereas it would have normally taken 6 transistors.
The other secret behind driving the displays is multiplexing.
Since we can only show 3 or 4 segments of a display at any time, we need to alternately show up to 3 segments for a short period of time and then the other 4 segments.
We can then repeat the procedure for the other display.
This means any segment will only be illuminated for a maximum of 25% of the time and if we deliver a higher current for this short period of time, we can achieve a very good brightness.
This is one of the features of a LED. It can be pulsed with a higher current for a short period of time and the brightness will be equivalent to a lower constant current.
In fact the overall current will be less in pulse-mode and this represents a saving in power.
To deliver this higher current we need driver transistors as the chip is only able to deliver 25mA from each drive line and we need about 30mA.
The other secret to the operation of the circuit is the voltage divider. It is designed to put 0.5v between the base and emitter of the two transistors when the output of the chip is floating.
This means neither of the transistors is turned on and no segment will be illuminated.
When the output of the chip is HIGH, the lower transistor is turned on and this turns on the middle transistor to illuminate a segment.
When the output of the chip is LOW, the upper transistor is turned on.
The multiplexing and driving the segments involves a lot more programming and setting the lines to input and then output, but this will not inhibit the running of the program as the displays must be illuminated for long periods of time compared with the time taken for carrying out the instructions.
The whole purpose of this project is to show what can be done with a small micro
PARTS LIST
- 1 - PIC Lick-1 module
Other components can be bought from your local electronics store.
Kits for PIC Lick-1 can be obtained from Talking Electronics:
http://www.talkingelectronics.com

Quick Links
Legal Stuff
Social Media